
User's Manual
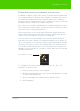
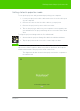
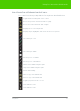
Table Of Contents
- Welcome
- Installing ēno interactive whiteboards
- Preparing to use ēno
- Using ēno interactive whiteboards
- Get started using ēno interactive whiteboards
- ēno interactive whiteboard control icons
- Projector control icons (for the PolyVision projector)
- Cursor control using the ēno stylus
- Using the on-screen keyboard
- Writing and erasing with the ēno stylus
- Printing and saving
- Spotlight and reveal options
- Opening a blank window for writing
- The PolyVision driver
- Configuring PolyVision driver options
- Configuring PolyVision projectors
- Choosing alignment accuracy
- Using on-screen tools
- Getting help
- Checking for updates
- Exiting the PolyVision driver
- To uninstall the PolyVision driver in Windows
- To uninstall the PolyVision driver on a Macintosh
- To uninstall the PolyVision driver using Linux
- Care and maintenance
- Technical support
- Warranty
- Appendix 1: ēno Bluetooth pairing options
- Index

PolyVision 36
Using ēno interactive whiteboards
Using ēno interactive whiteboards
Get started using ēno interactive whiteboards
PolyVision makes it easy to install the PolyVision driver and add Bluetooth
capability to any computer so it can interact with the ēno whiteboard.
Everything you need is provided with the ēno whiteboard.
To get started using your ēno interactive whiteboard:
1. Make sure the computer and projector are connected and turned
on. (Refer to "Getting started in projection mode" on page 34.)
2. Make sure the latest version of the PolyVision driver is installed on
the computer. ēno requires PolyVision driver 1.8 or later. (Refer to
"Install the PolyVision driver" on page 22 and "Checking for updates"
on page 60.)
3. Remove the ēno stylus cap to turn it on. (Refer to "Power on and off
the stylus" on page 25.)
4. Make sure the ēno stylus has a Bluetooth connection. (Refer to "Pair
the ēno stylus with the ēno receiver" on page 26.)
5. Tap the projection mode control icon. (Refer to "Getting started in
projection mode" on page 34.)
6. To toggle the stylus between pen and cursor functions, tap the pen/
cursor control icon. (Refer to "ēno interactive whiteboard control
icons" on page 37.)
7. To write or draw, tap a pen color control icon and write on the ēno
whiteboard. (Refer to "Writing and erasing with the ēno stylus" on
page 40.)
8. To erase, tap an eraser control icon and erase. (Refer to "Writing and
erasing with the ēno stylus" on page 40.)
9. To print a copy using the printer connected to the computer, tap the
print control con. (Refer to "Printing and saving" on page 41.)
10. To save a copy as a file in the computer “My Documents” folder, tap
the save control icon. (Refer to "Printing and saving" on page 41.)
11. To type, tap the keyboard control icon and tap the on-screen
keyboard. (Refer to "Using the on-screen keyboard" on page 39.)