
User's Manual
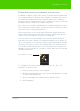
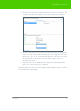
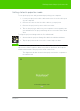
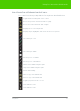
Table Of Contents
- Welcome
- Installing ēno interactive whiteboards
- Preparing to use ēno
- Using ēno interactive whiteboards
- Get started using ēno interactive whiteboards
- ēno interactive whiteboard control icons
- Projector control icons (for the PolyVision projector)
- Cursor control using the ēno stylus
- Using the on-screen keyboard
- Writing and erasing with the ēno stylus
- Printing and saving
- Spotlight and reveal options
- Opening a blank window for writing
- The PolyVision driver
- Configuring PolyVision driver options
- Configuring PolyVision projectors
- Choosing alignment accuracy
- Using on-screen tools
- Getting help
- Checking for updates
- Exiting the PolyVision driver
- To uninstall the PolyVision driver in Windows
- To uninstall the PolyVision driver on a Macintosh
- To uninstall the PolyVision driver using Linux
- Care and maintenance
- Technical support
- Warranty
- Appendix 1: ēno Bluetooth pairing options
- Index

PolyVision 34
Getting started in projection mode
Getting started in projection mode
To set up the projector and get started projecting your computer:
1. Locate your projector’s video cable and connect it to the video port
of your computer.
2. Connect the other end of the video cable to your projector.
3. Connect the projector’s power cord to an outlet.
4. Turn on the projector and focus your computer screen squarely onto
your whiteboard. The projected image does not need to fill the white
area.
To align the projected image with the ēno whiteboard:
1. Assure that the projected image fits within the whiteboard frame.
2. Tap the projection mode icon on the control strip one time.
note:
NOTE:
If this is the first use of the ēno whiteboard, if the computer has just
rebooted, or if the PolyVision driver has just been launched, then tap the
whiteboard instead of the projection mode control icon.
The alignment window shown below projects from the computer to
the whiteboard.