
User's Manual
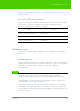

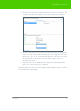


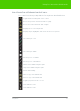
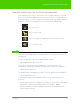

Table Of Contents
- Welcome
- Installing ēno interactive whiteboards
- Preparing to use ēno
- Using ēno interactive whiteboards
- Get started using ēno interactive whiteboards
- ēno interactive whiteboard control icons
- Projector control icons (for the PolyVision projector)
- Cursor control using the ēno stylus
- Using the on-screen keyboard
- Writing and erasing with the ēno stylus
- Printing and saving
- Spotlight and reveal options
- Opening a blank window for writing
- The PolyVision driver
- Configuring PolyVision driver options
- Configuring PolyVision projectors
- Choosing alignment accuracy
- Using on-screen tools
- Getting help
- Checking for updates
- Exiting the PolyVision driver
- To uninstall the PolyVision driver in Windows
- To uninstall the PolyVision driver on a Macintosh
- To uninstall the PolyVision driver using Linux
- Care and maintenance
- Technical support
- Warranty
- Appendix 1: ēno Bluetooth pairing options
- Index

PolyVision 32
Preparing to use ēno
Multiple ēno interactive whiteboards and icon strips
In addition to support for up to three styli on a single interactive whiteboard,
one computer with the PolyVision driver installed can support up to three
ēno interactive whiteboards showing separate parts of the computer’s
desktop, acting as added monitors for the computer. You may need to add
an additional video card(s) to use multiple projectors.
Since all the ēno interactive whiteboards are communicating via the same
host computer’s PolyVision driver, you have the option of using any of three
styli on any of the communicating devices.
All users must have an ēno stylus with its Bluetooth signal paired to the
same computer that is projected on the interactive whiteboards. Refer to
“Pair the ēno stylus with the ēno receiver” on page 26.
In a room that is set up with multiple ēno interactive whiteboards that
respond to the same computer, each whiteboard must have a unique “A,”
“B,” or “C” magnetic icon strip and a unique product identification number
(located on the lower left corner of the whiteboard). This enables users at
each board to independently write, erase, and operate the computer. For
example, the user at board “A” can write in red ink while the user at board
“B” writes in black ink.
To configure the PolyVision driver to respond to the “A,” “B,” or “C”
magnetic icon strip (or “All”):
1. Connect the projectors to your computer.
2. Click the PolyVision driver icon in the system tray (Windows or Linux)
or menu extras (Macintosh).
3. Choose “Configure the PolyVision driver” from the menu.
4. Click “Hardware.”
B
“B” magnetic icon strip