
User's Manual


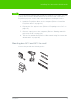
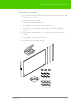
Table Of Contents
- Welcome
- Installing ēno interactive whiteboards
- Preparing to use ēno
- Using ēno interactive whiteboards
- Get started using ēno interactive whiteboards
- ēno interactive whiteboard control icons
- Projector control icons (for the PolyVision projector)
- Cursor control using the ēno stylus
- Using the on-screen keyboard
- Writing and erasing with the ēno stylus
- Printing and saving
- Spotlight and reveal options
- Opening a blank window for writing
- The PolyVision driver
- Configuring PolyVision driver options
- Configuring PolyVision projectors
- Choosing alignment accuracy
- Using on-screen tools
- Getting help
- Checking for updates
- Exiting the PolyVision driver
- To uninstall the PolyVision driver in Windows
- To uninstall the PolyVision driver on a Macintosh
- To uninstall the PolyVision driver using Linux
- Care and maintenance
- Technical support
- Warranty
- Appendix 1: ēno Bluetooth pairing options
- Index

PolyVision i
Welcome . . . . . . . . . . . . . . . . . . . . . . . . . . . . . . . . . . . . . . . . . . . . . . . . . 6
What are ēno interactive whiteboards?. . . . . . . . . . . . . . . . . . . . . . . . 6
Register your PolyVision product . . . . . . . . . . . . . . . . . . . . . . . . . . . . 7
Installing ēno interactive whiteboards . . . . . . . . . . . . . . . . . . . . . . . . . . . . 8
ēno installation options. . . . . . . . . . . . . . . . . . . . . . . . . . . . . . . . . . . . 8
Installation checklist . . . . . . . . . . . . . . . . . . . . . . . . . . . . . . . . . . . . . . 8
Mounting ēno 2610 and 2810 to a wall . . . . . . . . . . . . . . . . . . . . . . . 9
What comes in the box . . . . . . . . . . . . . . . . . . . . . . . . . . . . . . . . 10
Mount the ēno 2610 and 2810 whiteboard on the wall. . . . . . . . . 11
Position the wall brackets. . . . . . . . . . . . . . . . . . . . . . . . . . . . . . . 11
Mount the brackets to the wall . . . . . . . . . . . . . . . . . . . . . . . . . . . 13
Mount the whiteboard to the wall brackets . . . . . . . . . . . . . . . . . . 15
Magnetically mounting ēno click whiteboards (2650 and 2850) . . . . 16
What comes in the box . . . . . . . . . . . . . . . . . . . . . . . . . . . . . . . . 17
Preparing to magnetically mount ēno click . . . . . . . . . . . . . . . . . . 17
Magnetically mounting the ēno click . . . . . . . . . . . . . . . . . . . . . . . 18
Removing the magnetically-mounted ēno click whiteboard. . . . . . 20
Install the control icons. . . . . . . . . . . . . . . . . . . . . . . . . . . . . . . . . . . 21
Install the PolyVision driver . . . . . . . . . . . . . . . . . . . . . . . . . . . . . . . . 22
System requirements . . . . . . . . . . . . . . . . . . . . . . . . . . . . . . . . . . 22
PolyVision driver installation . . . . . . . . . . . . . . . . . . . . . . . . . . . . . 23
Preparing to use ēno . . . . . . . . . . . . . . . . . . . . . . . . . . . . . . . . . . . . . . . 25
Stylus batteries . . . . . . . . . . . . . . . . . . . . . . . . . . . . . . . . . . . . . . . . 25
Install the ēno stylus battery . . . . . . . . . . . . . . . . . . . . . . . . . . . . . 25
Power on and off the stylus . . . . . . . . . . . . . . . . . . . . . . . . . . . . . 25
Pair the ēno stylus with the ēno receiver. . . . . . . . . . . . . . . . . . . . . . 26
ēno receiver LED status summary and troubleshooting . . . . . . . . . . 28
Using the ēno stylus and ēno receiver with a different computer . 29
Removing a stylus paired to the ēno receiver . . . . . . . . . . . . . . . . 29
If you use the older PolyVision Bluetooth adapter... . . . . . . . . . . . . . 30
ēno stylus LED status summary . . . . . . . . . . . . . . . . . . . . . . . . . . 31
Multiple ēno users . . . . . . . . . . . . . . . . . . . . . . . . . . . . . . . . . . . . . . 31
Multiple ēno styli. . . . . . . . . . . . . . . . . . . . . . . . . . . . . . . . . . . . . . 31
Multiple ēno interactive whiteboards and icon strips . . . . . . . . . . . 32
Getting started in projection mode . . . . . . . . . . . . . . . . . . . . . . . . . . 34
Table of contents