
User's Manual
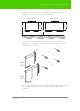
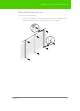
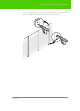
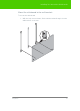
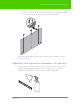
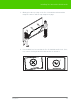
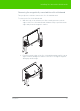
Table Of Contents
- Welcome
- Installing ēno interactive whiteboards
- Preparing to use ēno
- Using ēno interactive whiteboards
- Get started using ēno interactive whiteboards
- ēno interactive whiteboard control icons
- Projector control icons (for the PolyVision projector)
- Cursor control using the ēno stylus
- Using the on-screen keyboard
- Writing and erasing with the ēno stylus
- Printing and saving
- Spotlight and reveal options
- Opening a blank window for writing
- The PolyVision driver
- Configuring PolyVision driver options
- Configuring PolyVision projectors
- Choosing alignment accuracy
- Using on-screen tools
- Getting help
- Checking for updates
- Exiting the PolyVision driver
- To uninstall the PolyVision driver in Windows
- To uninstall the PolyVision driver on a Macintosh
- To uninstall the PolyVision driver using Linux
- Care and maintenance
- Technical support
- Warranty
- Appendix 1: ēno Bluetooth pairing options
- Index

PolyVision 19
Installing ēno interactive whiteboards
3. Gently pivot the top edge of the ēno click whiteboard toward the
magnetic surface until the top magnets engage.
4. Use a bubble level to test that the ēno click whiteboard is level. If it is
not, remove it using instructions below, then re-mount it.
E
2
2
1
0
#
0
8
0
9
0
0
/
1
/
A
B
e
t
a
-
N
o
t
f
o
r
R
e
s
a
l
e
E22
10
#
0
8
0
9
00
/
1
/A Beta - Not fo
r
R
e
s
a
l
e
E2210#080900/1/A Beta - Not for Resale