
User's Manual
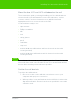
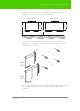
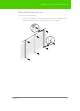
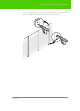
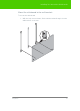
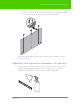
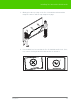
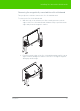
Table Of Contents
- Welcome
- Installing ēno interactive whiteboards
- Preparing to use ēno
- Using ēno interactive whiteboards
- Get started using ēno interactive whiteboards
- ēno interactive whiteboard control icons
- Projector control icons (for the PolyVision projector)
- Cursor control using the ēno stylus
- Using the on-screen keyboard
- Writing and erasing with the ēno stylus
- Printing and saving
- Spotlight and reveal options
- Opening a blank window for writing
- The PolyVision driver
- Configuring PolyVision driver options
- Configuring PolyVision projectors
- Choosing alignment accuracy
- Using on-screen tools
- Getting help
- Checking for updates
- Exiting the PolyVision driver
- To uninstall the PolyVision driver in Windows
- To uninstall the PolyVision driver on a Macintosh
- To uninstall the PolyVision driver using Linux
- Care and maintenance
- Technical support
- Warranty
- Appendix 1: ēno Bluetooth pairing options
- Index

PolyVision 11
Installing ēno interactive whiteboards
Mount the ēno 2610 and 2810 whiteboard on the wall
These instructions guide you through installing your ēno whiteboard on a
sheetrock wall. If your wall material is some other substance, such as
concrete or brick, use these instructions as a guideline but install
appropriate anchors to secure the unit to the wall.
Locate and have ready to use:
• tape measure
• Phillips screwdriver
• drill
• level
• safety glasses
• pencil
• stud finder
• step stool
• models 2610: two wall brackets and four sheetrock anchors with
screws (provided)
• models 2810: three wall brackets and six sheetrock anchors with
screws (provided)
note:
NOTE:
Instructions and fasteners are provided to help you install the whiteboard
when walls have metal or wood studs. Be sure to locate wall studs and use
them to drive mounting screws whenever possible.
Position the wall brackets
To position the wall brackets:
1. Choose a location on the wall with convenient access to your
computer and a projector connection.
2. Where possible, locate wall studs and select drill-hole locations that
align with wall studs. Sheetrock anchors are provided in case studs
cannot be used.