
Assembly Instructions


ASSEMBLY INSTRUCTIONS
MADE IN CHINA
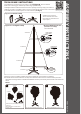
Top view
Side view
Fig. C
STORAGE INSTRUCTIONS
5. Allow branches to fall into place or gently pull up and out. When adjusting branches, be sure that all
wires are free of branch hinges.
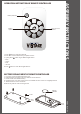
6. Insert green label plug into the wall outlet.(See Fig. B ), Push Power Button on Remote Controller your
entire tree should now be lit. Select Color Selection Buttons or Modes Options can change light show
effects.
7. A button on Control Box can manually operate the light modes and colors selection.
8. Begin to shape the branches and tips working from the bottom to the top. Start with tips farthest from
the pole and fan out one to the right, one to the left and one at the center of the main stem. (See Fig. C)
9. After shaping the entire tree following the previous step, slightly upsweep all branch tips for a uniform
look. Shift branches to fill any gaps. Your Christmas tree is now complete and ready to be decorated.
1. Unplug extension cord from the wall outlet first and then remove all ornaments and decorations.
2. When not in use, please store your tree in a cool, dry place away from sunlight. Exposing your tree to
excessive heat or humidity may damage your tree.
4 5 6
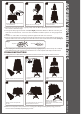
Remove the protective cap of Section
1 and add Section 2.
Deploy the Section 2 like Step 3.
Remove the protective cap of Section
2 and add Section 3.
1 3
Detach Section 3 and store it into box.
Fold the lower layer of Section 2 like
Step 2.
4 5 6
Detach Section 2 and put it into
the box.
Cover the protective cap of Section 1
then fold same as Section 2.
Detach Section 1 from tree stand and
pack them into the box.
Fix the Remote Controller back onto
power cord
2
Cover the protective cap of the
Section 2.