
Assembly Instructions


ASSEMBLY INSTRUCTIONS
MADE IN CHINA
*Electrical Rating For The Tree
(For Indoor Use Only)
0.8A 120V 60Hz
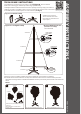
Fig. B - Tree and Light Assembly
1. Before you start to assemble your tree, choose an appropriate location near a wall outlet.
2. Assemble the tree stand and place on a level surface. (See Fig. A)
Congratulations on purchasing your new tree from
Polygroup. This tree feature
Quick Set® technology to make set up and storage quick and easy.
Carefully follow the instructions below on how to quickly and easily set up your new tree.
TREE ASSEMBLY INSTRUCTIONS
3. Each tree section is numbered with a tag. Please identify all sections before assembling.
4. Assemble the tree from bottom to tree top. Start with the bottom section and remove the protective
cap before inserting into the assembled stand. Make sure the pole is firmly inserted and secured into the
stand.
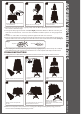
Section 3
Section 2
Section 1
Insert
Green Label
Plug Into Wall
Outlet
Do Not Tamper
Internal Parts
Open the
protective
cover
Do Not Tamper
Internal Parts
Open the
protective
cover
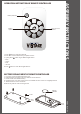
Fig. A - Tree Stand Assembly
Unfold the legs and lay the
stand in a flat area. Then slide
the locking disc downward and
snap into place.
Please scan code to
learn how to shape
and set up your tree
1 2
Section 1
Section 3
Section 2
Remove tree stand and tree sections
from box.
Detach Remote Controller from
power cord.
Insert Section 1 into the tree stand.
Deploy and shape the Section 1 .
SET UP
3
Control Box