
User's Manual

- 8 -
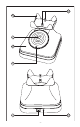
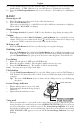
2. Plug the AC/DC adaptor into the DC Jack (22) on the bottom of the base and the other
end into an electrical outlet. The In-use/Charge Indicator (19) lights, verifying the battery
is charging.
Important: -Do not connect the telephone line to the modular jack until the phone
has been charged for 12 continuous hours.
- Charge the handset battery for 12 continuous hours prior to first use.
The initial battery charge is important for best performance.
3. Plug the telephone line cord into the Telephone Line in Jack (21) on the bottom of the
base and into a modular jack.
Caution: Use the original AC/DC adaptor, that came with this phone. Using other
adaptors may damage the phone.
NOTE: The phone automatically defaults to touch tone dialing. To change to pulse (rotary)
dialing, see Tone/Pulse dialing. If you do not know which type of service you have,
check with your telephone company.
Digital Security System
•Your cordless phone uses a digital security system to provide protection against false
ringing, unauthorized access and charges to your phone line.
•When you place the handset in the base, the unit verifies its security code. After a power
outage or battery replacement, place the handset in the base for about 20 seconds to reset
the code.
INITIAL PROGRAMMING
• Before using this telephone the following 5 initial program set-ups must be completed:
Language setting
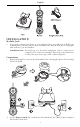
1. Make sure the phone is off (not in TALK mode).
2. Press the Flash/Program Button (11), 1ENG 2FRA 3ESP shows on screen. English is
factory set.
3. Use the handset number keys (or / keys) to enter the desired setting. For example, to
choose French, press the number 2 key or press / key until displaying the French
language.
4. Press the Flash/Program Button (11) to store selection. You will hear a confirmation
tone.
Area code setting
This is required to use Caller ID service from your telephone company.
5. After step 4 above, AREA CODE – shows on screen.
6. Use the handset keypad to enter your 3-digit area code.
7. Press the Flash/Program Button (11) to store selection. You will hear a confirmation
tone.
Ringer tone setting
8. After step 7 above, RINGER TONE 1 shows on the screen, Ringer tone 1 is factory set.
9. Use the number keys to enter the desired setting. For example, to choose Ringer Tone 2,
press the number 2 key.
10. Press the Flash/Program Button (11) to store selection. You will hear a confirmation
tone.
Tone/pulse setting
11. After step 10 above, 1 TONE 2 PULSE shows on screen. Tone is factory set.
12. Use the number keys to enter the desired setting. For example, to choose Tone dialing,
press the number 1 key.
13. Press the Flash/Program Button (11) to store selection. You will hear a confirmation
tone.
Default setting
14. After step 13 above, DEFAULT 1NO shows on screen. No is factory set.
English