MGC Personal Scheduler Quick Start Guide Version 8.
Copyright © 2006 Polycom, Inc. All Rights Reserved Catalog No. DOC2139B Version 8.0 Proprietary and Confidential The information contained herein is the sole intellectual property of Polycom, Inc. No distribution, reproduction or unauthorized use of these materials is permitted without the expressed written consent of Polycom, Inc. Information contained herein is subject to change without notice and does not represent commitment of any type on the part of Polycom, Inc.
Table of Contents Introduction . . . . . . . . . . . . . . . . . . . . . . . . . . . . . . . . . . . . . . . 1-1 Package Contents . . . . . . . . . . . . . . . . . . . . . . . . . . . . . . . . . . . . . . . . . . . . 1-2 System Requirements . . . . . . . . . . . . . . . . . . . . . . . . . . . . . . . . . . . . . . . . 1-3 Prerequisites . . . . . . . . . . . . . . . . . . . . . . . . . . . . . . . . . . . . . . . . . . . . . . . 1-4 About the MGC Personal Scheduler User’s Guide . . . . . . . . . . . . . .
Table of Contents Viewing the Report . . . . . . . . . . . . . . . . . . . . . . . . . . . . . . . . . . 3-21 Appendix A: Default Templates . . . . . . . . . . . . . . . . . . . . . . .A-1 Default Conference Template Properties - Default_COP . . . . . . . . A-2 Default Conference Template Properties - Default_Video . . . . . . . A-6 Default Conference Template Properties - Default-Audio . . . . . . . A-9 Default Conference Template Properties - Software CP . . . . . . .
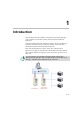
1 Introduction Polycom MGC Personal Scheduler is designed for scheduling audio and video conferences on the MCU directly from the Microsoft Outlook® application. Using the standard Microsoft Outlook conventions, the user schedules the conference start date and time, conference duration, and invites other participants from their Microsoft Outlook Calendar. MGC Personal Scheduler is a plug-in to the users’ Outlook Client application.
Chapter 1 - Introduction The MGC Personal Scheduler is configured by an Administrator who e-mails the Personal Scheduler application to end-users or use the automatic Client installation. The installation of the client software is automatic allowing Personal Scheduler to seamlessly interface with the end-users’ Microsoft Outlook application. Once the user schedules the conference in Microsoft Outlook, it is submitted to the Personal Scheduler Server for MCU resource availability.
MGC Personal Scheduler Quick Start Guide System Requirements This section lists the MGC Personal Scheduler requirements. There are different requirements for the computer running the MGC Web Server Manager and for the computer running the MGC Personal Scheduler for the Client.
Chapter 1 - Introduction Prerequisites This manual assumes the user has the following knowledge: • Familiarity with the Windows environment • Familiarity with Microsoft Outlook® • Basic knowledge of video conferencing concepts and terminology About the MGC Personal Scheduler User’s Guide The Personal Scheduler User’s Guide includes the following topics: 1-4 • Chapter 1 - Introduction Provides a general description of Personal Scheduler, System Requirements and Prerequisites.
2 Installation and Configuration After the Administrator installs the MGC Personal Scheduler package, he/ she configures the Client software for deployment for end-user installation. Personal Scheduler is configured solely by the Administrator; there is no configuration required on the part of the end-user. After Personal Scheduler is configured, the Administrator sends the Personal Scheduler Client application by e-mail or can use the automatic Client installation.
Chapter 2 - Installation and Configuration MGC Personal Scheduler Software Installation The Administrator has the option to automatically deploy the Personal Scheduler Client by installing the Client automatically or enable user to manually install the Client on the hard disk. The Administrator of MGC Personal Scheduler Client can enable the user to install the Client in one of two ways: • Attach the ClientInstall Version 8.0 folder in an E-mail enabling the user to save the folder to disk.
MGC Personal Scheduler Quick Start Guide 2. On the Insert menu, click File, or click the Attach File icon. The Insert File dialog box opens. 3. Browse to the directory where the Client Setup file is located. By default this file is located at: C:\Program Files\MGC Personal Scheduler 8.0\Personal Scheduler\ClientInstall. 4. Click the Setup file. 5. Click the Insert button arrow, and then click the Insert as Shortcut option button in the list. The link appears in the e-mail message as a shortcut.
Chapter 2 - Installation and Configuration 6. Send the e-mail to end-users for installation. 7. Once the e-mail is received by the end-user, he/she should double-click the shortcut to start the self-extracting installation of Personal Scheduler. 8. In rare instances when the MGC Personal Scheduler cannot recognize the Clients e-mail address, the following dialog box opens, asking the user to enter their e-mail address.
MGC Personal Scheduler Quick Start Guide SQL Database Configuration The database enables access to various database tables, such as the MCUs Users and Groups lists. Personal Scheduler includes two default databases: Access database and SQL database. If you are using the Access database, you do not have to define any additional properties. If you are using the SQL database, you must define the MGC Web Server user properties.
Chapter 2 - Installation and Configuration The Services window opens. 4. Right-click OperSrvV8_0, and then click Properties. The OperSrvV8_0 Properties dialog box opens. 5. 2-6 Click the Log On tab.
MGC Personal Scheduler Quick Start Guide 6. Select This account and then click the Browse button to select the user. The Select User dialog box opens, displaying the name of the selected user. 7. Select the user name from the list, and click OK. The OperSrvV8_0 Properties dialog box opens. 8. In the Password field, enter the user’s password. 9. In the Confirm Password field, enter the user’s password again. 10. Click OK to confirm and complete the procedure.
Chapter 2 - Installation and Configuration MGC Web Server Manager Configuration The MGC Web Server Manager application is the user interface for configuration of Personal Scheduler. It allows the Personal Scheduler Server to communicate via the MGC Web Server with the MCUs. Configuration of the MGC Web Server Manager includes: • Connecting to the Server • Adding MCUs • Connecting the MCUs • Configuring Personal Scheduler To start the MCU Web Server Manager application: 1.
MGC Personal Scheduler Quick Start Guide The MGC Web Server Manager window opens. Connecting the MGC Web Server Manager The MGC Web Server Manager application is the link between the MCU and the Personal Scheduler Server. The MGC Web Server Manager must first connect to the Personal Scheduler Server before the connection to the MCU may be initiated. To connect the MGC Web Server Manager: • Right-click on the Server icon and then click Connect Server.
Chapter 2 - Installation and Configuration Adding a New MCU Conferences are reserved on an MCU. At least one MCU must be defined in the MGC Web Server database. To add an MCU: 1. Click the [+] icon next to Database to expand the list. 2. Click the [+] icon next to to expand the list. 3. Right-click on the MCUs icon, and then click Add New MCU to DB. The MCU Properties dialog box opens. 4. Fill in the fields as described in Table 2-1.
MGC Personal Scheduler Quick Start Guide Table 2-1: MCU Properties Fields Field Description Password The password used when connecting to the MCU. ISDN Prefix The first digits of the MCU number that are added at the beginning of the dial-in number allocated by the MCU. The full dial-in number is allocated by the service provider that supplies the phone line - as the call passes through the PBX, the MCU truncates part of the full number. This number is configured in the MGC Manager application.
Chapter 2 - Installation and Configuration Table 2-1: MCU Properties Fields 2-12 Field Description Order The order in which the MCUs are selected to handle a new conference when two or more MCUs are connected. When a new conference is started, the system tries to establish it on the MCU numbered as 1. For more information, see the MGC Web Server Manager User’s Guide. If Personal Scheduler is installed as part of the Polycom WebCommander package, the WebCommander server requirements must also be met.
MGC Personal Scheduler Quick Start Guide Connecting an MCU After you have connected to the MGC Web Server Manager and added at least one MCU, you can now connect the MCU. To connect to an MCU: 1. Click the Server icon to display the list of MCUs currently defined in the MGC Web Server Manager. The MCUs list contains all of the MCUs currently defined in all databases set in the MGC Web Server Manager application. If the same MCU is defined in two databases, it will appear twice in the MCU list. 2.
Chapter 2 - Installation and Configuration Personal Scheduler Visual Customization The administrator can specify the text, icons and images, and configure the Tab fields and properties in the client’s Personal Scheduler.
MGC Personal Scheduler Quick Start Guide The following Message Header title can be customized in the E-mail message from the MGC Personal Scheduler Configuration window.
Chapter 2 - Installation and Configuration The MGCScheduler.oft file is automatically backed up in the CustomizeMGCSchedule.oft file located in the ClientInstall folder. When the MGC Personal Scheduler is re-installed, for example with you upgrade your version, the administrator can simply copy and paste the Visual Configuration information from the CustomizeMGCSchedule.oft file to the MGCScheduler.oft file prior to deploying the Client application.
MGC Personal Scheduler Quick Start Guide MGC Personal Scheduler Parameter Configuration After the MGC Web Manager is connected to the Personal Scheduler Server and at least one MCU has been connected, you can set the Personal Scheduler configuration parameters in the MGC Web Manager application. To configure Personal Scheduler from the MGC Web Manager: 1. Right-click the Database icon, and then click Personal Scheduler Configuration.
Chapter 2 - Installation and Configuration The MGC Personal Scheduler Configuration dialog box opens. 2. Fill in the fields as described in Table 2-2. Table 2-2: MGC Personal Scheduler Configuration Fields 2-18 Field Description Database Select the database that contains the Conference template that will be used to schedule conferences from the Personal Scheduler. The database contains five default Conference templates.
MGC Personal Scheduler Quick Start Guide Table 2-2: MGC Personal Scheduler Configuration Fields Field Description User Select the User name that the client software uses to login to the database. This login is transparent to the User. Each User is assigned permissions which defines his/her access rights to various Groups. It is strongly recommended to use User admin1, as this User has full read and write permissions in the database.
Chapter 2 - Installation and Configuration Table 2-2: MGC Personal Scheduler Configuration Fields Field Description Port Number Enter the Port number of the computer on which the Personal Scheduler server is installed. The Port number automatically gets written to the server.txt file, which is part of the client installation files. It is distributed to all end-users and is used by the client application to connect to the Personal Scheduler Server.
MGC Personal Scheduler Quick Start Guide Table 2-2: MGC Personal Scheduler Configuration Fields Field Description PreConference Activation You can select to start the reservation x minutes before the conference start time. This is recommended to allow dial-in participants to connect to the conference a few minutes before the start time. The default value is 10 minutes. Enable Limit Recurrences Click Enable Limit Recurrences. The Limit Recurrences number is enabled.
Chapter 2 - Installation and Configuration Table 2-2: MGC Personal Scheduler Configuration Fields Field Description Allow Language Selection Select this box to enable the default language selection. The default language of the MGC Personal Scheduler is the default language of the computer’s operating system. Default Language - From the drop down box select the default language of the WebCommander Web site.
MGC Personal Scheduler Quick Start Guide Table 2-2: MGC Personal Scheduler Configuration Fields Field Description Customize Meeting Request Menu Name Specify the Meeting request menu name. Appointment Menu Name Enter the Appointment request menu name. Message Header Title field Enter the name of the E-mail Message Header. Menu Icon Path Enter the path of the bitmap. The File must be in .bmp format.
Chapter 2 - Installation and Configuration Customization from the Microsoft Outlook Editor The following items can be customized in the Polycom Personal Scheduler tab from the Microsoft Outlook Editor/Form Configuration window: • Tab name • Tab fields (name and location) • Tab images • Tab general properties The names and location of the tab fields can be changed, but they cannot be deleted.
MGC Personal Scheduler Quick Start Guide To customize the Personal Scheduler - Polycom Meeting Request properties: 1. Double click on the MGC Schedule file located in MGC Personal Scheduler 8.0\MGC Personal Scheduler\ClientInstall. If your server does not have Outlook 2000 installed, you must copy the MGC Schedule file to a computer that has Outlook 2000 to customize the file. After the file has been customized, return the file to it’s original location (MGC Personal Scheduler 8.
Chapter 2 - Installation and Configuration The Polycom Office window opens in Microsoft Outlook. 2. 2-26 From the Tools menu, click Forms and then click Design This Form.
MGC Personal Scheduler Quick Start Guide The Design window opens Select the Polycom Office tab. 3. To change the name of the tab, from the Forms menu, click Rename Page. The Rename Page window opens. 4. Enter the desired name of the tab and click OK.
Chapter 2 - Installation and Configuration 2-28 5. To move the location of a field, click on the field name in the window, and drag and drop the field to the desired location in the window. 6. To change the name of a field, click on the field name in the window, highlight the current field name and replace it with the desired field name. 7. To change the images in the window, right click Advanced Properties. 8. The Properties window opens. 9. Scroll down and select Picture.
MGC Personal Scheduler Quick Start Guide 10. Click on the box located at the top right corner. The Load Picture window opens. 11. Select the desired picture and click Save. The picture appears. For more details on changing all of the general properties of the Form, refer to your Microsoft Outlook documentation. The factory default settings are stored in the file MGC ScheduleBackup located in MGC Personal Scheduler 8.0\MGC Personal Scheduler\ClientInstall.
Chapter 2 - Installation and Configuration Setting a Password You can specify a password that the conference scheduler is required to enter prior to scheduling a conference from the MGC Personal Scheduler. This password is specified in the User Properties. If this field is left blank, a password is not required. To specify a password for a new user: 1. In the Browser area, right-click the User icon, and then click Add New User to DB. The User Properties dialog box opens. 2.
MGC Personal Scheduler Quick Start Guide To specify a password for an existing user: 1. In the Browser area, click the Users icon. The Users list is displayed in the Status pane. 2. Double-click on a user’s name. The User Properties dialog box opens. 3. Continue with step 1 in the previous procedure.
Chapter 2 - Installation and Configuration Managing Templates The template contains the conference parameters and is stored in the database. A template is selected by the end-user when reserving a conference in Personal Scheduler. Five default templates are included with Personal Scheduler: • Default_CoP • Default_Video • Default-Audio • SW CP • Video-Switch • Refer to Appendix A for a detailed description of the default template properties.
MGC Personal Scheduler Quick Start Guide 3. Double-click the Personal Scheduler Templates icon. The list of templates appears. To view the template parameters: 1. Right-click the template name and then click Properties.
Chapter 2 - Installation and Configuration The Conference Properties window opens, displaying the template parameters. 2. 2-34 Refer to the MGC WebCommander Web Server Manager - Installation and Configuration Guide, Version 8.0, for details on defining the template parameters.
MGC Personal Scheduler Quick Start Guide To add a new template: 1. Right-click the Personal Scheduler Templates icon and then click Add New Personal Scheduler Res. The Conference Properties window opens, displaying the template parameters. 2. Refer to the MGC WebCommander Web Server Manager - Installation and Configuration Guide, Version 8.0, for details on defining the template parameters.
Chapter 2 - Installation and Configuration 2-36
3 Managing Conferences The MGC Personal Scheduler is used by end-users to schedule and reserve audio and video conferences on the MCU via Microsoft Outlook. Conferences are reserved using the Polycom Office Appointment or the Polycom Office Meeting option. When you create a meeting, you identify the people to invite and you send them an e-mail invitation.
Chapter 3 - Managing Conferences Scheduling Conferences To schedule a Polycom Office audio or video conference: 1. On the File menu, click New, and then click Polycom Office Appointment or Polycom Office Meeting. Alternatively, click the icon. The MGC Polycom Office Scheduler window opens.
MGC Personal Scheduler Quick Start Guide 2. If you are scheduling a Meeting, in the To field, enter the participant name(s)/e-mail address(es). (This step can be skipped if you are defining an Appointment.) 3. In the Subject field, enter a description. A subject must be entered to reserve the conference on the MCU. If no subject is entered, an error message is displayed. 4. Enter the start and end times. 5. Optional: Select other options you want and write an e-mail message. 6.
Chapter 3 - Managing Conferences 8. Select the ViaVideo Auto Connection check box to attach a ViaVideo attachment to a Meeting invitation. When the Meeting participant clicks the ViaVideo link, their ViaVideo endpoint automatically opens and connects to the On Going conference. 9. From the Conference Type drop-down box select the appropriate conference template. The conference template contains pre-defined parameters. For more details on the templates, see Appendix A. 10.
MGC Personal Scheduler Quick Start Guide The Invite Dial-out Endpoints window opens. Endpoints are saved in the database and configured with a leased line connection. When the conference starts the endpoint is automatically connected. In a conference with manual dial-out settings, the leased line must be connected manually. 14. To add an endpoint, in the Endpoints database list, select the endpoint to be added, and click the double right arrow button [>>].
Chapter 3 - Managing Conferences 18. Send the e-mail. The reservation can be recurring. For details, see “Scheduling Recurring Appointments and Meetings” on page 3-16. Scheduling the Reservation Directly From the Calendar You can easily schedule a reservation by selecting a block of time on the calendar. To do this you must first configure the MGC Personal Scheduler to be the default appointment form. To configure the appointment form: 1. 3-6 Right-click the Calendar icon and then click Properties.
MGC Personal Scheduler Quick Start Guide The Calender Properties dialog box opens. 2. From the When posting to this folder, use drop-down list, select Forms. The Choose Form dialog box opens. 3. From the Look In drop-down list, select Personal Forms Library.
Chapter 3 - Managing Conferences 4. Select Polycom Office and click Open. The Calendar Properties dialog box opens. The Polycom Office option is now available in the When posting to this folder, use drop-down list. Click OK. The Calendar Properties dialog box closes and Polycom Office (MGC Personal Scheduler) is set as the default calendar form.
MGC Personal Scheduler Quick Start Guide To schedule the reservation on the calendar: 1. Select the block of time on the calendar for the reservation. 2. Right-click the selected block of time and then click New Appointment. The Polycom Office window opens. 3. Continue with step 7 on page 3-3.
Chapter 3 - Managing Conferences E-mail Signature The e-mail received by the meeting invitees contains a signature that includes conference parameters required to start the conference. However a participant may receive an attachment that includes a .plcm file, which contains a ViaVideo link. When the user opens the attachment, the ViaVideo endpoint on his desktop automatically opens and connects to the On Going conference.
MGC Personal Scheduler Quick Start Guide Table 3-1 describes the signature fields. Table 3-1: E-mail Signature Fields Field Description Conference dial in number is: This is the conference dial-in number. This number is defined in the MCU Properties dialog box. For more information, see Chapter 2, “Adding a New MCU” on page 2-10”. Conference IP dial in number is: This is the conference IP dial in number. It is composed of the IP prefix and the conference name on the MCU.
Chapter 3 - Managing Conferences Table 3-1: E-mail Signature Fields Field Description Web Office URL: This is a link to your Polycom WebOffice site. This is only applicable if you have WebOffice installed on your computer and you have selected the Polycom WebOffice check box when setting up a reservation. MGC Manager Reservation Remarks Details of the conference are retrieved from the MGC Manager.
MGC Personal Scheduler Quick Start Guide 3. Right click on the Reservation name and select Properties.
Chapter 3 - Managing Conferences 4. 3-14 The Properties dialog box opens, displaying the Remarks field.
MGC Personal Scheduler Quick Start Guide Modifying Appointments and Meetings Modifying an Appointment or Meeting in Outlook also modifies the reservation on the MCU. Appointments and Meetings are modified using the standard Microsoft Outlook conventions.
Chapter 3 - Managing Conferences Scheduling Recurring Appointments and Meetings A recurring appointment or meeting is a reservation that occurs repeatedly. For example, a reservation that occurs on a regular basis, such as a weekly conference, can be designated as recurring. All recurrences are reserved on the MCU. 3-16 1. Schedule the Appointment or Meeting as described in “Scheduling Conferences” on page 3-2. 2. Click the Recurrence button.
MGC Personal Scheduler Quick Start Guide The Appointment Recurrence window opens. 3. Using the standard Outlook conventions, select the recurrence pattern and range of recurrence options you want. 4. Click OK. The recurring reservations are added to the Appointment or Meeting and a confirmation box opens indicating that the reservation has been made.
Chapter 3 - Managing Conferences Modifying Recurring Appointments or Meetings You can change the appointment time or range the of recurrences for all instances of an Appointment or Meeting. You can update one occurrence, or multiple occurrences. Modifying a recurring Appointment or Meeting in Outlook also modifies the reservation on the MCU. Appointments and Meetings are modified using the standard Microsoft Outlook conventions.
MGC Personal Scheduler Quick Start Guide Canceling Recurring Appointments and Meetings Canceling a Recurring Appointment or Meeting also deletes the reservation in the MCU. You can cancel one occurrence, or multiple occurrences. Appointments and Meetings are cancelled using the standard Microsoft Outlook conventions. After one occurrence of the Appointment or Meeting is cancelled, the following window opens indicating that the reservation has been removed from the MCU.
Chapter 3 - Managing Conferences Application Exception When an exception occurs in the Personal Scheduler/Client an Application Error Information window can appear on screen. The operator/user can choose to send an email to support with information that helps analyze the source of the problem. This function can be disabled in the Web Server Manager. In the Options menu, select Administrator Send Email Configuration and clear the Send Email Notification check box. 1.
MGC Personal Scheduler Quick Start Guide 2. Click View Report, to read technical information about the exception. The Crash Report dialog box is displayed. You can view and read details about the exception. — • — 3. To return to the Application Error Information, click Back In the Application Error Information dialog box, click Send Report, to email the report. When you have sent the email, a confirmation dialog box is displayed. Click OK to exit.
Chapter 3 - Managing Conferences Shown below is an actual email with attachments. You can view the report (.rpt) file with any text browser as shown below: The contents of this report is identical to the information that can be viewed in the Crash Report1.rpt file.
A Appendix A: Default Templates There are five default Conference templates included in the MGC WebCommander database: • COP (Default_COP) • Video (Default_Video) • Audio (Default-Audio) • Software Continuous Presence (SW CP) • Video Switching (Video-Switch) For a detailed description of these fields, refer to the MGC Manager User’s Guide Volume I.
Appendix A: Default Templates Default Conference Template Properties - Default_COP Parameter Value General Name Default_COP Remarks (empty) Duration 2:00 Hours Billing (empty) Meet Me Per Conf. Yes Entry Queue Access No Conference Entry Password (empty - to be allocated by system) Web/Chairperson Password (empty - to be allocated by system) Start on MCU Auto Numeric ID (empty) Conference User Defined 1-3 (empty) Conf.
Parameter Value Same Layout Yes (greyed out) Lecture Mode None Lecturer Name Auto select (greyed out) Timer (disabled) Interval 10 sec. (greyed out) FECC/LSD Rate None T120 Rate None Audio Alg.
Appendix A: Default Templates Parameter Value Auto Termination Yes Minutes Before First Join 25 Minutes After Last Quit 5 Dial-Out Manually No Allow undefined Participants Yes Min Number of Participants 3 Max Number of Participants Auto Cascade None Master None Chair Control None Label None Attended None Message Service Name Empty Start Conf.
Parameter Value Number of Occurrences (disabled) Video Layout Video Layout 5+ Background (enabled) Layout Border Yes Speaker Notation Yes Recording Enable Recording No Recording Link Name Empty Start Recording Immediately (greyed out) A-5
Appendix A: Default Templates Default Conference Template Properties - Default_Video Parameter Value General Name Default_Video Remarks (empty) Duration 2:00 Hours Billing (empty) Meet Me Per Conf. Yes Entry Queue Access No Conference Entry Password (empty - to be allocated by system) Web/Chairperson Password (empty - to be allocated by system) Start on MCU Auto Numeric ID (empty) Conference User Defined 1-3 (empty) Conf.
Parameter Value Same Layout No Lecture Mode None Lecturer Name Auto select (greyed out) Timer (disabled) Interval 10 sec. (greyed out) FECC/LSD Rate None T120 Rate None Audio Alg.
Appendix A: Default Templates Parameter Value Auto Termination Yes Minutes Before First Join 25 Minutes After Last Quit 5 Dial-Out Manually No Allow undefined Participants Yes Min Number of Participants 3 Max Number of Participants Auto Cascade None Master None Chair Control None Label None Attended None Message Service Name Empty Start Conf.
Parameter Value Number of Occurrences (disabled) Video Layout Video Layout 5+ Background (enabled) Layout Border Yes Speaker Notation Yes Recording Enable Recording No Recording Link Name empty Start Recording Immediately (greyed out) Default Conference Template Properties - Default-Audio Parameter Value General Name Default_Audio Remarks (empty) Duration 2:00 Hours Billing (empty) Meet Me Per Conf.
Appendix A: Default Templates Parameter Value Numeric ID (empty) Conference User Defined 1-3 (empty) Media Audio Networks IP, ISDN, ATM, MPI Participants None defined Advanced A-10 Auto Termination Yes Minutes Before First Joint 25 Minutes After Last Quit 5 Dial Out Manually No Allow undefined Participants Yes (greyed out) Min number of Participants 3 Max Number of Parties Auto Audio Mix Depth 3 Encryption No Label None Audio Alg. 56(G.
Parameter Value Lock No On Hold No Enable Invite Yes Roll Call No Entry Tone Yes End Time Alert Tone Yes - 5 Minutes Exit Tone Yes Meet Me Per Conf Limited Occurrences greyed out Number of Occurrences 1 Recording Enable Recording No Recording Link Name Empty Start Recording Immediately (greyed out) A-11
Appendix A: Default Templates Default Conference Template Properties - Software CP Parameter Value General Name SW CP Remarks (empty) Duration 2:00 Hours Billing (empty) Meet Me Per Conf. Yes Entry Queue Access No Conference Entry Password (empty - to be allocated by system) Web/Chairperson Password (empty - to be allocated by system) Start on MCU Auto Numeric ID (empty) Conference User Defined 1-3 (empty) Conf.
Parameter Value Same Layout Yes (greyed out) Lecture Mode None Lecturer Name Auto select (greyed out) Timer (disabled) Interval 10 sec. (greyed out) FECC/LSD Rate None T120 Rate None Audio Alg. Auto VTX1000 No (greyed out) SilenceIT Yes (greyed out) Pro-Motion None (greyed out) Dual Stream Mode None (greyed out) Video Protocol H.264 (greyed out) Video Format CIF (greyed out) Frame Rate 30 pic/sec.
Appendix A: Default Templates Parameter Value Auto Termination Yes Minutes Before First Join 25 Minutes After Last Quit 5 Dial-Out Manually No Allow undefined Participants Yes Min Number of Participants 3 Max Number of Participants Auto Cascade None Master None Chair Control None Label None Attended None Message Service Name Empty Start Conf.
Parameter Value Number of Occurrences (disabled) Video Layout Video Layout 2, 4 (depending on the number of connected participants) Background No Layout Border No Speaker Notation No Recording Enable Recording No Recording Link Name Empty Start Recording Immediately (greyed out) A-15
Appendix A: Default Templates Default Conference Template Properties - Video-Switch Parameter Value General Name Video-Switch Remarks (empty) Duration 2:00 Hours Billing (empty) Meet Me Per Conf. Yes Entry Queue Access No Conference Entry Password (empty - to be allocated by system) Web/Chairperson Password (empty - to be allocated by system) Start on MCU Auto Numeric ID (empty) Conference User Defined 1-3 (empty) Conf.
Parameter Value Same Layout Yes (greyed out) Lecture Mode None Lecturer Name Auto select (greyed out) Timer (disabled) Interval 10 sec. (greyed out) FECC/LSD Rate None T120 Rate None Audio Alg. 56 (G.722/G.
Appendix A: Default Templates Parameter Value Auto Termination Yes Minutes Before First Join 25 Minutes After Last Quit 5 Dial-Out Manually No Allow undefined Participants Yes Min Number of Participants 3 Max Number of Participants Auto Cascade None Master None Chair Control None Label None Attended None Message Service Name Empty Start Conf.
Parameter Value Number of Occurrences (disabled) Video Layout Video Layout 1x1 (full screen) Background (enabled) Layout Border Yes Speaker Notation Yes Recording Enable Recording No Recording Link Name Empty Start Recording Immediately (greyed out) A-19
Appendix A: Default Templates A-20