RMX 1000 V1.1.1 and SE 200 V3.0.2/CMA Server V4.
Copyright © 2008 Polycom, Inc. All Rights Reserved Catalog No. 3150-16966-001 Version 1.1.1 Proprietary and Confidential The information contained herein is the sole intellectual property of Polycom, Inc. No distribution, reproduction or unauthorized use of these materials is permitted without the expressed written consent of Polycom, Inc. Information contained herein is subject to change without notice and does not represent commitment of any type on the part of Polycom, Inc.
Polycom RMX 1000 V1.1.1and SE 200 V3.0.2/CMA V4.
1 Introduction SE 200 V3.0.2/CMA V4.0 can be used to manage RMX 1000 V1.1.1 , include device management, conference scheduling, and conference management. This guide mainly takes detailed explanation about how SE 200 V3.0.2/CMA V4.0 integrated manages RMX 1000.
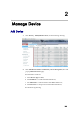
2 Manage Device Add Device 1 Click Device | Admin/Monitor View, See the following drawing: 2 Click Add Device listed in Commands | Device Navigation, there will pop-up Add New Device page. Set information as follows: a. Select Device Type to RMX, b. Set IP Address to a valid IP of RMX 1000 device, c. Set Admin ID to a valid username of the RMX 1000 device, d.
Chapter 2- Manage Device 3 Click Find Device, RMX 1000 device will be found, and system will pop-up a Device Found message. See the following drawing: 2-2 4 Click OK. 5 Click Identification; set System Name to a valid value.
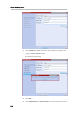
Polycom RMX 1000 V1.1.1and SE 200 V3.0.2/CMA V4.0 Integration User Guide RMX1000. See the following drawing: 6 Click Add, Add New Device command will submit, and if no error message pop-up, means the RMX 1000 device is added successfully. View Device status 1 Click Admin/Monitor View, select Filter to Type, and select another drop-down box behind Filter to RMX, device named RMX1000 lists in the device list. 2 View Status of RMX1000 in the list.
Chapter 2- Manage Device 3 Select RMX1000 in the list, and view Device Summary, device details is same as user set. Also user can click View Device Details to view the device details. Edit Device detail 1 Select RMX1000 in the device list, then click Edit Device, Edit Device page will pop-up, user can edit the device details. See the following drawing: 2 Click Update, Edit Device command will submit. Delete Device Select RMX1000 in device list, set the checkbox to SELECTED.
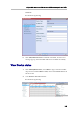
3 Schedule conference Create a template Create a template with the same RMX Profile Name in RMX1000 device 1 Click System Management | Conference Setup | Conference Templates, see the following drawing: 2 New information and new command will display in the page. Click Add 3 Set Add Conference Template information: a. Set General Info page: b. Set Name to a valid value. Here we set Name to rmx1000_hml.
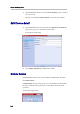
Chapter 3- Schedule conference c. Set MCU Settings page: Set Supported MCUs | RMX to SELECTED; Set RMX Profile Name to a profile which exists in the profile list of the RMX 1000 device. See the following drawing: Create a conference 1 Click Conference | Add Conference, See the following drawing: 2 Add Conference page will display, and set following information: Set Conference Name to a valid value; here we set to admin – testconf.
Polycom RMX 1000 V1.1.1and SE 200 V3.0.2/CMA V4.0 Integration User Guide Click Schedule; See the following drawing: 3 Conference Email Notification page will display. 4 And then user can click Skip Email, Email send will cancel; click Send, a Conference successfully scheduled email will be sent to participants in conference. See the following drawing: 5 Conference created successfully.
4 Manage conference 1 Click Monitor Conf. View, select Filter. 2 Conferences corresponding to Filter which user selected list in Monitor Conf. View list. 3 Select one conference, and click Manage; Here we select admin-testconf; 4 Click Manage Conference or Manage. See the following drawing: 5 Page will change to Manage Conference – admin-testconf with new Commands: Active Conference | Terminate Conference; Extend Conference; Change Layout; Add Participant. Selected Participant.
Chapter 4- Manage conference Change Layout Click Change Layout, Choose Video Mode page will pop-up. User can change conference layout in the page, and Click OK to submit. See the following drawing: Extend Conference 1 Click Extend Conference, and then select Extend Conference Time, click Update. 2 View Conference Details, Duration and End Data/Time will auto update.
Polycom RMX 1000 V1.1.1 and SE 200 V3.0.2/CMA V4.0 Integration User Guide Manage participant Add participant 1 Click Add Participant, Add Participants page will pop-up. See the following drawing: 2 Click Search, user can add Participants in the participant list.
Chapter 4- Manage conference Also user can click Add Guest, and then input valid Name and Number. And then click OK. See the following drawing: 3 Click Connect New Participants, the selected participant will add to the Participants list.
Polycom RMX 1000 V1.1.1 and SE 200 V3.0.2/CMA V4.0 Integration User Guide Connect/Disconnect Participant 1 Select a disconnected participant in the Participants list. Click Connect Participant. See the following drawing: 2 Select a connected participant in Participants list, click Disconnect Participant.
Chapter 4- Manage conference 3 Confirm information will pop-up. Click Yes, the Disconnect Participant command will submit. Click No, the Disconnect Participant command will cancel. See the following drawing: Remove Participant 1 Select a participant in list, and then click Remove Participant. 2 Confirm information will pop-up. 3 Click Yes, the Remove Participant command will submit. 4 Click No, the Remove Participant command will cancel.
Polycom RMX 1000 V1.1.1 and SE 200 V3.0.2/CMA V4.0 Integration User Guide Mute/unmute Participant 1 Select a unmuted participant in Participants list, click Mute Participant; 2 Select a muted participant in list, and then click Unmute Participant.
Chapter 4- Manage conference 4-8
5 Terminate conference 1 Select an activated conference in Monitor Conf. View list, and click Terminate Conference, 2 Confirm Active Conference Termination information will pop-up. - Click Terminate, the Terminate Conference command will submit. - Click Do Not Terminate, the Terminate Conference command will cancel.