
Network Router - Wireless Network Device User Manual
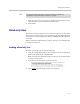
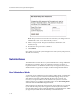
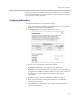


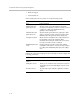
Table Of Contents
- Introduction
- Getting Started
- Configuring the V2IU 4350
- Configuration Guide For IP Centrex Applications
- Configuration Guide For Station Side IP PBX Applications
- Configuration Guide For Trunk Side IP PBX Applications
- Configuration Guide For Hosted Video Applications
- Configuration Guide For Enterprise Video Applications
- System Configuration
- Read-only User
- Subinterfaces
- ToS Byte Setting
- H.323 Configuration
- Forwarding Rules
- Peering Proxy
- Clients List Lock
- H.323 Activity Monitor
- VoIP Configuration
- Data Networking Configuration
- Traffic Management Configuration
- System Diagnostics
- Saving and Restoring the V2IU 4350 Configuration
- Upgrading the V2IU 4350
- Appendix
- Regulatory Notices

Configuring the V2IU 4350
3 - 27
When viewing the Network Information page, Subinterfaces are designated in
the Interface Information section with the device name and number, separated
by a colon (for example, eth0:100).
Configuring Subinterfaces
To configure subinterfaces, use the following steps:
1. Using the configuration graphical user interface, from the Configuration
Menu on the left-hand side, click Network.
2. Click Subinterfaces. The window shown below opens.
3. On this screen, complete the following information:
• IP Address is the address to be assigned to the subinterface.
•Netmask is the network mask to use for the address. If several addresses
are applied to an interface and these addresses are in a common network,
they must use a common subnet. The system does not support
supernetting.
• Interface is the port where the subinterfaces will be configured.
4. When you have finished entering this information, click Add. The
following popup appears:
5. Click OK. The new subinterfaces entry appears on the Subinterfaces
window in the list area.