
Network Router - Wireless Network Device User Manual
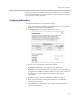


Table Of Contents
- Introduction
- Getting Started
- Configuring the V2IU 4350
- Configuration Guide For IP Centrex Applications
- Configuration Guide For Station Side IP PBX Applications
- Configuration Guide For Trunk Side IP PBX Applications
- Configuration Guide For Hosted Video Applications
- Configuration Guide For Enterprise Video Applications
- System Configuration
- Read-only User
- Subinterfaces
- ToS Byte Setting
- H.323 Configuration
- Forwarding Rules
- Peering Proxy
- Clients List Lock
- H.323 Activity Monitor
- VoIP Configuration
- Data Networking Configuration
- Traffic Management Configuration
- System Diagnostics
- Saving and Restoring the V2IU 4350 Configuration
- Upgrading the V2IU 4350
- Appendix
- Regulatory Notices

Configuring the V2IU 4350
3 - 23
2. Enter the System Location.
This is a comment string that can be used to indicate the physical location
of the 4350. By default, no value is set.
3. Enter the System Contact.
This is the administrative contact information for the 4350. By default, no
value is set.
4. Enter the SNMP Port.
This is the port that the 4350 uses for SNMP communications with the
network management system. The default is 161.
5. Press Submit.
Disable SNMP
1. Select System.
2. Select System Overview.
3. Select Services Configuration.
4. Uncheck the Enable SNMP checkbox.
5. Press Submit.
Configure Remote System Logging
The 4350 can be configured to log system messages to an external syslog
server.
1. Select the Enable Remote System Logging checkbox.
2. Enter the IP address of the Remote Syslog Host.
By default messages are sent to the remote host on port 514. This port can
be changed by using the syntax ADDRESS:PORT.
3. Press Submit.
Disable Remote System Logging
1. Select System.
2. Select System Overview.
3. Select Services Configuration.
4. Uncheck the Enable Remote System Logging checkbox.
5. Press Submit.