
Network Router - Wireless Network Device User Manual

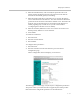
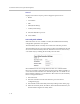
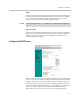
Table Of Contents
- Introduction
- Getting Started
- Configuring the V2IU 4350
- Configuration Guide For IP Centrex Applications
- Configuration Guide For Station Side IP PBX Applications
- Configuration Guide For Trunk Side IP PBX Applications
- Configuration Guide For Hosted Video Applications
- Configuration Guide For Enterprise Video Applications
- System Configuration
- Read-only User
- Subinterfaces
- ToS Byte Setting
- H.323 Configuration
- Forwarding Rules
- Peering Proxy
- Clients List Lock
- H.323 Activity Monitor
- VoIP Configuration
- Data Networking Configuration
- Traffic Management Configuration
- System Diagnostics
- Saving and Restoring the V2IU 4350 Configuration
- Upgrading the V2IU 4350
- Appendix
- Regulatory Notices

User Manual V
2
IU 4350 Converged Network Appliance
3 - 14
• 802.1p is not currently supported
1. Select the Network link.
2. Select Enable VLAN support.
3. Press Submit.
4. Select System.
5. Select VLAN Configuration.
6. Adjust LAN Port Membership drop-down boxes to specify 802.1 or
802.1q mode, as desired. Press Modify.
If changing modes, the radio-buttons or checkboxes will change from one
style to the other.
7. Under Add and configure a new VLAN enter a new VLAN ID, the 4350’s
IP address within this VLAN, and the Network Mask. Press Add.
A new VLAN entry will be added to the VLAN Configuration above.
8. Depending on the mode of a physical port, assign it to one or more
VLANs:
Caution
Be careful when changing a port from 802.1 to 802.1q mode. Any 802.1 devices
connected to that port (such as your management PC!) will loose access to the
4350. Port 4 is only able to receive 802.1 frames, so a PC can always be connected
to this port if the configuration of the other ports is unknown.