USER MANUAL FOR THE PolyCom EX System If you require assistance, please contact the NORTH Network Support Centre at 1-866-480-2255 or support@northnetwork.com Prepared by: M. Dreger Edited by: A. Nickoloff, Manager Service Development & Training August 18, 2004 Version 1.1 PolyCom EX User Manual Aug. 18, 2004 v 1.1 Page 1 of 13 Copyright © NORTH Network 1998. The information herein may be reproduced provided that it is accurate and NORTH Network is credited as the source.
Table of Contents CHAPTER 1 – GENERAL SYSTEM INFORMATION ............................3 Using The Remote Control................................................................................... 3 The Remote ControlThe Remote Control Buttons Explained ....................................4 The Remote Control Buttons Explained.......................................................................5 Turning the PolyCom EX System ON & OFF ......................................................
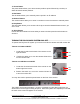
CHAPTER 1 – GENERAL SYSTEM INFORMATION USING THE REMOTE CONTROL The remote control works very much like a television remote control. The remote control is used to move the camera right and left (pan), up and down (tilt), zoom in and out, adjust the volume and make video calls. There are two sensors located on the bottom of the remote control. When you place the remote control down on the table, the image that you see on your monitor may change.
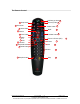
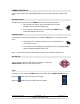
The Remote Control Snap button 1 2 Directional 4 Select button Home button 3 Call/hang up button12 Directory button 13 Volume Back 21 14 Zoom button Far/Near buttons15 Mute b tt 7 Auto Picture in Picture (PIP) 5 6 8 9 Preset Camera Keyboard button 10 Delete Dot PolyCom EX User Manual 17 18 button Number 11 Graphics 16 button Help 19 20 Aug. 18, 2004 v 1.1 Page 4 of 13 Copyright © NORTH Network 1998.
The Remote Control Buttons Explained 1 Snap Button The snap button allows you to preview and send still images to the far site. 2 Directional Buttons The directional buttons allow you to adjust the camera and navigate through menus. 3 Home Button The home button returns you to the main (home) screen. 4 Volume Button The volume button allows you to increase or decrease the sound you hear from the far sites. 5 Zoom Button The zoom button allows you to zoom the camera image in or out.
17 Preset Button The preset button allows you to store camera positions (when followed by a number) or delete all stored camera positions. 18 Dot Button The dot button allows you to manually enter a period in an IP address. 19 Number Buttons The number buttons allow you to enter in numbers or move the camera to a stored preset. 20 Help Button The help button allows you to access online help; access the Network Status screen if you are in a call.
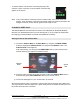
To ensure that the unit has been connected properly to the network, a green “up arrow” for each network connection will appear on the screen. Note: If any of the network connections have not been made, a red “down arrow” will appear. Once all network connections have been made, the network information will disappear from the screen and the system will be ready for use.
Speed Dialing a Frequently Called Site If you call certain site frequently you can use the Speed Dial option to access the six most recent video calls made from your location. To speed dial a frequently called site: 1. Access the Speed Dial on the Main Menu, by using the red DIRECTIONAL buttons to highlight the Speed Dial icon and press the SELECT button. The Speed Dial List screen appears. 2.
CAMERA CONTROLS You can control both your camera (Near End) and the camera at the other location (Far End). Near End Camera To adjust your camera, press the NEAR button on the remote control once. The camera icon found in the top right hand corner of the television monitor will point towards you. If the camera is already facing you, pressing the NEAR button temporarily displays other icons. Far End Camera To control the far end camera during a call, press the FAR button on the remote control once.
Camera Presets - Storing It is suggested that all camera presets be done before starting a videoconference. A total of 10 presets are available. YOUR CAMERA: The camera icon in the top right corner should be pointing towards you. If not, press the NEAR button. Frame the individual(s) or objects using the ZOOM button and DIRECTIONAL buttons. FAR END CAMERA: The camera icon in the top right corner should be pointing away from you. If not, press the FAR button.
Camera Presets - Deleting Camera presets will remain until they are either changed or deleted. To delete all your presets: 1. Press the PRESET button on your remote. 2. Press the # (number sign) on your remote. The camera presets are now deleted. You cannot delete presets one at a time; you can only delete them all at once. Snapshots TAKING/SENDING A SNAPSHOT IMAGE During a call you can obtain and send a snapshot image of what is on the screen.
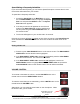
PICTURE-IN-PICTURE (PIP) During a call on a single-monitor system, the PIP displays the camera view at the Near End. This helps you to adjust your own image if you need to. During a call on a single-monitor system, if a remote site shows content, such as a slideshow presentation, the content appears in the main part of the screen and the PIP changes to show the people at the Far End.
CHAPTER 2 – TROUBLESHOOTING PROBLEM Monitors are black. POTENTIAL SOLUTION The system may be in standby mode. Pick up the touch sensitive remote control. The Main Menu screen should appear on the main monitor. The monitors may be turned off. Locate the POWER button(s) on the monitor(s) and turn it (them) on. Remote control and the monitor(s) both appear to be without power.