Getting Started Guide for the VSX™ Series July 2004 Edition 3725-21286-005/A
GETTING STARTED GUIDE FOR THE VSX SERIES Trademark Information Polycom® and the Polycom logo design are registered trademarks of Polycom, Inc., and Global Management System™, PathNavigator™, Siren™ 14, StereoSurround™, Visual Concert™, VSX™, and VTX™ are trademarks of Polycom, Inc. in the United States and various other countries. All other trademarks are the property of their respective owners. Patent Information The accompanying product is protected by one or more U.S.
Contents System Basics ...................................................................................... 1 Using the Remote Control ..................................................................................................... 1 Getting More Information ...................................................................................................... 3 Calling and Answering.......................................................................... 4 Answering a Video Call ...................
GETTING STARTED GUIDE FOR THE VSX SERIES Changing the Way Calls Are Answered ............................................... 29 Temporarily Refusing Calls ...................................................................................................29 Answering Calls Automatically...............................................................................................29 Muting Automatically Answered Calls .....................................................................................
Getting Started Guide for the VSX™ Series When you attend a meeting using the Polycom® VSX system, you’ll see that it’s very much like any other meeting you attend in a physical conference room: You see and hear other people and they see and hear you. Depending on how your system is configured, you can make video calls to one or more sites using ISDN or IP connections. You can show information to other participants and they can show you information.
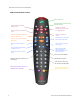
GETTING STARTED GUIDE FOR THE VSX SERIES VSX Series Remote Control Place or end a call Open the directory to make a call or work with an entry Adjust the camera; navigate through menus Return to the Place a Call (home) screen Increase or decrease the sound you hear from the far sites Mute the sound you’re sending to the far sites Zoom the camera image in or out Turn automatic camera tracking to presets on or off Select a camera or other video source Confirm your current selection; perform functions on
SYSTEM BASICS VSX Series Remote Control (VSX 8000) The remote control that you received with your VSX 8000 system has separate buttons for placing and ending calls. All other buttons are the same as the buttons on the remote controls for the VSX 3000 and VSX 7000. Place a call End a call In this guide, general instructions refer to the Call-Hang Up button on the remote control supplied with the VSX 3000 and VSX 7000 systems.
GETTING STARTED GUIDE FOR THE VSX SERIES Calling and Answering Answering a Video Call When a call comes in, you hear a ringing sound, and you may see a message that includes the number of the person calling. If the person is listed in the directory, you’ll also see the person’s name. The system administrator configures the system to answer incoming calls in one of these ways: The system prompts you to answer the calls manually. The system answers incoming calls automatically.
CALLING AND ANSWERING Calling by Entering a Name or Number To place a call by entering a name or number: 1. From the Place a Call screen, enter one of these: The ISDN number (for example, 19784444321). The system name (for example, Ascot Conference Room). The IP address (for example, 255.255.255.255). The system automatically determines the type of call to make based on the information you enter. To learn about entering characters, see Using the Remote Control on page 1. 2.
GETTING STARTED GUIDE FOR THE VSX SERIES Calling from the Contacts or Speed Dial List Your system administrator may have customized a Contacts or Speed Dial list for easy calling. To place a call using the Speed Dial or Contacts list: 1. Select Speed Dial or Contacts from the Place a Call screen. 2. Scroll to the entry you want to call. 3. Press Call-Hang Up to place the call. Calling by Using the Directory The directory is a list of names and numbers that’s stored locally on the VSX system.
CALLING AND ANSWERING Types of Video Calls You Can Make You can make either ISDN or IP calls (or both) using the VSX system, depending on your system configuration. You can call systems on ISDN networks, on the same LAN as your system, or on a different LAN from your system. The network used by your system and the far-site system can affect how you dial the call. From… You can call… By dialing… ISDN ISDN Phone number IP Phone number of the far-site gateway and the extension (E.
GETTING STARTED GUIDE FOR THE VSX SERIES Placing Audio-only Calls and Adding Audio-Only Sites (VSX 8000) Depending on the configuration, you can use your VSX 8000 system to place an audio-only call, or you can add an audio-only call to a video conference. This lets you: Use your system in the same way as a telephone. Add audio-only participants to your video calls. Add video calls to your audio-only calls.
CALLING AND ANSWERING Adding a Video Call to an Audio-Only Call If you are already in an audio-only call, you can add a video call to your call. To add a video call after your audio-only call connects: 1. On the Place a Call screen, enter the number you want to call. 2. Press Call on the remote control to place the call. Ending an Audio-Only Call To hang up from an audio-only call: Call-Hang Up on the remote control. 1. Press 2. Select the audio-only site from the Hangup screen to hang up the call.
GETTING STARTED GUIDE FOR THE VSX SERIES Controlling What You See Adjusting your cameras lets you show conference participants what you want them to see. You can adjust cameras and other video sources before the meeting starts and while the meeting is in progress. Selecting and Adjusting a Camera or Other Video Source You can use the remote control to select the main camera or any other nearsite or far-site video sources, such as document cameras, laptops, VCRs or DVD players.
CONTROLLING WHAT YOU SEE To adjust a camera using the remote: 1. Near or Far to select either a near-site or far-site Press camera. 2. Press the arrow buttons on the remote control to move the camera up, down, to the left, or to the right. 3. Press Zoom to zoom out or in. To adjust the main camera on the VSX 3000 system: © Polycom, Inc. 1. Position the camera up, down, to the left, or to the right manually: 2.
GETTING STARTED GUIDE FOR THE VSX SERIES Setting and Using Camera Presets Camera presets are stored camera positions that you can create ahead of time or during a call. With the press of a button, presets let you: Automatically point a camera at pre-defined locations in a room. Select a video source such as a VCR or DVD player, a document camera, or an auxiliary camera.
CONTROLLING WHAT YOU SEE Press Zoom to zoom the camera out or in. 3. Press Preset. 4. Press and hold a number to store the preset position. To store a double-digit preset (10-99), hold the second number down. Any existing preset stored at that number is replaced. To delete all presets: Near to choose a near-site video 1. If a call is connected, press source. 2. Press Preset. 3. Press Delete to delete all presets. You cannot delete just one preset.
GETTING STARTED GUIDE FOR THE VSX SERIES Showing, Moving, and Turning Off the PIP The Picture-in-Picture (PIP) gives you another view of your video conference so that your call is more like a face-to-face meeting. The view shown in the PIP changes automatically, depending on how the system is set up and what is happening in the meeting. You can also exchange the view shown in the PIP with that shown in the main screen.
CONTROLLING WHAT YOU SEE Enabling Voice Tracking to Presets (VSX 8000 Only) If your system configuration uses the Polycom PowerCam Plus camera, you can set the main camera to automatically move to the preset location that is closest to the speaker. When you enable this voice tracking to presets, you can view the people who are speaking throughout the meeting without having to manually adjust the camera at all.
GETTING STARTED GUIDE FOR THE VSX SERIES Controlling What You Hear Adjusting Volume During a call, you use the remote control to raise or lower the volume of the sound you hear. Changing the volume affects only the sound you hear at your site. To adjust the volume: >> Press Volume. When the VSX 3000 system is in use for video conferencing, use the remote control to adjust the volume. When the VSX 3000 is in use as a monitor for your PC, use the VOL button on the front of the system to adjust the volume.
CONTROLLING WHAT YOU HEAR Enjoying Stereo Audio in Video Calls If your video conferencing room is configured to use stereo sound, the microphones are positioned at the end of the conference table nearest the video conferencing system. One microphone pod is positioned on the left side of the table and one on the right. The left and right microphones are configured during system setup. It is important that you do not move them as this may detract from the stereo audio experience.
GETTING STARTED GUIDE FOR THE VSX SERIES Showing Content and Video Sources Depending on the equipment you have connected to your system, you may be able to show the following to the far sites: Any information stored on a laptop or PC (VSX 7000 and VSX 8000 systems) A paper document or object placed on a document camera A videotape or DVD You can share one type of content or one video source at a time, and you can switch to a different type of content or video source if you need to.
SHOWING CONTENT AND VIDEO SOURCES To set the resolution and refresh rate, go to your computer’s Display Control Panel. Showing Content with the VSX 7000 System To show content stored on a laptop or PC: 1. Connect the laptop to a Visual Concert VSX device: For more information about using the Visual Concert VSX device, see the Visual Concert VSX Quick Tips, available at www.polycom.com/videodocumentation. 2. Press on the Visual Concert VSX unit or press the remote control.
GETTING STARTED GUIDE FOR THE VSX SERIES Showing Content with the VSX 8000 System To show content stored on a laptop or PC: 1. Connect the laptop to an ImageShare II device: 2. Press the blue ImageShare selection button to toggle between displaying Content and displaying People. Using a Document Camera, VCR, or DVD Player All VSX systems enable you to show different types of information to other sites in a call, such as through a document camera, VCR, or DVD player. Before the call begins: 1.
WORKING WITH DIRECTORY ENTRIES Working with Directory Entries The directory on your VSX system stores dialing information that helps you make calls quickly and easily. When a site listed in the directory calls your system, the system displays the name on the screen when the call comes in. If a site that calls you is not listed in the directory, you are prompted to save the contact information in the directory when the call ends.
GETTING STARTED GUIDE FOR THE VSX SERIES 3. Specify the following information: In this field… Enter this information… Name Name that will appear in the directory list and on incoming call messages. Number ISDN number to use for calling the site. Call Quality Call speed to use for ISDN calls to the site. IP Number IP address for calls to the site. Extension The system’s gateway extension. Call Quality Call speed to use for IP calls to the site.
WORKING WITH DIRECTORY ENTRIES To edit an entry: 1. Press Directory on the remote control. 2. Scroll to the entry you want to edit and then select Edit. 3. Edit the information as needed. 4. Select Save to save your changes and return to the directory. To delete an entry: Directory on the remote control. 1. Press 2. Scroll to the entry you want to delete and then select Delete. While you can delete entries from your local directory, you cannot delete entries from a global directory.
GETTING STARTED GUIDE FOR THE VSX SERIES Including Multiple Sites in Calls You can use the VSX system to participate in multipoint conferences. During a multipoint conference, a multipoint conferencing unit (MCU) enables the video to switch between sites so that you can always see and hear the participant who is speaking. You can also share content in a multipoint call, just as you can in a point-to-point call.
INCLUDING MULTIPLE SITES IN CALLS Create a multi-site entry in the directory. To place a multipoint call by adding sites to a call: 1. Call the first site. 2. When the call connects, press 3. Select Add Video Call, and place a call to the next site. 4. Repeat steps 2 and 3 until all sites are connected. Call-Hang Up. To place a multipoint call using a multi-site directory entry: Directory on the remote control. 1. Press 2. Find the multi-site entry in the directory list. 3.
GETTING STARTED GUIDE FOR THE VSX SERIES Setting the Multipoint Viewing Mode You can choose the way you want to view the sites during a multipoint video conference. For example, you can view all of the sites at the same time, view only the site where the speaker is located, or let the system determine what you see. To set the multipoint viewing mode: 1. Select System from the Place a Call screen. 2. Select Admin Settings from the System screen. 3. Select Monitors from the Admin Settings screen. 4.
INCLUDING MULTIPLE SITES IN CALLS Controlling How the System Answers Multipoint Calls 1. Select System from the Place a Call screen. 2. Select Admin Settings from the System screen. 3. Select Monitors from the Admin Settings screen. 4. Select Multipoint Setup from the Monitors screen. 5. Scroll to the Auto Answer Multipoint field and select one of the following: Select this… To do this… No Answer calls manually.
GETTING STARTED GUIDE FOR THE VSX SERIES To use the chair control options when you are in a multipoint call: 1. On a PC, open a web browser. 2. In the browser address line, enter the system’s IP address, for example, http://255.255.255.255, to go to the video conferencing system’s web interface. 3. Click Place a Call. 4. Click Chair Control to go to the Chair Control screen. The Chair Control option is only available when the system is in a multipoint call.
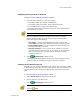
CHANGING THE WAY CALLS ARE ANSWERED Changing the Way Calls Are Answered Your system administrator may have configured the system to let you choose the way incoming calls are handled. Temporarily Refusing Calls If you do not wish to be disturbed by calls, you can refuse incoming calls with the Do Not Disturb feature. Callers hear a busy signal and you receive no notification about incoming calls. You can, however, make outgoing calls. To temporarily refuse incoming calls: 1.
GETTING STARTED GUIDE FOR THE VSX SERIES If you have a VSX 3000 system that you are using as your PC monitor, Polycom recommends that you set up the system so that you have to answer calls manually. If you receive a call while using the system as a PC, you hear a ringing sound and you can switch to video to answer the call manually. Alternatively, you can ignore the call and it will not connect, thereby preventing the caller from seeing or hearing you at your desk.
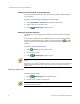
SCHEDULING CALLS Scheduling Calls You can use the calendar and call scheduling feature to schedule video conferences. When you schedule a call using this feature, the system automatically calls the site you selected on the date and time you specified. For recurring calls, you can indicate whether you want the system to automatically make the call daily, weekly, or monthly. To schedule a call: 1. Select System from the Place a Call screen. 2. Select Utilities from the System screen. 3.
GETTING STARTED GUIDE FOR THE VSX SERIES Using the VTX 1000 Conference Phone in Video Calls Your conference room may include a VSX video conferencing system integrated with a VTX™ 1000 conference phone. This configuration lets you use the video conferencing system and the conference phone together to place and manage video and audio-only calls.
USING THE VTX 1000 CONFERENCE PHONE IN VIDEO CALLS Muting the Audio in a Call that Includes a VTX Conference Phone You can use the mute button on the VTX conference phone to mute the audio in video calls. To mute the audio in a call with the VTX conference phone: >> Do one of the following: Press the Mute button on the VTX conference phone. Press Mute on the remote control. The red indicator lights on the VTX conference phone show when the audio is muted.
GETTING STARTED GUIDE FOR THE VSX SERIES Ending a Call with Audio-Only Participants Your conference may include a mix of video participants and audio-only participants. If an audio-only participant hangs up during the call, you need to disconnect the call from the conference. This is the same as hanging up a telephone receiver in a regular phone call. To disconnect the audio-only call: 1. Press 2.
STREAMING A CONFERENCE TO THE WEB Streaming a Conference to the Web Your system may be configured to allow you to stream point-to-point or multipoint calls to the web. When you stream a conference, any number of others can watch the conference’s live video or presentation using a web browser. Starting a Stream Your system may be configured to allow you to make point-to-point or multipoint calls available for others to view using a web browser.
GETTING STARTED GUIDE FOR THE VSX SERIES 3. Click Place a Call > Utilities > Streaming. 4. If prompted, enter the user name and password provided by the conference organizer. To stop viewing the streaming conference: >> Close the web browser. 36 WWW.POLYCOM.
CUSTOMIZING YOUR WORKSPACE Customizing Your Workspace Your system administrator may have configured the system to let you customize what you see on the screen. You can change these options before you place a call and when the system is in a call. Allowing the Far Site to Control Your Camera If you have a VSX 7000 or VSX 8000 system, you can allow the far site to control your camera. This enables the other participants to adjust what they see.
GETTING STARTED GUIDE FOR THE VSX SERIES 4. 5. Scroll to PIP, press , and select one of these settings: Select this setting… To show the PIP… Camera When you press any of the camera control buttons. Auto On connection and when you pick up the remote control. On On connection and during the call. Off Only when you press control. Press screen.
CUSTOMIZING YOUR WORKSPACE 4. Scroll to Keypad Audio Confirmation and press option. 5. Press screen. to enable the Home to save your change and return to the Place a Call If Keypad Audio Confirmation is on and you enter a number while in multipoint call using an internal MCU, the far sites will hear the numbers as you enter them. If you do not want the far sites to hear the numbers, mute the MCU’s microphone.
GETTING STARTED GUIDE FOR THE VSX SERIES 4. Press screen. Home to save your change and return to the Place a Call Changing the System Color Scheme Depending on your system configuration, you may be able to change the color scheme of your VSX system screens. To change the color scheme: 1. Select System from the Place a Call screen. 2. Select User Settings from the System screen. 3. Select 4. Scroll to Color Scheme, press schemes. 5. Press screen. to see more settings.
USING YOUR VSX 3000 SYSTEM AS A PC MONITOR Using Your VSX 3000 System as a PC Monitor If you have a VSX 3000 system, you can save space in your office or conference room by also using the VSX 3000 XGA display as your PC monitor. Typically, you do not need to change the factory defaults for these settings. However, if you do need to access the monitor settings, use the buttons on the front of the VSX 3000 monitor. Press MENU, then press SELECT and ADJUST as needed to change the settings.
GETTING STARTED GUIDE FOR THE VSX SERIES To answer a call while using the VSX 3000 system as a PC monitor: 1. When you hear a ring, press the Input button on the front of the system to switch to the video conferencing system. You must answer within 90 seconds, or the system will automatically reject the call. 2. Press Call-Hang Up on the remote control. If you use the VSX 3000 system as your PC monitor, Polycom recommends that you set up the system so that calls must be answered manually.
VIDEO CONFERENCING TIPS Video Conferencing Tips Read through these quick tips for ideas on how to optimize your video conferencing experience. You’ll find general tips for a better meeting, as well as simple suggestions for improving video and audio quality, and for showing documents. Tips for Great Meetings Make sure you have the video number(s) of the site you want to call or that the site is listed in a directory.
GETTING STARTED GUIDE FOR THE VSX SERIES side of the table and one on the right. The left and right microphones are configured during system setup. It is important that you do not move them as this may detract from the stereo audio experience. Don’t place papers or other objects on or in the way of the microphone, and don’t rustle papers or tap on the microphone or table.