
Installation guide


Setting up the Polycom HDX Ceiling Microphone Array Series
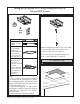
For suspended ceilings (continued)
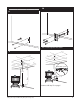
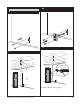
11 For the Polycom HDX 8000, Polycom
HDX 7000, and Polycom HDX 6000
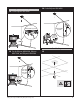
4
4
VCR/DVD
3
VCR/DVD
3
AUX
10’ (3.1 m)
RJ-45
adapter
to Walta
connector
HDX 8000
HDX 7000
HDX 6000
Systems
Continue with Step 15 on page 6.
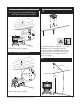
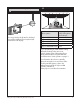
11 For the Polycom HDX 4000
10’ (3.1 m)
100-240VAC 50/60Hz 2.3A
RJ-45
adapter
to Walta
connector
HDX 4000
Systems
Continue with Step 15 on page 6.
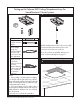
For ceilings that are not suspended
12
To attach the electronics enclosure, use suitable
hardware for your ceiling type. Align the
enclosure so that, when the Microphone Array
is attached, the dot on the Microphone Array
points towards the main display as shown in
Step 16 on page 7.
13
50’ (15.2 m)
~
10’
(3.1 m)
5