Microsoft–Polycom Integrated Solution User’s Guide
Copyright © 2005 Polycom, Inc. All Rights Reserved Catalog No. DOC2223A Version 1.0 Proprietary and Confidential The information contained herein is the sole intellectual property of Polycom, Inc. No distribution, reproduction or unauthorized use of these materials is permitted without the expressed written consent of Polycom, Inc. Information contained herein is subject to change without notice and does not represent commitment of any type on the part of Polycom, Inc.
Polycom-Microsoft User’s Guide Table of Contents Microsoft—Polycom Meeting Scenarios . . . . . . . . .1-1 Point-to-Point Meeting ........................................................................... 1-2 Multipoint Conferencing Scenarios ..................................................... 1-3 Meet Me—Starting an Ongoing Video Conference from Windows Messenger and Office Communicator ......................................... 1-3 Single Dial Entry Queue ................................................
Signing-in Windows Messenger and Office Communicator Clients to the Live Communications Server ...................................................... A-12 Office Communicator Configuration ....................................... A-12 Windows Messenger Configuration ......................................... A-15 Defining the Conferencing Properties in your Office Communicator .................................................................................................................
1 Microsoft—Polycom Meeting Scenarios Microsoft–Polycom integrated solution offers high quality point-to-point and multipoint voice, and video conferencing calls (in any combination) across communication devices, applications and services. This solution empowers users to connect and share information in real-time regardless of type of call.
Microsoft—Polycom Meeting Scenarios • “Single dial” Entry Queue (Office Communicator users only) • Multipoint Ad-hoc conferencing • Reservation-based dial-out • Extending an ongoing Windows Messenger or Office Communicator multipoint session into a multipoint audio and video conference.
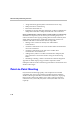
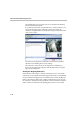
Polycom-Microsoft User’s Guide Multipoint Conferencing Scenarios This section describes the various multipoint conferencing scenarios available with Microsoft Windows Messenger or Office Communicator and Polycom endpoints and MGC unit. Meet Me—Starting an Ongoing Video Conference from Windows Messenger and Office Communicator The Meeting Room that was added to the buddy list of Office Communicator or Windows Messenger can be used to start a multipoint video conference. You select it from the buddy list.
Microsoft—Polycom Meeting Scenarios The video is displayed in the Windows Messenger window. Since Windows Messenger does not support DTMF codes, conference password as a security measure cannot be implemented, and the video layout cannot be changed via Click&View (a feature of using Polycom endpoints and the MGC MCU). The Meeting Room is activated, and you are added to the Meeting Room as the first participant.
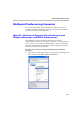
Polycom-Microsoft User’s Guide To start a video conference using the Meeting Room in Office Communicator: 1 In Office Communicator buddy list, select the Meeting Room (for example, MR01) and then click Call. The Conversation window opens. 2 Click the Start a video conversation icon to activate and join the conference.
Microsoft—Polycom Meeting Scenarios The Meeting Room is activated, and you are added to the Meeting Room as the first participant. If a conference password is implemented as a security measure, you must enter the appropriate conference password to enter the conference using the Office Communicator keypad selected from the Audio Controls pane. The video layout displayed in the Office Communicator window depends on the Meeting Room video settings.
Polycom-Microsoft User’s Guide When using Office Communicator that supports the use of DTMF codes, a conference password can be implemented as a security measure. Office Communicator users joining the conference enter the conference password using the keypad from the Audio Controls pane. In addition, the conference video layout can be changed via Click&View (a feature of using Polycom endpoints and the MGC MCU). Participants using an H.
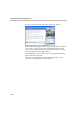
Microsoft—Polycom Meeting Scenarios Single Dial Entry Queue An Entry Queue is used as a special routing lobby to all Meeting Rooms and conferences, enabling one dial-in number to be used for joining all conferences. Participants are routed to the destination conference by entering the conference ID using DTMF codes. This scenario is supported only with Office Communicator. Windows Messenger does not support DTMF codes.
Polycom-Microsoft User’s Guide The Conversation window opens. 2 Click the Start a video conversation icon to activate and join the conference. 3 Once connected to the Entry Queue the IVR system prompts you for the target conference ID. Click the keypad icon in the Office Communicator Audio Controls pane.
Microsoft—Polycom Meeting Scenarios 4 On the keypad, enter the target conference ID followed by the pound (#) key. You are moved to the conference. Joining the Ongoing Conference Other Office Communicator users can join the conference by connecting to the Entry Queue and entering the target conference ID as described in steps 1-4. Other, non-Office Communicator users can join the conference via the Entry Queue. Participants using ISDN connection dial the Entry Queue dial-in number. Participants using H.
Polycom-Microsoft User’s Guide MGC Manager Monitoring The active Entry Queue and Meeting Room are displayed in the MGC Manager, in the On Going Conferences list.
Microsoft—Polycom Meeting Scenarios Ad-hoc Entry Queue and Conference Creation This procedure is similar to the Single Dial Entry Queue procedure, with the exception that the Meeting Room is not defined in the MGC Manager in advance and the ongoing conference is created on-the-fly. In addition, the Entry Queue must be set as Ad-hoc, and the conference Profile must be assigned to it. When the user enters the target conference ID, the MCU checks for an ongoing conference with this ID.
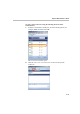
Polycom-Microsoft User’s Guide Dial-out to Conference Participants In this scenario, a video conference is scheduled on a Polycom MCU and it includes predefined participants; Office Communicator, Windows Messenger and other SIP and non-SIP users. At the scheduled time the conference is activated and the MCU automatically dials out to the predefined participants and connects them to the conference.
Microsoft—Polycom Meeting Scenarios 3 4 Define the following parameters: a Name—Enter the participant name. b Connection Type—Select Dial-Out. c Interface Type—Select SIP. d SIP Address—Enter the participant address in the format [user name]@[domain]. Do not use spaces or special characters such as commas, quotation marks, inverted tags and so forth either in the user name or in the domain part. e Address Type—Select SIP URI.
Polycom-Microsoft User’s Guide Escalating Windows Messenger or Office Communicator IM Multiparty Session to an Audio/Video Conference When you invite several buddies to a Windows Messenger or Office Communicator IM session, you can add audio and video to the conference after it has started (provided that the other participants have video capabilities).
Microsoft—Polycom Meeting Scenarios 2 Add a new buddy to the conference, selecting the Ad-hoc Entry Queue from the buddy list. A new conference is created and is automatically assigned an identification number (for example, 6741). An invitation to join the video conference is sent from the MCU (conference 6741) to all the IM session participants. 3 1-16 Participants must accept the invitation to join the video conference.
Polycom-Microsoft User’s Guide 4 Once the invitation is accepted and the participant joins the conference, the video is displayed in Windows Messenger window according to the selected conference layout. The ongoing video conference is also added to the list of On Going Conferences in the MGC Manager application.
Microsoft—Polycom Meeting Scenarios Office Communicator To add Audio and Video to an Office Communicator session: 1 Start an Office Communicator session by inviting the required buddies from the list. 2 Add the Ad-hoc Entry Queue from the buddy list: a 1-18 Click the Invite someone to join this conversation icon.
Polycom-Microsoft User’s Guide b In the Invite someone to join this conversation window, select the name of the ad-hoc Entry Queue.
Microsoft—Polycom Meeting Scenarios 1-20 3 A new conference is created and is automatically assigned an identification number (for example, 6741). An invitation to join the video conference is sent from the MCU (conference 6741) to all the IM session participants. 4 Participants must accept the invitation to join the video conference.
Polycom-Microsoft User’s Guide 5 Once the invitation is accepted and the participant joins the conference, the video is displayed in the Windows Messenger window according to the selected conference layout. The ongoing video conference is also added to the list of On Going Conferences in the MGC Manager application.
Microsoft—Polycom Meeting Scenarios Office Communicator New Multipoint Conferencing Scenarios Based on SIP-CX Protocol This section describes Office Communicator New Multipoint Conferencing Scenarios Based on Microsoft SIP-CX conference control capabilities. SIP-CX protocol enables Office Communicator users complete conference control from within the Office Communicator client; monitor their ongoing conference, invite others to join their conference and schedule a conference.
Polycom-Microsoft User’s Guide The Join the Conference dialog box opens, with the indication Connecting to the conference. Once the connection to the conference is established, you are requested to select where the conferencing service will call you back to connect you to the conference. 2 Select the callback number / address to be used by the MGC. Select one of the following options: — — — a A predefined E.
Microsoft—Polycom Meeting Scenarios 3 The Office Communicator is expanded to show the video window and the conference controls, and your self image is displayed in the video window. In addition, the conference connection parameters are displayed in the Conversation window.
Polycom-Microsoft User’s Guide An Office Communicator User Invites another Office Communicator Contact to the Conference Office Communicator users running a conference can invite other Office Communicator users to their conference. To Invite another Office Communicator user to your conference: 1 In Office Communicator, click Actions and then click Invite Someone to Join This Conversation.
Microsoft—Polycom Meeting Scenarios 2 Select the contact to be invited to your conference from the contacts list, or enter the contact name to find. An invitation is sent from the inviter to the invitee’s Office Communicator UA with the conference details which are displayed in the invitee's Office Communicator client.
Polycom-Microsoft User’s Guide An Office Communicator User Joins an Existing Conference An Office Communicator user can select to join someone else's conference by specifying the conference details (name and password). To Join an existing conference: 1 In Office Communicator, click Actions, click More, and then click Join an Existing Conference.
Microsoft—Polycom Meeting Scenarios 3 The user gets an invitation in his Conversation window with the conference details. The user can join the conference with their preferred media either by dialing in using the displayed conference SIP URI, or select/specify a callback number/address in the displayed Join the Conference dialog.
Polycom-Microsoft User’s Guide An Office Communicator User Dials out to another Office Communicator User Office Communicator users can specify and add a new participant to their ongoing conference. The invitee MUST be on the user’s Office Communicator contact list but can be offline or can be away and the connection can be done to the user’s media device such as cellular phone, laptop, telephone, etc. To dial out to another Office Communicator user: 1 Start a new conference.
Microsoft—Polycom Meeting Scenarios The New Phone Number dialog box opens. The MGC system supports the use of a dial plan for parsing and interpreting a received number as an H.323 alias, SIP URI or ISDN number to be used accordingly by the MGC system for initiating a callback to that device. The E.164 number (no SIP URI) is converted into a SIP URI by Office Communicator, inserted into the Refer-To field and sent in the REFER transaction to the MGC system. For example: the user enters "1234567".
Polycom-Microsoft User’s Guide Adding Audio/Video to an Office Communicator Multiparty IM Session In this scenario the a multiparty IM session is escalated into an audio / video conference on a Polycom MGC unit from the Office Communicator toolbar. To escalate an Office Communicator multiparty IM Session to an audio/ video multipoint conference: 1 While a multiparty IM session is running in Office Communicator, on the toolbar click the Conference button.
Microsoft—Polycom Meeting Scenarios The Join the Conference dialog box opens in the Conversation window. 2 The IM session organizer can select / specify a callback number / address to be used by the system, or selects Computer to use the audio/video device used by Office Communicator itself. The IM session organizer can select any other SIP, ISDN, PSTN, H.323 device to be called back by the MGC. 3 Click the Go button.
Polycom-Microsoft User’s Guide 5 Click the link to select the callback option. The Join Conference dialog box is displayed in the remaining participants Office Communicator client. 6 Select/specify a callback number / address to be used by the system, or selects Computer to use the endpoint connected to the user’s Office Communicator client.
Microsoft—Polycom Meeting Scenarios Scheduling a Meeting—Office Communicator–Outlook Integration Office Communicator users can schedule conferences using Outlook from their Office Communicator client. To schedule a conference: 1 In Office Communicator, on the Actions menu, click Schedule a Conference.
Polycom-Microsoft User’s Guide The Outlook New Meeting Request window opens, with the meeting organizer’s conference information taken from the conference parameters configured in the Office Communicator Options— Accounts. For detailed description, see "Defining the Conferencing Properties in your Office Communicator” on page A-17. The following parameters are displayed: 2 — The conference SIP URI, for example, 1007@ip.co.
Microsoft—Polycom Meeting Scenarios Starting a Data Sharing Session During an ongoing point-to-point or multipoint audio and video meeting you can add data sharing; application sharing and whiteboard. The data sharing invitation is sent to all meeting participants. To start a data sharing session during an ongoing conference: 1-36 1 In the Conversation window, click the Data Sharing button.
Polycom-Microsoft User’s Guide Once the invitation is accepted by the meeting participants, the Sharing Controls at the bottom of the Conversation window are enabled. 3 Click the Application Sharing button to start an application sharing session.
Microsoft—Polycom Meeting Scenarios The Sharing dialog box opens. 4 1-38 Click the application you want to share, and click the Share button. The Application opens on the computers of all meeting participants.
Polycom-Microsoft User’s Guide Conference Control via Office Communicator SIP-CX Protocol Once the conference has started, the meeting organizer can perform various operations using the Office Communicator controls.
Microsoft—Polycom Meeting Scenarios In addition, using the participant menu, the meeting organizer can: 1-40 • Mute/Unmute a participant • Remove participant from the conference • Play recorded announcement • Send a file or e-mail to the participant
A Appendix A: Multipoint Conferencing Settings This appendix describes the configuration procedures required to enable multipoint conferencing with Office Communicator and Windows Messenger clients. Several procedures are required by Office Communicator users only, to enable direct conferencing, monitoring and control capabilities and conference scheduling from within Office Communicator.
Appendix A: Multipoint Conferencing Settings Enabling Office Communicator Conferencing Features This procedure is required only when using Office Communicator conferencing features to start, join or control a multipoint audio and video conference directly from within Office Communicator.
Polycom-Microsoft User’s Guide 6 Right-click the Administrative Templates, and then select Add/ Remove Templates. 7 In the Add/Remove Templates dialog box, click the Add button.
Appendix A: Multipoint Conferencing Settings 8 In the Policy Templates dialog box, select communicator.adm and click Open. The selected file is added to the Add/Remove Templates dialog box. 9 In the Add/Remove Templates dialog box, click Close. 10 In the Group Policy window, in the Local Computer Policy tree, expand the Administrative Templates—>Microsoft Office Communicator Policy Setting and click the Microsoft Office Communicator Feature Policies folder.
Polycom-Microsoft User’s Guide 11 In the Feature Policies - Settings list, double-click Enable Conferencing. The Enable Conferencing Properties dialog box opens. 12 Click Enabled, and OK.
Appendix A: Multipoint Conferencing Settings The system returns to the Group Policy window. At this point you can either close the Group Policy window, or you can modify the bandwidth allocated to video conferencing (optional and not required if using Office Communicator default allocation). Enabling video calls with Office Communicator 13 In the Group Policy window, in the features list displayed on the right pane, double-click the Prevent video calls option.
Polycom-Microsoft User’s Guide Enabling data sharing with Office Communicator 16 In the Group Policy window, in the features list displayed in the right pane, double-click the Prevent collaboration features option. 17 In the Prevent collaboration features properties dialog box, click the Disabled button. 18 Click OK. The system returns to the Group Policy window. 19 If you do not need to modify the bandwidth allocation, close the Group Policy window.
Appendix A: Multipoint Conferencing Settings Bandwidth Allocation Modification This procedure is optional and is required only if you need to change the default bandwidth allocated by Office Communicator (default allocation is 1 MB per second) for audio and video calls. To modify the Bandwidth allocated to Office Communicator audio and video calls: 1 In the Group Policy window, double-click the Limit bandwidth for audio and video calls entry.
Polycom-Microsoft User’s Guide 2 In the Limit bandwidth for audio and video calls Properties dialog box, click Enabled. 3 In the Maximum bandwidth box, enter the maximum bandwidth that can be allocated to a video call. For example, to limit the bandwidth to 384 Kbps, enter 384000. 4 Click OK. 5 Close the Group Policy window without saving (click NO when prompted).
Appendix A: Multipoint Conferencing Settings Modifying Windows Hosts List to Include the LCS This procedure is required to enable data transfer between your computer and the LCS. To define the LCS as a local host: 1 Using Windows Explorer, browse to the following folder: C:\WINDOWS\system32\drivers\etc or in the Address box, enter %windir%\system32\drivers\etc 2 Double-click the Hosts file and select the Notepad application to display its contents.
Polycom-Microsoft User’s Guide For example: 172.22.187.159 pool01.ip.co.il 172.22.187.159 ip.co.il 4 Save the file.
Appendix A: Multipoint Conferencing Settings Signing-in Windows Messenger and Office Communicator Clients to the Live Communications Server To sign in Windows Messenger and Office Communicator users to the LCS, the IP address of the LCS server must be configured in the Windows Messenger and the Office Communicator. Office Communicator Configuration 1 Open Office Communicator. 2 On the Actions menu, click Options. The Options dialog box opens.
Polycom-Microsoft User’s Guide 3 Click the Accounts tab. 4 Click the Advanced button. 5 Enter the sign-in name as defined in the LCS. 6 In the Advanced Connection Settings dialog box, click Configure settings.
Appendix A: Multipoint Conferencing Settings 7 In Server name or IP address field, enter the IP address of the LCS server. 8 In the Connect using box, select TCP as the protocol to use for the connection. 9 Click OK. 10 Click OK to exit the Options dialog box.
Polycom-Microsoft User’s Guide Windows Messenger Configuration To configure the connection parameters: 1 Open Windows Messenger. 2 On the Tools menu, click Options. 3 Click the Accounts tab. 4 In the Options—Accounts dialog box, in the SIP Communications Service Account section, make sure that the My contacts include users of a SIP Communication Service check box is selected. 5 Click the Advanced button.
Appendix A: Multipoint Conferencing Settings 6 In the SIP Communications Service Connection Configuration dialog box, click Configure settings. 7 In Server name or IP address box, enter the IP address of the LCS server (Server B in the configuration). 8 In the Connect using section, select TCP as the protocol to use for the connection. 9 Click OK to complete the configuration. Windows Messenger can now be used to communicate between clients.
Polycom-Microsoft User’s Guide Defining the Conferencing Properties in your Office Communicator The properties defined here are based on the Meeting Room properties created by the system administrator in the MGC Manager. These parameters enable you to automatically start and join your conference from Office Communicator.
Appendix A: Multipoint Conferencing Settings 3 In the Conferencing Information section, enter the following information: Table A-1 4 A-18 Conference Information Parameters Field Description Conference ID Enter the name assigned to your Meeting Room in the MGC environment. If an Entry Queue is used for conference access, use numerals.
Polycom-Microsoft User’s Guide Adding a Meeting Room or an Entry Queue to the Buddy List To enable the multipoint conferencing scenarios from Windows Messenger or Office Communicator (without SIP-CX component), the Meeting Rooms and Entry Queues must be added to their buddy lists. This procedure is performed only after the Meeting Room or Entry queue is defined in the MGC Manager and LCS 2005.
Appendix A: Multipoint Conferencing Settings 2 Select the option to add the contact by e-mail address, and click Next. 3 Enter the Meeting Room/Entry Queue e-mail address, or use the Search option, and then click Next. A confirmation message is displayed. 4 Click Finish. The name of the Meeting Room or Entry Queue appears in the Office Communicator Contact list.
Polycom-Microsoft User’s Guide Windows Messenger To add the Meeting Room or Entry Queue as a Contact in the Windows Messenger buddy list: Once the Meeting Room is defined, it can be added to the buddy list of all Windows Messenger users in the organization. 1 On the Tools menu, click Add a Contact. The Add a Contact wizard opens. 2 Select the option to add a contact by e-mail address, or use the Search option and then click Next.
Appendix A: Multipoint Conferencing Settings 3 Make sure that the selected service is SIP and enter the Meeting Room/Entry Queue SIP address. The name of the Meeting Room or Entry Queue appears in the Windows Messenger Buddy list.
Polycom-Microsoft User’s Guide Adding Endpoints to Office Communicator and Windows Messenger Buddy Lists Once the endpoint is registered with LCS, you can add it to the buddy list of Windows Messenger and Office Communicator. For a detailed description of endpoint configuration and the creation of its user account in the LCS, see Chapter 2, “Endpoint Settings” on page 2-36.
Appendix A: Multipoint Conferencing Settings A-24