W-TRUSS shade structure system INSTALLATION INSTRUCTIONS : N IO T C ith U R ed w tion T S ovid alla N CO al pr inst u ring R n a O to m d du F T efer l use O N R teria ma P.O. Box 458 27725 Danville Avenue Castle Rock, MN 55010 www.poly-tex.com REV: AD-120621 U.S.
SAFETY GUIDELINES PLEASE READ THE INSTALLATION INSTRUCTIONS CAREFULLY BEFORE ASSEMBLING THE STRUCTURE. SAVE THESE INSTRUCTIONS FOR FUTURE REFERENCE. WARNING This structure is intended to be self-supporting, provided it is constructed with all frames, hardware, sheathing, sheeting, bracing, cables, and membrane in place, and secured to the foundation as shown in the manual. Stability during construction, from winds and loads imposed during erection, is the sole responsibility of the installer.
W-TRUSS Index PART IDENTIFICATION Pg 1 SITE PREPARATION Pg 2 FITTING LOCATION & INSTALLATION Pg 3 W-TRUSS INSTALLATION Pg 4 DIAGONAL CABLE INSTALLATION Pg 5 BUNGEE INSTALLTION Pg 6 SHADE CLOTH INSTALLATION Pg 7 INSTALLING EXPANSION FITTINGS Pg 8 REV: AD-120621
PARTS IDENTIFICATION WT2000 W-TRUSS (OR CUSTOM SIZE) PT2521 BUNGEE BALL SH2006 CABLE ASSEMBLY FT4010 2 WAY FITTING NB1759 3/8" x 3-1/2" HEX BOLT SU2005 13'-0" POST 3" SQ 7x7x1/2 (11/16") REV: AD-120621 NB1934 1/2" x 4" HEX BOLT FT4013 1 WAY FITTING (OPTIONAL) FT4011 3 WAY FITTING (OPTIONAL) FT4012 4 WAY FITTING (OPTIONAL) FT4023 EXPANSION FITTING (OPTIONAL) FT4017 FLOATER FITTING (OPTIONAL) RS6020 3" x 3" BLACK POST CAP NB1863 3/8" FLAT WASHER NB1937 1/2" LOCK WASHER NB1864 3/8" LOCK WASHER N
SITE PREPARATION STOP BEFORE STARTING INSTALLATION OF VERTICAL POSTS PLEASE REFER TO THE CUSTOM LAYOUT SHEET THAT WAS SENT WITH THE MANUAL. FAILURE TO FOLLOW CUSTOM LAYOUT COULD RESULT IN SHORTAGE OF PARTS TO COMPLETE THE W-TRUSS. AS ACCURACY IN THIS PART OF THE WORK IS VERY CRITICAL, PLEASE MAKE SURE THAT THIS PAGE IS THOROUGHLY UNDERSTOOD BEFORE PROCEEDING.
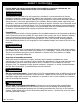
FITTING LOCATION & INSTALLATION 1/2" HEX NUT (2) 2 WAY FITTING (2) 5/16" x 3/4" HEX BOLT (2) 1/2" x 4" HEX BOLT (2) 1/2" HEX NUT (2) 4 WAY FITTING (2) 1/2" LOCK WASHER (2) 1/2" HEX NUT (2) 1/2" LOCK WASHER (2) 5/16" x 3/4" HEX BOLT (2) POST CAP 1/2" x 4" HEX BOLT (2) 6" G 1 / N 1 5 IT T I IN G 4 1 F TT OF F FI P O TO O P T TO 3 WAY FITTING (2) 5/16" x 3/4" HEX BOLT (2) 1/2" x 4" HEX BOLT (2) 1/2" LOCK WASHER (2) FIGURE 1 Install fitting onto vertical post at desired height and fasten the 5/16" x 3
W-TRUSS INSTALLATION FLOATER FITTING (2) 3/8" FLAT WASHER (4) 3/8" LOCK WASHER (2) 3/8" HEX NUT (2) 3/8" x 3-1/2" HEX BOLT (4) 3/8" LOCK WASHER (4) 3/8" x 3-1/2" HEX BOLT (2) 3/8" FLAT WASHER (8) 2 WAY FITTING (2) OPTIONAL FLOATER FITTING INSTALLATION W-TRUSS (2) 5 2 3/8" HEX NUT (4) VERTICAL POST REV: AD-120621 1 6 3 4 7 8 FOR LARGE INSTALLATIONS WORK FROM A CORNER AS THE PATTERN SHOWS.
DIAGONAL CABLE INSTALLATION FLAT WASHER LOCK WASHER HEX NUT TURNBUCKLE DETAIL A LOCK WASHER HEX NUT FLAT WASHER DETAIL B REV: AD-120621 INSTRUCTIONS: 1. Remove a 3/8" hex nut, lock washer, and flat washer from one corner fitting (DETAIL B). Do not discard. 2. Fasten bracket on non-turnbuckle end of cable assembly to top fitting as shown in DETAIL B. 3. Adjust turnbuckle to make cable assembly as long as possible. 4.
BUNGEE INSTALLATION INSTRUCTIONS: CAUTION: WEAR EYE PROTECTION WHEN INSTALLING BUNGEE CORDS. 1. INSERT BUNGEE CORD THROUGH GROMMET IN FABRIC. 2. WRAP CORD AROUND SUPPORT. 3. INSERT BALL THROUGH LOOP. 4. ONCE IN PLACE, MOVE BUNGEE SO BALL IS OVER THE GROMMET AS SHOWN. 1 2 5. A BUNGEE MAY SLIP OFF IF NOT INSTALLED PROPERLY. OCCASIONALLY CHECK INSTALLATION TO ENSURE ALL BUNGEES REMAIN ATTACHED. 6. WHEN REINSTALLING, INSPECT BUNGEE BALLS FOR WEAR OR DAMAGE. DO NOT USE DAMAGED BUNGEE BALLS. 7.
SHADE CLOTH INSTALLATION WARNING: This product was not designed to support ANY amount of snow. Be sure all chances of snow accumulation have passed before installing the shade cloth. If by chance snow does accumulate on top of the shade cloth, IMMEDIATELY remove the bungee balls securing the shade cloth to allow snow to fall to the ground.
INSTALLING EXPANSION FITTINGS Center FT4023 on post and push up tight to existing fitting. Drill 9/16" thru hole using the top hole of the FT4023 fitting as a guide. Insert the hex bolt and tighten securely with lock washer and hex nut. FT4023 1/2" X 4" HEX BOLT, LOCK WASHER & HEX NUT FT4023 1/2" X 4" HEX BOLT, LOCK WASHER & HEX NUT FT4023 FT4023 FT4023 For corner expansion applications alternate the holes so the bolts do not interfere with each other as shown.