
Data Sheet


minimum. You should change the target maximum to be equal to the maximum velocity that you want
your motor to move in the forward/positive direction. Since you already set the “Max speed” parameter
in the “Motor” box (see Section 4.3), you could just copy that value into the target maximum box. If
you want your motor to go the same speed in both directions, you should set the target minimum to
the negative of the target maximum. Otherwise, you should set the target minimum to be the lowest
(most negative) velocity that you want your motor to have when moving in the other direction. Click
“Apply settings” to save these settings to the Tic.
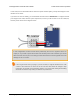
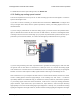
Example Tic scaling settings for analog
speed control mode.
Now connect motor power and click “Resume” to start your system. If the Tic Control Center software
says “Motor de-energized because of safe start violation.”, you should center your input. After doing
that, you should be able to move your analog input to control the speed of the motor.
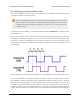
The safe-start feature helps prevent unexpected motion of the stepper motor by making sure that the
stepper motor does not start moving until after your analog input goes to the neutral position. When
you are starting up your system, you will always have to move your input to the neutral position if it was
not there already. It is possible to disable this feature by checking the “Disable safe start” checkbox in
the “Advanced settings” tab.
You should make sure that the motor is moving in the correct direction. If it is not, you can check
the “Invert motor direction” checkbox to fix it. (You could also rewire the stepper motor to reverse the
current in one coil, but be sure to turn off the stepper motor power before doing that.)
Finally, check the “Scaling degree” parameter. The default setting is “1 – Linear”. If you want finer
control at low speeds and coarser control at high speeds, you can change it to one of the higher
settings.
For details about how the input scaling works, see Section 5.2.
Tic Stepper Motor Controller User’s Guide © 2001–2018 Pololu Corporation
4. Setting up the controller Page 48 of 150