
Data Sheet
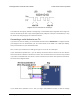
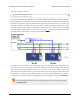

Because the Tic considers an input value of 2.1 V on SCL or SDA to be high, you can connect
those pins directly to 3.3 V microcontrollers without needing a level shifter. If your microcontroller’s
I²C interface is not 5V tolerant, it will usually still have a diode going from each I/O pin to its logic
supply. These diodes clamp the voltage on the pins, preventing the Tic’s pull-up resistors from pulling
the pins too high. If you want to be extra safe and not rely on the clamping diodes, you can disable
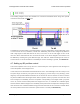
the Tic’s pull-up resistors by going to the “Advanced settings” tab in the Tic Control Center, changing
the functions of SCL and SDA to “Serial”, and making sure the “Pull-up” checkbox for each pin is not
checked.
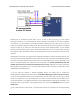
Depending on your setup, you might need to add pull-up resistors to the SCL and SDA lines of your
I²C bus to ensure that the signals rise fast enough. The Tic’s pull-up resistors are enabled by default,
and many I²C master devices will have pull-ups too, but that might not be enough, especially if you
want to use speeds faster than 100 kHz or have long wires. The I²C-bus specification and user
manual [https://www.pololu.com/file/download/UM10204.pdf?file_id=0J435] (1MB pdf) has some information
about picking pull-up resistors in the “Pull-up resistor sizing” section, and trying a value around 10 kΩ
is generally a good starting point.
If you are using an Arduino or Arduino-compatible board, you should now try running the
I2CSpeedControl example that comes with the Tic Arduino library [https://github.com/pololu/tic-arduino].
If you are using a different kind of microcontroller board, you will need to find or write code to control
the Tic on your platform. If you are writing your own code, we recommend that you first learn how to
use the I²C interface of your platform, and then use the I2CSpeedControl example as a reference. You
should also refer to the sections in this guide about the Tic’s commands (Section 8) and I²C protocol
(Section 10).
If your connections and code are OK, you should now see the Tic’s stepper motor moving back and
Tic Stepper Motor Controller User’s Guide © 2001–2018 Pololu Corporation
4. Setting up the controller Page 38 of 150