
Data Sheet

More information about the serial interface
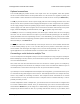
This user’s guide has more information about the Tic’s commands (Section 8) and serial protocol
(Section 9).
4.6. Setting up I²C control
This section explains how to connect a microcontroller to the Tic’s I²C interface so that you can send
commands to control the Tic. The Tic Stepper Motor Controller library for Arduino [https://github.com/
pololu/tic-arduino] makes it particularly easy to control the Tic from an Arduino or Arduino-compatible
board such as an A-Star 32U4 [https://www.pololu.com/a-star].
About the I²C interface
The SCL and SDA/AN pins of the Tic provide its I²C interface. The pins are open drain outputs,
meaning that they only drive low and they never drive high. Each pin has a 470 Ω series resistor
protecting it from short circuits. By default, each pin is pulled up to 5 V by the Tic’s microcontroller with
a pull-up resistor that is typically around 40 kΩ. When the Tic is reading the SCL or SDA pin as an
input, any value over 2.1 V will be considered to be high.
Devices on the I²C bus have two roles: a master that initiates communication, and a slave that
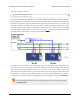
responds to requests from a master. The Tic acts as the slave. The Tic uses a feature of I²C called
clock stretching, meaning that it holds the SCL line low to delay I²C communication while it is busy
processing data from the master.
Connecting an I²C device to one Tic
If you have not done so already, you should follow the instructions in Section 4.3 to configure and test
your stepper motor. You should leave your Tic’s control mode set to its default value of “Serial / I²C /
USB” and leave the “Device number” set to its default value of 14. The “Device number” specifies the
7-bit address for the Tic to use on the I²C bus.
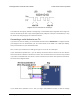
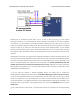
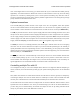
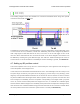
Next, connect your device’s SCL pin to the Tic’s SCL pin, and connect your device’s SDA pin to the
Tic’s SDA pin. You should also connect your device’s GND (ground) pin to one of the Tic’s GND pins.
These connections, and some other optional connections, are shown in the diagram below:
Tic Stepper Motor Controller User’s Guide © 2001–2018 Pololu Corporation
4. Setting up the controller Page 37 of 150