
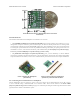
Data Sheet


◦ If you want to use a custom threshold, you should send RC pulses to the device. The device will indicate
that it recognizes the RC input signal by blinking the LED with a special pattern that consists of a fade in
followed by a blink, with a period of 2 s. The device will calculate the minimum and maximum pulse widths
seen during this phase of learning mode, and set the threshold equal to the point midway between them (the
average). In general, we recommend moving your input to both the off position and the on position during
this phase of learning mode, and not moving it anywhere outside of that range. However, if you are using a
servo controller to send pulses, you might want to simply send pulses equal to the desired threshold. If you
accidentally send incorrect pulses, you will have to power off the device and start over at step 1.
4. Tap the learning mode jumper again to save the chosen threshold. If the threshold you chose was not within
the allowed range of 900 to 2100 μs, then the device will indicate an error by blinking the LED rapidly eight
times per second. If that error happens, the threshold will not be saved and you should power off the device and
try the procedure again with a different threshold. If the threshold you chose was within the allowed range, then
it will be saved to non-volatile memory and you will see the LED fade in repeatedly with a period of 1 s.
5. You can now chose whether to enable inversion. If you do not want to enable inversion, simply power off
the device now to exit learning mode. If you do want to enable inversion, tap the learning mode jumper again.
The LED will start fading out repeatedly with a period of 1 s.
6. Power off the device to exit learning mode. Your learning mode jumper connection should be removed at
this point. The settings you chose have been saved in non-volatile memory of the device and you can power it
on to use the new settings.
9.2. Restoring the Default Settings
This section gives steps for restoring the switch to its default settings. This is a good thing to try if you have any
trouble using the switch. The general configuration procedure is documented in Section 9.1, but the instructions here
are easier to follow if you just want to restore the device to its default settings. To follow these instructions, you will
need to know how to connect and disconnect the learning mode jumper, as described in Section 9.
1. Get the device into learning mode. In order to do this, power off the device, connect the learning mode
jumper, and then power it on. After it is powered on, you should disconnect the learning mode jumper. At this
point, you will see the indicator LED fading in and out with a period of 1 second.
2. Tap the learning mode jumper (connect it and then disconnect it). The indicator LED should be blinking a
different pattern now.
3. Power off the device to exit learning mode.
After following these instructions, the threshold should be 1696 μs and inversion should be disabled.
9.3. Enabling Inversion
This section gives steps for enabling inversion while still using the default threshold of 1696 μs. The general
configuration procedure is documented in Section 9.1, but the instructions here are easier to follow if you just want to
enable inversion and are happy with the default threshold value. To follow these instructions, you will need to know
how to connect and disconnect the learning mode jumper, as described in Section 9.
1. Since you don’t want to set the threshold, you should stop sending RC pulses to the device. If you are
controlling the switch with an RC receiver, you might need to power off the transmitter and power cycle the
receiver. If possible, you could just disconnect the wire going to the RC IN pin.
2. Get the device into learning mode. In order to do this, power off the device, connect the learning mode
jumper, and then power it on. After it is powered on, you should disconnect the learning mode jumper. At this
point, you will see the indicator LED fading in and out with a period of 1 second.
Pololu RC Switch User’s Guide © 2001–2015 Pololu Corporation
9. Configuring Your RC Switch Page 34 of 35