
Data Sheet


6. Click the “Compile” button to compile the program. If you have not saved yet, you will be prompted
to choose a location to save the program. After the compilation succeeds, you will have a valid HEX
file and you could load it onto the P-Star using the Pololu USB Bootloader Utility (p-load) from
the command line. However, we recommend following the instructions below which explain how to
integrate p-load with MicroCode Studio so you can load your program onto the P-Star without leaving
the IDE.
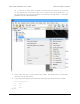
7. Locate the “Compile Program” toolbar button and open its menu by clicking the triangle to its right. If
you see p-load as an option in this list, then you have probably done these steps before and can skip to
step 14.
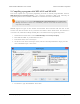
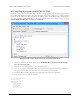
8. Select “Create a custom programmer entry”. Click “Next”.
9. For the “Display Name”, enter “p-load”. Click “Next”.
10. For the “Programmer Filename”, enter “p-load.exe”. Click “Next”.
11. Click the “Find Manually…” button and select the p-load “bin” folder. If you installed p-load in
the default location, the bin folder can be found at “C:\Program Files (x86)\Pololu\USB Bootloader
Utility\bin”. Click “Next”.
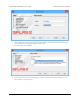
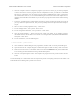
12. For the “Parameters”, enter the following line:
-w $hex-filename$ --pause-on-error
13. Click “Finished” to finish adding the new programmer, and click “OK” to exit the parent dialog box.
14. Open the menu for the “Compile Program” toolbar button again to make sure that “p-load” is checked.
15. Make sure that the P-Star is in bootloader mode as described in Section 5.2. The yellow LED should
be on and the green LED should be showing a double-blink pattern.
16. Click the “Compile Program” button. This compiles the program and runs p-load to load it onto the
P-Star.
You should briefly see a window that shows the output from p-load. If everything worked, then the P-Star’s red
LED should now be blinking with a period of one second.
Pololu P-Star 25K50 Micro User’s Guide © 2001–2017 Pololu Corporation
10. Compiling a program with PICBASIC PRO Page 37 of 38