
Data Sheet


bcf TRISC, 6
return
ledRedOff:
bsf TRISC, 6
return
start:
bcf LATC, 6 ; Set up the red LED
; Enable Timer 0 as a 16-bit timer with 1:256 prescaler:
; since the instruction speed is 12 MHz, this overflows about
; every 1.4 seconds.
movlw b'10000111'
movwf T0CON
mainLoop:
movf TMR0L, W ; Trigger an update of TMR0H
; Blink the red LED with a period of 1.4 s.
btfss TMR0H, 7
rcall ledRedOff
btfsc TMR0H, 7
rcall ledRedOn
goto mainLoop
end
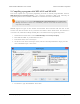
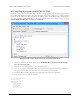
12. To compile the code, open the “Run” menu and select “Build Main Project”.
13. The “Output” pane should show the build output from MPLAB X. One of the last lines of the output
should say “Loading code from” and have the full path to the HEX file produced during compilation.
Where to find more information
For information about the instruction set, hardware peripherals, and registers on the PIC18F25K50, see the
PIC18F25K50 datasheet [http://www.microchip.com/PIC18F25K50].
For information about MPLAB X, you can find useful resources under the “Help” menu and in the “docs”
directory inside your MPLAB X installation.
For information about MPASM, see its user’s guide, which is in the “mpasmx/docs” directory inside your
MPLAB X installation.
If you have questions, you can post in Microchip’s MPASM forum [http://www.microchip.com/forums/f16.aspx] or
the Pololu Robotics Forum [http://forum.pololu.com/].
Pololu P-Star 25K50 Micro User’s Guide © 2001–2017 Pololu Corporation
9. Compiling a program with MPLAB X and MPASM Page 35 of 38