
Data Sheet

LATC6 = 0;
/* Enable Timer 0 as a 16-bit timer with 1:256 prescaler: since
the instruction speed is 12 MHz, this overflows about every 1.4
seconds. */
T0CON = 0b10000111;
while(1)
{
TMR0L; // trigger an update of TMR0H
// Blink the green LED with a period of 1.4 s
LED_GREEN(TMR0H >> 7 & 1);
// Blink the yellow LED with a period of 0.7 s
LED_YELLOW(TMR0H >> 6 & 1);
// Blink the red LED with a period of 0.35 s
LED_RED(TMR0H >> 5 & 1);
}
}
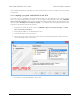
13. To compile the code, open the “Run” menu and select “Build Main Project”.
14. The “Output” pane should now show the build output from MPLAB X. This includes all the command-
line arguments passed to XC8 to compile the program, and all the output from the compiler. You
should see several instances of warnings similar to “warning: (1311) missing configuration setting for
config word 0x300000, using default”. This is OK, since the P-Star’s configuration bits are set during
manufacturing and they cannot be changed using the bootloader.
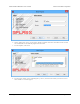
15. One of the last lines of the output should say “Loading code from” and have the full path to the HEX
file produced during compilation. This path and filename will be important later when you load the
program onto the P-Star.
Where to find more information
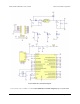
For information about the hardware peripherals and registers on the PIC18F25K50, see the PIC18F25K50
datasheet [http://www.microchip.com/PIC18F25K50].
For information about MPLAB X, you can find useful resources under the “Help” menu and in the “docs”
directory inside your MPLAB X installation.
For information about XC8, look in the “docs” directory inside your XC8 installation to find its user’s guide.
If you have questions, you can post in Microchip’s XC8 forum [http://www.microchip.com/forums/f249.aspx] or the
Pololu Robotics Forum [http://forum.pololu.com/].
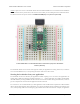
5.4. Programming using p-load
The previous sections cover how to install Pololu USB Bootloader Utility (p-load) and the drivers for the P-Star
(Section 5.1), how to get the P-Star into bootloader mode (Section 5.2), and how to compile a simple program
for the P-Star (Section 5.3). Once all these steps are complete, you are ready to use p-load to write the program
to your P-Star.
To do so, open a command prompt and run a command of the form:
p-load -w HEXFILE
Pololu P-Star 25K50 Micro User’s Guide © 2001–2017 Pololu Corporation
5. Getting started Page 19 of 38