
Data Sheet
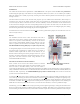
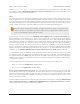
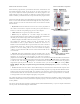

Buzzer and CS-GND jumpers on
the A-Star 32U4 Prime.
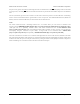
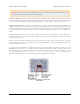
Battery level jumper on the A-
Star 32U4 Prime.
When the demo program starts, you should see the words “A-Star Prime” and
then “Demo Program” appear. If you do not see any text on the LCD, you
may need to adjust the contrast potentiometer. The demo program is not
usable without an LCD. If a buzzer is soldered in and the buzzer shorting
block is installed, you should also hear a beep when the demo program starts.
After the program has started, press the B button to proceed to the main menu.
Press C or A to scroll forward or backward through the menu, and press B to
make a selection or to exit one of the demos. There are six demos accessible
from the menu:
• Keyboard: This demo makes the A-Star act as a two-key keyboard. If
the A-Star is connected to a computer via USB, you can press button A or
button C to send the corresponding key presses to the computer.
• LEDs: Blinks the red, green, and yellow user LEDs.
• Music: Plays an adaptation of J. S. Bach’s Fugue in D Minor for
microcontroller and piezo, while scrolling a text display. This demonstrates
the ability for the A-Star to play music in the background.
• Power: Displays information about the board’s power sources. The top
line displays the measured voltage on VIN, in millivolts. For this
measurement to work, a jumper should be installed to connect A1 to
BATLEV. The board should also be powered from one of the connection
points labeled “Power In”, and the power switch must be in the “On”
position, or else the reading will be 0 mV. The bottom line displays
“USB=Y” if power from the USB connector is detected and “USB=N” if it
is not detected.
• SD card: This demo communicates with the microSD card to get the
size of the card’s main partition and then displays it on the LCD, in units of
megabytes. To use this part of the program, you will need to install a
jumper between GND and CS. (You will also need to have a version of the board with a microSD card socket and
you will need to insert a formatted microSD card into the socket.) While the CS-GND jumper is installed, button
A will not work. Also, if the CS-GND jumper is installed and the microSD card is not inserted, the program
might detect spurious presses on button A. To avoid these issues, you can connect CS to pin 4 using a male-
female jumper wire [http://www.pololu.com/category/67/male-female-premium-jumper-wires] instead of installing the
jumper.
• Serial: This demo uses the A-Star’s virtual USB serial port to send and receive data from the computer. You
can connect to the A-Star’s serial port using a standard terminal program or by using the Serial Monitor feature
from the Tools menu in the Arduino IDE. Any characters you send to the A-Star will be displayed on the LCD,
and information about the received characters will be sent back to the computer. If you press the A or C buttons,
a message will be sent to the computer saying they were pressed.
The A-Star 32U4 Prime versions with included LCDs also come with the buzzer and battery voltage sensing jumpers
installed by default and the contrast potentiometer adjusted properly, so the LCD, buzzer, and voltage sensing should
work by default.
The source code of the demo program is included with the AStar32U4Prime library, so you can compile it and load it
onto any A-Star 32U4 Prime using the Arduino IDE.
Pololu A-Star 32U4 User’s Guide © 2001–2014 Pololu Corporation
5. A-Star 32U4 Prime Page 30 of 47