
User Manual


3. Getting Started
3.a. Installing Windows Drivers and Software
If you are using Windows XP, you will need to have Service Pack 3
[https://technet.microsoft.com/en-us/windows/windows-xp-service-pack-3.aspx] installed before
installing the drivers for the Maestro. See below for details.
Before you connect your Maestro to a computer running Microsoft Windows, you should install its
drivers:
1. Download the Maestro Servo Controller Windows Drivers and Software
[https://www.pololu.com/file/0J266/maestro-windows-130422.zip] (5MB zip)
2. Open the ZIP archive and run setup.exe. The installer will guide you through the steps
required to install the Maestro Control Center, the Maestro command-line utility (UscCmd),
and the Maestro drivers on your computer. If the installer fails, you might have to extract all
the files to a temporary directory, right click setup.exe, and select “Run as administrator”.
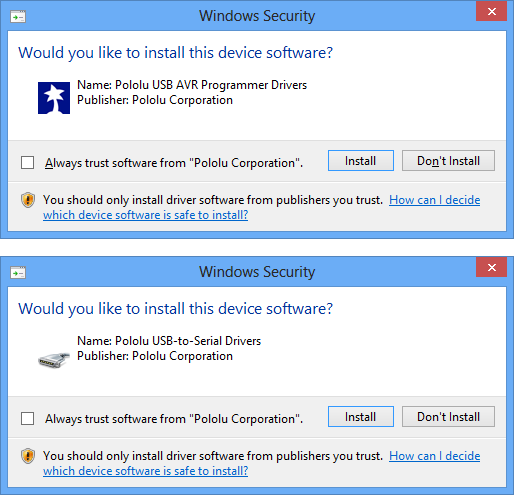
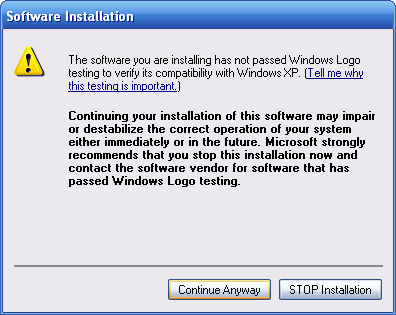
3. During the installation, Windows will ask you if you want to install the drivers. Click “Install”
(Windows Vista, Windows 7, and later) or “Continue Anyway” (Windows XP).
4. After the installation is finished, your start menu should have a shortcut to the Maestro
Control Center (in the Pololu folder). This is a Windows application that allows you to
configure, control, debug, and get real-time feedback from the Maestro. There will also be a
command-line utility called UscCmd which you can run at a Command Prompt.
Windows 10, Windows 8, Windows 7, and Windows Vista users: After following the steps above,
you can connect a Maestro to your computer, and your computer should automatically install the
Pololu Maestro Servo Controller User’s Guide © 2001–2019 Pololu Corporation
3. Getting Started Page 21 of 102