Titleblock do NOT print this page Date Drawing # File Name Scale Drawn By Color Emboss Ht. Deboss Depth Finish Process Notes Artwork 10 May 2013 HBP2835 N1SurroundBar_MN2835C.
English Important Safety Instructions This product was designed and manufactured to meet strict quality and safety standards. There are, however, some installation and operation precautions which you should be particularly aware of. 1. Read Instructions. All the safety and operating instructions should be read before the system is operated. 2. Retain Instructions. The safety and operating instructions should be retained for future reference. 3. Heed Warnings.
19. Replacement Parts. When replacement parts are required, be sure the service technician has used replacement parts specified by the manufacturer or that the parts have the same characteristics as the original part. Unauthorized substitutions may result in fire, electric shock or other hazards. CAUTION: Danger of EXPLOSION if battery is incorrectly replaced. Replace only with the same or equivalent type.
Inside Your N1 SurroundBar™ Carton: Important Note: If anything is missing or damaged, or if your Polk N1 SurroundBar fails to operate, please notify your dealer immediately. We recommend keeping your original carton and packing materials in case you need to ship the unit in the future. SurroundBar Remote Control (Battery Included) 6' Digital (Optical) Cable Quick Start Guide Owner’s Manual Online Registration Card Power Supply Specifications Dimensions 4" H x 39 1/4" W x 4 1/2" D (10.2 cm x 99.
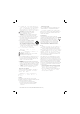
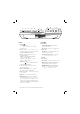
1 2 3 4 5 7 6 20V 60W Controls 1. Powerr ( )—Turns on the bar or puts it in standby mode. LED—Blue, green or red light to indicate operating status. 2. Learn—Puts the bar into “learning mode” so you can program it to respond to commands from your TV’s IR remote control. 3. Source—Changes which input source you are listening to. Source 1: optical (Blue LED for PCM or Green for Dolby Digital) Source 2: coaxial (Blue LED for PCM or Green for Dolby Digital) Source 3: analog 4.
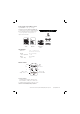
Where To Locate Your Bar For The Best Sound Note: The rubber feet are detachable and may be removed entirely (for wall-mounting the bar) or moved along the bottom surface of the bar, depending upon your installation. Table Mount Wall Mount 2 1 4 3 Overall Dimensions 1. 4" H (10.2 cm) 2. 39 1/4" W (99.7 cm) Keyhole Slots 3. 32" W (81.28 cm) Top of Bar to Keyhole Slots 4. 1 1/16" (2.
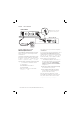
How To Connect Your Bar SURROUNDBAR 20V 60W Note: Remove the protective cap prior to inserting cable. SOURCE 3A SUB OUT 3 2 1 XBOX CONSOLE DIGITAL T OPTICAL OPTICAL AUDIO OUTPUT How To Optimize The Sound When TV Speakers Are On The setting to turn off your TV’s internal speakers should be here. You should hear sound from the bar. If you don’t, turn up the volume on the bar using its volume control buttons. If you can’t turn off your TV internal speakers, don’t worry.
Bluetooth® Wireless Technology To use your Bluetooth wireless technology device with the SurroundBar, you must first pair your device with your SurroundBar. Pairing creates the ability of your Bluetooth device to connect with your SurroundBar wirelessly. Pairing is like a handshake between your Bluetooth device and your SurroundBar in which they meet and exchange information. You only have to pair your SurroundBar with your Bluetooth device one time for this exchange of information to take place.
How To Set Up A Remote Control For Your SurroundBar SmartBar™ Programming Note: For your SurroundBar to respond to your remote control, you MUST FIRST program the bar to respond to your television’s original IR (Infra-Red) remote. An RF (Radio Frequency) remote will not work. Other remotes (cable, satellite) will work only afterr you have programmed the bar to respond to the TV’s IR remote.
5 Tap “Volume T “V Volume Up” button on your TV’s TV’s remote control 4 - 8 times, once per second. Tap, hold.. T do not hold LED LEARN LED blinks with each button press 6 LED VOL Volume Up button LED blinks blue When the LEARN LED and the button (command) both blink blue, the command has been learned. LED LED blinks blue VOL Verify command works. V Repeat steps 1-6 to program “Volume Down” ( – ), Source, Mute and Power button ( ).
Troubleshooting The bar does not power on. tt Ensure you have plugged the power supply into a live wall outlet. tt Ensure that all components of the power supply are connected properly. t Ensure the power supply is properly connected to the bar power input. No sound from the bar. tt Check that the TV or cable box is providing a signal. t If necessary, check using an alternate source. t tt Check that the bar is receiving power and is turned on. t Turn up the volume of the bar.
What if my provided optical cable is too short? t We did our best to provide a cable of adequate length; however, there might be a few setup instances in which the cable may be too short. If that is your situation, your local electronics store will have cables that meet your required length. My audio sounds strange and distorted. t Your N1 SurroundBar requires a clean, unaltered stereo signal for proper audio performance.
Limited Warranty Polk Audio, Inc., warrants to the original retail purchaser only. This warranty will terminate automatically prior to its stated expiration if the original retail purchaser sells or transfers the Product to any other party. Polk Audio, Inc.
Français Consignes de Sécurité Importantes Ce produit a été conçu et fabriqué pour répondre à de strictes normes de qualité et de sécurité. Veuillez cependant porter attention aux consignes de sécurité suivantes se rapportant à son installation et à son utilisation. 1. Lisez toutes les consignes de sécurité et d’utilisation avant d’utiliser cet appareil. 2. Conservez les instructions de sécurité et d’opération pour référence future. 3.
19. Pièces de rechange—Lorsque des pièces de rechange sont requises, assurez-vous que le technicien de service utilise des pièces de rechange spécifiées par le fabricant ou des pièces ayant les mêmes caractéristiques que les pièces d’origine. Des substitutions non autoriséesrisquent de provoquer un incendie, des chocs électriques ou d’autres dangers. AVERTISSEMENT: Danger d’explosion si la batterie est inexactement substituée. Remplacez seulement par la même chose ou le type équivalent.
Contenu de la boîte de la SurroundBarMC N1 Note importante: S’il manque des pièces, si vous découvrez des avaries ou si votre SurroundBar N1 Polk ne fonctionne pas, contactez immédiatement votre revendeur. Conservez la boîte et l’emballage—ils assureront la protection du produit en cas de transit éventuel.
1 2 3 4 5 7 6 20V 8 60W Contrôles 1. Interrupteurr ( )—Allume/éteint la barre ou la met en mode veille. DEL—Bleue, verte ou rouge selon l’état d’activité. 2. Learn—Met la barre en mode d’apprentissage pour vous permettre de la programmer pour répondre à la télécommande IR de votre télé. 3. Source—Détermine la source d’entrée audio. Source 1: Optique (DEL bleue pour PCM ou verte pour Dolby Digital) Source 2: Coaxiale (DEL bleue pour PCM ou verte pour Dolby Digital) Source 3: Analogique 4.
Où installer votre barre pour maximiser sa performance Note: Les pieds de caoutchouc sont détachables et peuvent être retirés (pour installation murale) ou repositionnés le long de la surface inférieure de la barre selon vos besoins d’installation. Sur une tablette Au mur 2 1 4 3 Dimensions hors tout 1. 4" H (10,2 cm) 2. 39 1/4" W (99,7 cm) Distance entre les fentes en trou de serrure 3. 32" W (81,28 cm) Distance du dessus de la barre aux fentes en trou de serrure 4.
Connexion de votre SurroundBar SURROUNDBAR 20V 60W Note: Retirez les capuchons de protection avant d’insérer le câble. SOURCE 3A SUB OUT 3 2 1 XBOX CONSOLE DIGITAL T OPTICAL OPTICAL AUDIO OUTPUT Comment optimiser le son quand les haut-parleurs de la télé sont actifs Le réglage qui permet de désactiver les hautparleurs de la télé devrait s’y trouver. Vous devriez entendre du son de la barre; sinon montez le volume à l’aide de ses touches de volume (– / +).
Technologie sans fil Bluetooth® Pour utiliser un dispositif sans fil à technologie Bluetooth avec la SurroundBar, vous devez d’abord apparier le dispositif et la SurroundBar. L’appariement permet au dispositif Bluetooth de se connecter sans fil à la SurroundBar et d’échanger des données. Vous n’aurez à apparier la SurroundBar à votre dispositif Bluetooth qu’une seule fois.
Comment programmer une télécommande pour contrôler votre SurroundBar Note sur la programmation SmartBarMC: Pour que la barre réponde à votre télécommande, VOUS DEVEZ D’ABORD la programmer pour qu’elle réponde à la télécommande IR (infrarouge) originale de votre télé. Les télécommandes RF (radiofréquences) ne sont pas compatibles. Les autres télécommandes IR (câble, satellite) ne fonctionneront que lorsque vous aurez programmé la barre pour qu’elle réponde à la télécommande IR de votre télé.
5 Tapotez le bouton «volume +» de la télécommande T de votre télé de 4 à 8 fois en autant de secondes. DEL La DEL LEARN clignote à chaque pression du bouton 6 DEL VOL Bouton «volume +» DEL clignote bleu Lorsque la DEL LEARN de même que la DEL du bouton sélectionné clignotent bleu, la commande a été programmée. DEL Del clignote bleu VOL Vérifiez si la commande fonctionne. V Répétez les étapes 1 à 6 pour programmer les touches de «volume -», source, Mute et interrupteur ( ).
Guide de dépannage La barre ne s’allume pas. tt Assurez-vous que le bloc d’alimentation est branché dans une prise de courant active. t Assurez-vous que tous les composants du bloc d’alimentation sont bien connectés. t Assurez-vous que le bloc d’alimentation est bien branché à l’entrée 24V de la barre. Pas de son de la barre. tt Assurez-vous qu’il y a un signal provenant de la télé ou du récepteur câble/sat. t Essayez une autre source audio si nécessaire.
Que faire si le câble optique fourni est trop court? quelques instants puis rallumez-la. Cela devrait rétablir la communication. t Le câble fourni devrait normalement être assez long, mais en certains cas il pourrait s’avérer trop court. Les magasins d’électronique pourront vous en fournir un plus long. Le son semble étrange et distortionné. tt Votre SurroundBar N1 requiert une source stéréo intégrale pour atteindre sa performance optimale.
Garantie limitée La garantie de Polk Audio, Inc., n’est valide que pour l’acheteur au détail original. La garantie sera automatiquement annulée avant sa date d’expiration spécifiée si l’acheteur original vend ou transfère le produit à tout autre parti. Polk Audio, Inc.