INSTRUCTION MANUAL DIGITAL SOLUTION HOME THEATER SYSTEM
A Word from Matthew Polk Table of Contents Dear Home Theater Buff, Safety Warnings ..........................................................................4 Digital Solution Features ............................................................5 Carton Contents ..........................................................................6 Quick Start Guide ........................................................................6 Rear Panel Guide ................................................................
ABOUT THE DIGITAL SOLUTION SYSTEM The Polk Performance Advantage The Digital Solution is the ultimate integrated home theater system. It compromises nothing in the pursuit of performance and ease-ofuse. And because it features Polk Audio loudspeakers, it boasts The Polk Performance Advantage over other “all-in-one” systems. To make the Digital Solution system a reality, we knew that we had to design not only the speaker system but also the preamp, surround processor and amplifiers as well.
“ ” NOTE TO CATV SYSTEM INSTALLER: This reminder is provided to call the CATV (Cable-TV) system installer’s attention to Article 820-40 of the NEC, that provides guidelines for proper grounding and, in particular, specified that the cable ground shall be connected to the grounding system of the building, as close to the point of cable entry as practical. NOTE: This equipment has been tested and found to comply with the limits for a Class B digital device, pursuant to Part 15 of the FCC Rules.
POLK DIGITAL SOLUTION FEATURES AND BENEFITS The Digital Solution system features the “Polk Performance Advantage.™” There are many all-in-one home theater systems from which to choose. Electronics manufacturers build most of them, and the speakers are afterthoughts to the electronics. Only the Polk Digital Solution systems have speakers designed by “The Speaker Specialists” and the speakers come first. Ask any audiophile, the speakers make the system.
GETTING STARTED Carton Contents Your new Polk Audio Digital Solution system comes in multiple cartons. If you do not have any of the pieces listed below, or if any component seems damaged, contact your Polk Audio retailer immediately.
Area A—Antenna Connections feature allows one component to “feed” the other the remote control signals. If you have such a need, use a single coaxial RCA-type cable (not supplied) to connect the Remote Control Extension Out jack of the Digital Solution preamp/processor to the Remote Control In jack of the DP-1 CD/DVD/MP3 player. This is where you hook up indoor or outdoor antennas for AM and FM radio reception.
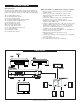
BASIC SYSTEM HOOK UP 8 Polk Customer Service (800) 377-7655
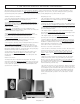
SPEAKER HOOK UP FRONT RIGHT AUDIO INPUT FROM PREAMP/PROCESSOR REAR RIGHT FRONT CENTER REAR LEFT FRONT LEFT TO REDUCE THE RISK OF FIRE OR ELECTRIC SHOCK, DO NOT EXPOSE THIS APPLIANCE TO RAIN OR MOISTURE. NO USER SERVICEABLE PARTS INSIDE. REFER SERVICING TO QUALIFIED SERVICE PERSONNEL. Note: Amplifier layout may be slightly different than that shown, depending on model of DS system. www.polkaudio.
HOOKING UP THE SYSTEM Connecting Radio Antennas Connection Precautions • Do not plug the preamp/processor or subwoofer into AC outlets until all other connections have been made. Connect the supplied FM wire antenna to the FM (75 Ohm) F-type connector. For better reception connect an indoor or outdoor FM antenna. • When connecting video sources, use either standard composite (good) or S-Video (better) cables throughout. Do not use both composite and S-Video connections.
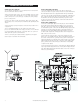
Connecting an Analog DSS (satellite TV) Receiver (see diagram on previous page) The first generation of DSS receivers (pre 1999) only have analog audio outputs and are not capable of delivering 5.1 channel digital surround sound. If your DSS receiver box only has Left and Right audio jacks and no jack marked “Digital Out” or “PCM Out,” use this hook up method.
Connecting a SACD or DVD-Audio Player If you have a multi-channel SACD or DVD-Audio player that also serves as a DVD-Video and CD player, we suggest you make all of the connections described here. Connect the six analog outputs from the multi-channel player to the corresponding analog 6 Channel Audio/DVD-Audio inputs on the Digital Solution preamp/ processor. Connect the digital audio (PCM/Bitstream) output of the player to the DVD DIGITAL AUDIO INPUTS of the DS preamp/processor.
Connecting the Speakers Connecting to AC Outlets We have supplied you with 5 sets of audiophile-grade speaker wire to connect your speakers. Each wire is color coded just to make it easy for you to see which wire is which at the amplifier side. There are three 20’ wires and two 40’ wires. In most set-ups the 20’ wires are the proper length for the front and center speakers but you can use any wire on any channel. Use whatever length makes sense for your set up and speaker placement.
SPEAKER PLACEMENT IMPORTANT NOTE: When this manual refers to “Front Left”, we mean the speaker on your left side as you face the front (TV) side of the room. When we refer to “Surround Left” we mean the speaker that is behind you and to your left as you face the front (TV) side of the room. For more detailed speaker placement information consult the manual in the speaker cartons or visit http://www.polkaudio.com/home/faqad/. Center Channel Speaker Place the center speaker as close to the TV as possible.
High Performance Accessories for your Digital Solution The days of plywood and cinderblock shelves and milk crate speaker stands are far behind you now. Your new Digital Solution System deserves the best in performance enhancing accessories. Your Polk Audio dealer has a full supply of high performance accessories like these for your home theater. Or, you can get the most from your home theater by ordering conveniently and securely through the Polk Audio Webstore. Just point your browser to http://polkaudio.
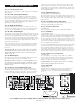
DIGITAL SOLUTION DIGITAL PREAMP / PROCESSOR DIGITAL SOLUTION DIGITAL PREAMP / PROCESSOR PREAMP/PROCESSOR FRONT PANEL GUIDED TOUR Power Switch and Standby Indicator When this switch is pressed once, the power turns ON and lights appear on the Main Display panel. When pressed again, the power turns OFF and the standby indicator light glows red. Make sure the Power switch on the back of the subwoofer enclosure is set to the “Standby” position.
IMPORTANT NOTE: The FM radio, AM radio, CD, and Tape audio inputs do not have corresponding video inputs. When you select any of these sources, you will see a blank screen on your TV (if your TV is on). WHAT THOSE TEENY LITTLE LIGHTS MEAN Test Tone Indicator Surround Button This button switches between the various surround sound modes and 2-channel stereo (except when the 6 Channel Audio input is used). TEST This light illuminates when the surround sound balance test tone is engaged.
REMOTE CONTROL OPERATION Loading Remote Control Batteries Remote Control Range The distance between the remote control transmitter and the preamp/processor should be 15 feet (5 meters) or less. If the transmitter is pointed to a direction other than the IR SENSOR or if there is an obstacle between them, the remote control may not work correctly. 1. Remove the back cover. 2. Insert two AA type batteries with correct (+) and (–) polarity. The batteries will last about 4 months with normal use.
REMOTE CONTROL GUIDED TOUR I—FM and AM Buttons Push the AM button to listen to AM band radio stations or push the FM button to listen to FM radio band radio stations. The remote control is divided into three major sections. The top section contains the most often used controls, such as POWER, MUTE, SUBWOOFER volume and system VOLUME controls. The middle section has the source buttons where you select the source component you want to hear and see.
9. Adjust the main volume control on the remote or front panel to a typical listening level. If you are using an SPL meter, set the volume to 70dB. SET-UP AND CALIBRATION After you have connected all speakers and source components you may start using the Digital Solution without any further set-up procedures and get excellent performance in most homes.
2. Measure the distance from your main listening position to the center speaker in feet (Fig.1) 3. Measure the distance from your main listening position to the front speakers in feet (Fig.1). 1. Play a Dolby Pro Logic source and press Surround until “Pro Logic” appears in the display window. Push the Delay button on the remote control, this menu will appear on your TV screen: 4. Subtract the center distance (B) from the front speaker distance (A). In the example in Figure 1 that would be 20 - 18 = 2 5.
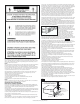
DIGITAL SOLUTION DIGITAL PREAMP / PROCESSOR Figure 2 HOW TO USE YOUR DIGITAL SOLUTION SYSTEM Listening to the Radio 1. Press the POWER switch (A) to turn on the power. 2. Press one of the SOURCE buttons (B) on the front panel or the AM or FM buttons on the remote (C) to select either the FM or AM band. 3. Press the TUNE UP and DOWN buttons (D) to tune in the desired station. Pressing once for less than a half-second changes the frequency by one half step.
Presetting Radio Station You can preset up to 50 FM/AM stations in any order. Stations can be preset either manually (by you) or automatically (by the tuner). Auto Presetting This function scans the frequencies in the selected band and automatically presets all stations that can be received. ▲ ▼ buttons on the front panel (B) to toggle through the sources until the display reads “DVD.” 3. Start the DVD player and select the audio track you wish to use.
ABOUT SURROUND SOUND The Polk Digital Solution system offers seven modes of operation: Stereo, 5 Channel Surround, Dolby Pro Logic, 2 channel Dolby Digital, Dolby Digital 5.1 surround, DTS 5.1 surround, and pass-through of 5.1 channel high definition formats such as multi-channel Super Audio CD (SACD) and DVD-Audio.
Operating from the Front Panel USING MULTI-ROOM FEATURE 1. Push the MULTI-ROOM button on the front panel of the preamp/processor 2. The red M U L T I indicator will blink and the words “SEL SOURCE” will appear on the display. The Multi Room feature allows you to listen to an audio source that is connected to the Digital Solution system in another room of the house. For example, you can watch a movie in the living room while your children listen to the CD player in the family room.
TROUBLESHOOTING If something doesn’t seem to work right, please use the chart below before calling your dealer or Polk Audio. You will actually save time in the long run if you have already eliminated some of the possible reasons for the problem. If this happens: Try this: Well then: No sound from any speaker with any source Make sure the volume isn’t turned down all the way. Try setting it to –20dB.
TROUBLESHOOTING If something doesn’t seem to work right, please use the chart below before calling your dealer or Polk Audio. You will actually save time in the long run if you have already eliminated some of the possible reasons for the problem. If this happens: Try this: Well then: The system will not go into Dolby Digital or DTS 5.1 surround sound with a DVD. Pro Logic appears in the display window. Make sure the DVD player is set up to deliver a 5.1 signal to the Digital Solution system.
Interference If this unit is placed very near a television, picture disturbance or noise may occur on the TV. In such a case, move the preamp/ processor as far as possible from the television. If the problem persists, re-route the TV antenna cable so that it is as far as possible from the power cable and audio and video connection cables of the Digital Solution system.
Digital Solution 7200 Specifications System Overall Frequency Response 28Hz – 23kHz -3dB Frequency Response Limits 32Hz – 20kHz Speaker Driver Complement Front & Surround Satellites Midrange 1 - 34" Diameter (8.3cm) Dynamic Balance, polymer composite with rubber surround, shielded Tweeter 1 - w" Diameter (1.91cm) Dynamic Balance, metalized fabric dome, shielded Center Midrange 2 - 34" Diameter (8.3cm) Dynamic Balance, polymer composite with rubber surround, shielded Tweeter 1 - w" Diameter (1.
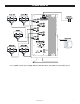
OVERALL HOOK UP
www.polkaudio.com 31 PARTS INSIDE. REFER SERVICING TO QUALIFIED SERVICE PERSONNEL. THIS APPLIANCE TO RAIN OR MOISTURE. NO USER SERVICEABLE TO REDUCE THE RISK OF FIRE OR ELECTRIC SHOCK, DO NOT EXPOSE REAR LEFT REAR RIGHT AUDIO INPUT FROM PREAMP/PROCESSOR Polk Customer Service (800) 377-7655 • www.polkaudio.
RM0856-1 5601 METRO DRIVE, BALTIMORE, MARYLAND 21215, USA, 410-764-5275, FAX: 410-764-5266 www.polkaudio.