Table of contents Quick Scanning Guide iii 1 Introduction System requirements Technical Support Registration card Unpacking 1-3 1-4 1-4 1-5 2 Setup and use The scanner and accessories Positioning the scanner SCSI guidelines SCSI ID numbers Installing a SCSI adapter in a PC Connecting the scanner to your computer Diagrams of various SCSI configurations Turning on the scanner Using the film carriers Inserting the carrier into the scanner Removing the carrier 2-1 2-3 2-3 2-5 2-6 2-6 2-8 2-9 2-10 2-14 2-1
Care and maintenance Maintenance Troubleshooting Limited One Year Equipment Warranty Service Polaroid Offices and Service Centers Radio and television interference 3-1 3-2 3-3 3-3 3-4 3-6 Appendix A: Specifications A-1 Index © Copyright 1996 Polaroid Corporation All rights reserved.
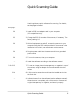
Quick Scanning Guide Use this guide as a quick reference for scanning. For details, see the pages indicated. See page: 2-6 1 Install a SCSI host adapter card in your computer (PC-compatibles only). 2-5 2 Change the SCSI ID number of the scanner, if necessary. The factory setting is 5. 2-6 3 With all equipment turned off, connect the scanner to your computer using the SCSI cable provided. If the scanner is the last device in the chain, use a terminator at the scanner.
1 Introduction The Polaroid SprintScan 45 multi-format film scanner allows you to capture and convert film images into electronic files that you can edit and incorporate into your documents and presentations. The scanner can be connected to a Macintosh computer, or an IBM-compatible computer with a SCSI host adapter installed (see page 2-6).
Scanning modes The digitized images can contain up to 4000 dpi (dots per inch) of image information. Color is achieved with a tri-color CCD in combination with a cold cathode fluorescent light source. Two modes are available: • 8-bit mode: Each dot can be represented by an 8-bit RGB code per color, resulting in 256 levels of gray, or 16.7 million colors. The original is scanned at 12-bits per channel, and the results are optimized to 8-bits per channel to produce a 24-bit RGB image.
System requirements Macintosh systems • A Macintosh Quadra or PowerPC computer. • System 7.1 or higher is required; System 7.5 is recommended. • 16MB of RAM is required; 32MB or more of RAM is recommended. • An 8-bit (or better) color monitor is required; a 24-bit color monitor is recommended. • At least 20MB of free hard disk space is required; a 2GB hard disk is recommended. • A removable storage device is recommended. PC systems • Microsoft Windows 3.1 (DOS 5.
Technical Support Hardware support If you need additional help with your Polaroid SprintScan 45 scanner, call us toll-free from within the continental United States at 1-800-432-5355, Monday through Friday, 8 a.m. to 8 p.m., Eastern Time. We offer a variety of Customer Support Services; call us for details and applicable fees. You may also write to Electronic Imaging Technical Support, Polaroid Corporation, 565 Technology Square 3B, Cambridge, MA 02139. In Canada, call toll free at 1-800-268-6970.
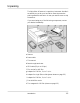
Unpacking The SprintScan 45 scanner is a precision instrument. Handle it as carefully as you do your hard drive. Save the protective packing materials and carton in case you need to move or ship the scanner. If you are missing any of the following components, contact your dealer immediately. a Scanner b Power cable c This manual d Pass-through terminator e SCSI cable (25-pin to 50-pin) f Film carrier for 4x5 film g Adapter for 120 film, 2 1/4 x 2 1/4 in.
2 Setup and use The scanner and accessories a Power/Ready indicator lights b Film carrier slot c Carrier access door 2-1
Rear panel a Air intake d Power connector b SCSI ID switch e SCSI connectors (25, 50) c Power switch Accessories a 4x5 carrier e Magnets for c and d b Four-slide film carrier f Single 35mm slide adapter c 2 1/4 x 2 1/4 in. film adapter g 35mm slide spacer d 2 1/4 x 2 3/4 in.
Positioning the scanner Place the scanner on a flat, stable surface, free of vibration. Leave at least 2 inches (50mm) of space around all sides and the top of the scanner for adequate ventilation, and leave room at the back to reach the power switch on the rear panel. Caution: As with any highly sensitive optical equipment, vibrations or bumping the scanner during use may result in picture defects. Locate the unit where it will not be disturbed during use.
The SprintScan 45 scanner is unterminated. If it is the last device in the chain, add a terminator. See the illustrations on pages 2-9–2-10. Powerbook note: According to Apple Computer, even though this computer has an internal hard disk, you should treat it as an unterminated device. This means that you must have two terminators on the SCSI chain. Apple also advises that if you have only one device connected to a Powerbook, you must have two terminators on this one device.
SCSI ID numbers WARNING: TO PREVENT DAMAGE TO YOUR HARDWARE AND SOFTWARE, READ THIS SECTION BEFORE TURNING ON YOUR SYSTEM. Each device on a SCSI chain must have a unique SCSI ID number from 0 to 6. The Apple Macintosh always uses SCSI ID number 7. The Macintosh internal hard drive usually uses SCSI ID number 0 or 1. The SprintScan 45 scanner is set at the factory to SCSI ID number 5.
Installing a SCSI adapter in a PC If you are using a PC-compatible computer, you must have a SCSI host adapter installed in your computer for connection to the scanner. We recommend an Adaptec SCSI host adapter. Before connection, be sure the settings are correct; check the documentation for your adapter. The SprintScan 45 scanner is compatible with most Windows ASPI-supported adapters (such as Adaptec).
The second port (25-pin) can be used to connect another SCSI device to the chain, using another SCSI cable. 3 Terminate the signal at the last device in the chain. If the scanner is the last device, connect the terminator provided to the 50-pin port. Then connect the SCSI cable to the terminator (picture 3). Be certain to use only SCSI-specified cables for all connections in the chain. For details, see pages 2-8–2-9.
Diagrams of various SCSI configurations The following diagrams illustrate different configurations. Find the appropriate configuration for your hardware, and follow the connection diagram and instructions. Note: The shorter the SCSI chain, the better it will work. Use SCSI cables that are only as long as necessary. The chain may not exceed 19 1/2 ft. (6m) total. Scanner is the only SCSI device The hard disk of the computer is internally terminated.
Scanner and another unterminated device Place the scanner at the end of the chain and use the terminator provided. Do not add any additional terminators. If one external device has an internal terminator, see the previous example. Use only approved SCSI cables. Turning on the scanner 1 With the scanner off, plug the power cord provided into the scanner (picture 4), and then into an appropriate grounded outlet. The scanner can operate over a voltage range from 100 to 240 VAC.
Using the film carriers The four-slide film carrier 1 With the text facing up and the hinge at the top, open the carrier flat as shown (picture 5). 2 Place up to four mounted 35mm slides in the spaces provided. Be sure the slide mounts fit properly in the recessed areas. The images should be right-side up and right-reading as you do so (picture 6). The emulsion side will face down. 3 Close the carrier carefully.
2 Open the carrier flat. Insert a 4x5 chrome or negative so that the left edge is against the positioning pins (picture 8). Position the film so the image is right-reading and right-side up (emulsion-side down). Note: The emulsion side is the dull side. 3 Close the carrier. Squeeze the carrier at the bottom edge and turn the knob to lock it.
The 120 film adapters (for 2 1/4 x 2 1/4 and 2 1/4 x 2 3/4 in. film) 1 Open the 4x5 carrier as described previously. 2 Locate the appropriate adapter for your image. One is designed for 2 1/4 x 2 3/4 in. images, and one is for 2 1/4 x 2 1/4 in. square images. Note: The frame of film must be cut from the film strip in order to be scanned. 3 Orient the adapter so that the words THIS SIDE UP (on the adapter) face up, and the notches are at the left edge (picture 9).
The single-35mm carrier 1 Open the 4x5 carrier as described previously. 2 Locate the single-35mm adapter. Note: You can use a negative, or a mounted or unmounted slide. 3 Orient the adapter so the metal tabs face up, and the notches are at the left edge. Slide the film into the channel, under the two metal tabs. Position the film so the image is right-reading and right-side up (picture 13). 4 If the film is unmounted or the mount is thin, use the slide spacer provided.
Inserting the carrier into the scanner 1 Open the carrier access door (picture 17). 2 Insert the carrier gently and firmly into the carrier slot as shown, until you feel it stop (picture 18). 17 18 3 Close the carrier access door. The scanner will not scan if the door is open. Note: Do not open the carrier access door while a scan is in process; the scan will be interrupted. The scan will resume when the door is closed, but the quality of the scan may be reduced.
3 Care and maintenance Maintenance Keep the carrier access door closed when the scanner is not in use, to protect it from dust. Cleaning the cabinet Clean with a mild detergent solution. Keep the sponge or cloth barely moist. Do not let moisture inside the scanner. Lamp and fuse replacement The lamp and fuse inside the Sprintscan 45 scanner are not user-serviceable.
Troubleshooting When the scanner is powered up, the POWER indicator should come on and the READY indicator should flash. A few seconds later, after the scanner's self-test is completed, the READY indicator should shine steadily. The scanning lamp will come on and should stay on all the time. Problems can usually be detected when the power is first turned on. This section covers the most common problems and their solutions. The POWER indicator fails to light up Turn the power switch off.
Limited One Year Equipment Warranty Polaroid Corporation warrants your Sprintscan 45 scanner equipment against defects in manufacture for a period of one year from the date of purchase. To verify the warranty period, you should keep the sales slip or other proof of the purchase date.
Polaroid Offices and Service Centers Massachusetts Polaroid Corporation Tel.: Toll free 1-800-432-5355 Australia Polaroid Australia Pty Ltd 13–15 Lyonpark Road PO Box 163 North Ryde, NSW 2113 Tel.: (02) 950 7000 Fax: (02) 887 2209 Belgique/België Polaroid (Belgium) S.A.-N.V. rue Colonel Bourg 111 Kolonel Bourgstraat 111 1140 Bruxelles-1140 Brussel Tel.: +32 2 726 97 00 Fax: +32 2 726 92 99 Toll free line: 32 2 78 155 905 Brasil Polaroid do Brasil Ltda. Av.
Japan Nippon Polaroid Kabushiki Kaisha Mori Building, No. 30 2-2 Toranomon 3-chome Minato-ku Tokyo (105) Tel.: 81-3-3438-8811 Toll free: 0120-248716 México Polaroid de México S.A. de C.V. Paseo de la Reforma 195-Piso 14 C.P. 06500 México, D.F. Tel.: 703-1111 Fax: 566-0505 Del interior al 91 (800) 70-727 Ventas 91 (800) 70-747 Nederland Polaroid Nederland B.V. Zonnebaan 45 3606 CH Maarssen PO Box 1219 3600 BE Maarssen Tel.: 31-30-410-420 Fax: 31-30-411-969 Reparaties: Polaroid (Europa) B.V.
Radio and television interference FCC Notice (U.S.A.) Note: This equipment (Model: CS-4500) has been tested and found to comply with the limits for a Class B digital device, pursuant to Part 15 of the FCC Rules. These limits are designed to provide reasonable protection against harmful interference in a residential installation.
Appendix A: Specifications Media capability 35mm to 4x5 in. format, positive and nagative, mounted and unmounted transparencies Maximum scan time 26ms/RGB line Actual resolution Minimum: 72 dpi; Maximum: 2000 x 4000 dpi Density range 0.0 – 3.
Power 40W Accessories Film holders: 4 x 5 in. (10.2 x 12.7cm) 2.4 x 2.8 in. (6x7cm) 2.4 x 2.8 in. (6 x 6cm) 35mm four-at-once 35mm single mount Dimensions (LxWxH) 21 x 13 x 7 in. (53.3 x 33 x 17.8cm) Weight 22 lb.
Index A Accessories, 2-2 Acoustic noise, A-2 Adaptec SCSI host adapter, 2-6 E 8-bit gray mode, 1-1 F Fan, 2-2 Adapter for 35mm slide, 1-5, 2-2, 2-13 FCC notice, 3-6 Adapters for 120 film, 1-5, 2-2, 2-12 Film carrier slot, 2-1 Adobe Photoshop, 1-1 Film carriers, 1-5, 2-2, B Brightness, 1-1, A-1 for 4x5 film, 1-5, 2-2, 2-10-2-11 four-slide film carrier, 1-5, 2-2, 2-10 Film formats, 1-1 C Carrier access door, 2-1, 2-14 Carrier, see also Film carriers insertion, 2-14 removal, 2-14 4x5 film, 2-11 4x5
P Pass-through terminator, 1-5, 2-7 SCSI adapter for a PC, 2-6 PC system requirements, 1-3 cable, 1-5, 2-6, 2-8-2-9 Plug-in module, 1-1 chains, 2-3 Polaroid Offices and Service Centers, 3-4–3-5 configuration diagrams, 2-8-2-9 Positioning the scanner, 2-3 guidelines, 2-3-2-4 Power connectors, 2-2, 2-4, 2-6 host adapter for the PC, 2-6 cable, 1-5 SCSI ID number, 2-4, 2-5 connector, 2-2 SCSI ID switch, 2-2 consumption, A-2 Self-test, 2-9 indicator light, 2-9, 3-2 Service, 3-3, 3-4–3-5 switc