About this user manual: Thank you for your purchase and use of the SMTP01 SocialMatic Android Camera system! Please read this user guide carefully before using the product and keep it handy for future reference! As our company is committed to a continual improvement process, some features and functionality may change from that which is presented here without prior notice. This includes both hardware and software product specifications.
1 2 3 Summary .................................................................... 3 1.1 Purpose ............................................................ 3 1.2 Model Number ................................................ 3 1.3 Unit Operation & Storage Conditions ............. 3 1.4 Technical Characteristics ................................. 3 Technical Parameters ................................................. 4 2.1 Hardware Specifications ..................................
.16 Photo Capture Button .................................. 15 3.17 Calculator .................................................... 15 3.18 Recording .................................................... 15 3.19 EMAIL ........................................................ 16 3.20 File browser ................................................. 17 3.21 Gallery ......................................................... 18 3.22 Screen Capture............................................. 19 3.23 Wi-Fi...........
1 Summary 1.1 Purpose The SMTP01 Android Camera system utilizes the latest ARM A9 processor, integrated ZINK imaging technology and the latest Android 4.4.2 operating system to provide real time instant digital printing and/or social media sharing of images captured by the camera. The device’s GPS functionality allows the user to “tag” the location where image capture occurred. 1.2 Model Number SMTP01 1.
2 2.1 Technical Parameters Hardware Specifications Parts Parameter Support Platform CPU Graphics Dual-core ARM CORTEX-A9 (1.5GHz) MALI 400 Y Y Screen 4.5”, 480×854, 160K Y Touch Panel Memory/ RAM Memory/ ROM Storage Network Capacitive Touch Screen Y 1GB Y 4GB Y Micro SD Y Wi-Fi 802.11b/g/n Y Blue tooth Internal GPS Interface USB Battery Charging Storage Interface Camera Host Camera Front Camera Battery V2.0 Y Capacity Sensor Acceleration Sensor Micro-USB2.
3 Function Specification 3.
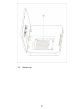
13) 14) 15) 16) Rear Camera Media tray door open switch Printed image exit slot Primary LCD 6
17) Media tray 7
3.2 Power Button Use Turn On: Press and hold for 2 seconds. Turn Off: Press and hold for 2 seconds tap Power off tap OK Reboot: Press and hold for 2 seconds tap restart tap OK Airplane mode: Press and hold for 2 seconds tap Airplane mode Sound mode: Press and hold for 2 seconds then select Sound , Vibrate or Silent 3.
3.6 Getting Started Charge the device ☆ It is not recommended to use the device while charging Plug the power adapter into an electrical wall outlet, and then connect to the device to fully charge the battery before use (A full charge takes about 3 hours) Turn the Device on Press & hold the power button for 2 seconds Wi-Fi Network Setup Since many features require a Wi-Fi connection, it is recommended that you set up the Wi-Fi network before first use. 1. 2. 3. 4. Tap → Settings.
3.7 Desktop ☆ Tap on any application icon to launch it. ☆ Touch, hold and then slide icons to reposition then on the screen. ☆ Touch, hold and slide icons onto “ Remove” to remove them from the Desktop screen. 3.8 Screen Lock Device can be set to have the screen locked automatically or manually by quickly pressing the power button. The system provides four lock screen styles for users. Enter Settings → Security → Lock Screen to switch. The default screen lock mode is slide. 3.
Recorder Recording and playback of audio Email Send/Receive email using your existing email addresses File Browser File manager application for viewing and managing files and apps.
3.10 Status and Notifications On the Desktop screen, lapse top left corner display notification area, lapse top right corner display status area. 3.11 Application Management Install Android Applications ☆ Many interesting and free Android applications can be found on the web Purchased or free Android applications that you have downloaded to your computer may be installed quickly & easily on your SMTP01 using the File Browser or task manager application. 1. Copy the .
3.12 Clock Tap the Alarm Clock application icon. Time / date, Alarm, Countdown and Stopwatch are displayed You can use your device as an alarm clock and to set multiple alarms. Add Alarm 1. Tap to set alarm → Press to add an alarm. 2. Set up your alarm as desired. 3. Tap OK. 4. Toggle on/off switch to enable. Shut Off Alarm Alert When a scheduled alarm is activated, a pop-up window with the alarm title appears. Drop to cancel the alert. Drop to to snooze for 10 minutes. Turn Alarm on 1.
3.13 Internet Browser Users can connect to the Internet through browser. Click the browser icon on the Desktop to open the Web browser. 3.14 Calendar Tap the Calendar application icon. For the first use of the Calendar, you will need to add an Exchange account. Enter account email address and password. Enter the system Settings → Account & sync →Add account, then follow prompts Add Event 1. On the Calendar screen, tap on the date to which you want to add an event. 2. 3. 4.
6. Tap to exit the Camera and back to the Desktop Take Videos 1. Tap switch to video, and you can take videos. 2. 3. 4. 5. Tap to begin and tap to stop. Videos are saved to the gallery. Slide the screen from right to left to enter the preview list. Press Back to the Camera. 6. Tap to exit the Camera and back to the Desktop. ☆During video recording,you can click the frame quickly to take pictures.
Settings Tap the recorder icon. Click Settings 1. Select the recording quality. 2. Select the recording time. 3. The default recording file name. 4. Select the default storage devices. 5. About. 3.19 EMAIL ☆ POP3, SMTP and Exchange accounts are supported Add Email accounts You can enter one or more personal email addresses that you would like to access through your SMTP01 1. 2. 3. 4. 5. 6. 7. 8. ☆ Tap the Email application icon.
Compose New Email Message 1. 2. On the Inbox screen, tap . Enter the e-mail address in the recipient field. If you want to add Cc or Bcc recipients, tap 3. 4. , and then enter the recipient email address. Tap in the Subject entry field to enter your desired subject title. Tap in the Compose email area to enter your personal message. 5. If desired, tap 6. When ready to send the email, tap to attach a file. Edit Email Accounts 1. Tap the 2. 3. On the Inbox screen, tap → settings.
Copy Media between Computer and SMTP01 You can use the File Browser to copy files between an external storage device and your computer. You can first copy the desired files onto a SD card or USB device ☆ ☆ 1. 2. The internal device storage is titled “Local”, a memory card “SD”, and a USB storage device is titled “USB”. The instructions below are for copying from a SD card or USB storage device into the device.
Delete Photos and Videos on the device On the top right of the screen, Tap icon →Tap select album or Select item. Select the album image thumbnails or video preview which you want to delete, tap →OK. If you want to delete a single picture (or video), enter the folder, select the picture (or video), tap , or delete it in the image thumbnails (or video preview) , tap → Delete.
Function Sound Display Volume Default Sound Touch Sound Screen Lock Sound Volume Icon Brightness Wallpaper Sleep Screen Saver The font size Wireless display Auto-Rotate Storage Battery Application Location Security Allow Access GPS Positioning Wi-Fi location info Screen lock Owner Info Password setting Display Password Device Manager Unknown Source Personal Verified Apps Trusted credential Install From SD Remove credential Language Language and Input Method Set auto-rotation of screen On / Off Sele
Account Add account Date & Time Auto Date & Time Auto Time Zone Set Date Set Time Set Time Zone Set Time Format Set Date Format system Other Functions Developer Options Use the network time Automatically determine the time zone Set date Set time Set time zone Set time format to 24H or 12H Set Date format Talkback, Zoom gestures, large fonts, say the password, auxiliary function shortcut, touch and hold the delay, enhance web auxiliary functions.
a) Click -> enter the camera mode. b) Click to start editing after taking photo. c) Click to insert emote 2. Photo Printing: a) After photo had being edited, click to enter printing mode. b) Click the “OK” button to print the photo in the pop-up preview window. c) Click cancel to terminate printing 3. Photo Sharing: a) After editing photo, click to enter the sharing screen. b) Click “next” to upload the photo to “SocialMatic.
Frequently asked questions: Android Q: What Android OS version is on my Device? A: 4.4.2 Basic Device Functionary Q: Do I have to charge the battery before use? A: You should charge the battery for at least 2 hours in the off status, the device may be used while charging, but this charging method is not recommended. Email Q: Can I use any of my personal email addresses to send/receive email? A: The device supports POP3 and SMTP accounts. Some free email accounts are not supported on mobile devices.
6) The rechargeable battery is designed and manufactured to be used and recharged frequently. As with all batteries, the capacity of the battery declines each time it is charged/depleted.
result in damage to the power lines or cables, and cause personal injury or damage to the product. FCC Statement This equipment has been tested and found to comply with the limits for a Class B digital device, pursuant to part 15 of the FCC rules. These limits are designed to provide reasonable protection against harmful interference in a residential installation.