
User manual


15
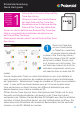
Peraumentareledimensionidellostencilésufficienteselezionareilpulsante
diingrandimentofinoaraggiungereledimensionidesiderate.Seleziona
poiilpulsante“Lock”perbloccareladimensioneeposizionescelta
dellostencil.Lagrigliasopral’immaginetiaiuteráadisegnareunaallavolta,
lasezionedelmodelloscelto.
Paraaumentareltamañodelaplantilla,simplementepulsehastaque
alcanceeltamañodeseado.Seleccioneelbotón“Bloquear”paraasegurar
suplantillaensulugareneltamañoylaposicióndeseados.Lacuadrícula
sobrelaimagenleayudaráadibujarsumodelounasecciónalavez.
Omdegroottevandestencilverhogenklikopdevergroottoetsgewoon
totdatudegewenstegrootteheeftbereikt.Selecteerdeknop“Lock”
omuwstencilopdejuistegrootteentepositioneren.Hetrasterop
deafbeeldingzaluhelpenomuwmodelperonderdeeltemaken.
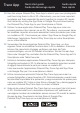
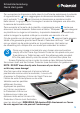
Onceyourimageislockedintoyourchosensizeandposition
simplyaffixtheTraceAppScreenProtectorintoplaceontoyour
SmartphoneorTabletscreenwiththeadhesivepadsprovided.
Affixthepadsdirectlyontothescreenfirstandthenplacethe
ScreenProtectorontopinordertocreateacleardistancebetween
thescreenitselfandtheScreenProtector(seeillustrationforguidance).
NOTE: DO NOT
draw directly onto the screen of your device
as this may cause damage!
Unefoisquevotreimageestàlabonnetailleet
positionnéecommevouslasouhaitez,ilvoussuffit
d’apposerleProtecteurd’écrandel’appliTracesur
l’écrandevotreSmartphoneoudevotre
tabletteaveclespastilles
adhésivesfournies.
Appliquezlespastilles
surl’écran,puisplacez
leProtecteurd’écransur
ledessuspourcréerune
distancenetteentrel’écranetle
Protecteurd’écran(voirillustration
pourlesdirectives).
REMARQUE: NE dessinez PAS directement sur l’écran
de votre appareil car cela pourrait l’endommager!
3
Schnellstartanleitung
Quick start guide