8” Portable DVD Player PDV-0823A Operation Manual 20040928 -1-
Contents Important Safety Instructions---------------------------------------------------------------------- 3 Precautions with Moisture-------------------------------------------------------------------------- 4 Function Features -------------------------------------------------------------------------------------- 5 Screen and main unit--------------------------------------------------------------------------------- 6 Remote Control--------------------------------------------------------------------------
Important Safety Instructions The lighting flash with arrowhead symbol, alerts the user to “dangerous voltage” which could cause electric shock. The exclamation point indicates to the user to read important operating and maintenance instructions in the manual. 1. 2. 3. 4. 5. 6. 7. 8. 9. Read and heed all these instructions and warnings, keep the manual book for future use. Do not operate the product near water or expose it into rain or moisture.
Precautions with Moisture Under the following circumstances, moisture may appear on the lens of the product, which is the most sensitive part of the DVD player: • The DVD player is suddenly moved from a cold place to a warm place. • A room is heated while the DVD player starts operating, or the DVD is placed by an air-conditioner. • In the hot summer season, the DVD player is moved from an air-conditioned room to a hot, damp place to be used. • The DVD player is being operated in a damp place.
Function Features 1. EXCELLENT SOUND 8. ON-SCREEN DISPLAY Dolby Digital output for great sound. On-screen displays in your choice of 2. HIGH RESOLUTION English/Spanish/French. MPEG2 decoding format achieves more than 9. AUDIO OUT 500 lines of horizontal resolution. Audio output terminal for connection to 3. SPECIAL FUNCTIONS audio amplifiers. Supports multi-angle, excessive language 10. EARPHONE OUTPUT caption. Lets you listen to movies or music without 4. COMPATIBILITY disturbing others.
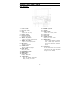
Screen and main panel Unit drawing 15. BRIGHT up/down 16. Speaker 17. Rotate button Rotates the screen picture 18. LCD screen 19. Latch hook 20. COLOR up/down Adjusts the screen colors 21. MODE button Press to toggle between 3 display sizes: normal (4:3), widescreen (16:9), and widescreen stretched (16:9). 22. LCD Screen 1. Power switch 2. Disc tray cover 3. Open Opens the disc tray 4. Remote sensor 5. Direction buttons Selects menu items 6. Prev skip button Skips to previous chapter/track. 7.
Screen and main panel Right side 1. Earphone volume adjusting knob Used to adjust the earphone and speaker volume. 2. Earphone jack 3. Audio output/input jack 4. Video output/input jack 5. Switch position between AV ‘IN’ and AV ‘OUT’ HI-FI earphone output (turn down the speaker volume when connecting) IN means the player is in audio and video input mode. OUT means the player is in normal playback mode. 6. Direct current 12V input jack Left side 1.
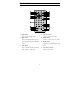
Remote Control 1. PWR button 4. Direction buttons Press to select menu items. Press to enter standby mode. 2. 5. INFO button ENTER button Press to confirm items or setting. Press for detailed information on disc. Press again to remove information from 3. 6. SETUP button screen. Press to access the DVD player’s setup TITLE button menu. Press to display CD titles (if present) 7. 0-9 number buttons Selects track numbers Press again for random play .
Remote Control 8. 9. PREV SKIP button 17. STOP button Press to enter beginning of current track. Press once to stop playback Press again for previous track. Press PLAY button to resume Press STOP twice to stop playback NEXT SKIP button Press to go to next chapter. completely. 10. SUBT button (DVD use) 18. PLAY button Press to select a subtitle language Press to begin playback. or to turn subtitles off. 19. GOTO button 11.
Connections Connecting to a TV Audio/video connections Always ensure that the DVD player, TV and any other electrical equipment that you are connecting to the DVD player is turned off and unplugged from the power supply. The easiest way to connect the DVD player to a television is via the supplied Audio/Video connections. Connect the audio/video cable from the DVD player to the TV’s audio/video inputs.
Playback Preparations Using the Remote Control 1. Refer to the drawing, take the back cover off of the remote control and remove the empty battery receptacle. 2. Prior to shipping, a separating film was applied to the battery. Remove this film. 3. Insert the battery into the receptacle and insert the receptacle into the remote. 4. For best results, aim the remote directly at the player’s receiving window. Stay within 15 feet and angles of 60 degrees or less. 5.
Playback Preparations Disc Formats Supported by this Player DISC LOGO DIAMETER 12cm DVD 8cm PLAYBACK TIME/ PLAYABLE SIDES 133 min (SS-SL) 242 min (SS-DL) 266 min (DS-SL) 484 min (DS-DL) 41 min (SS-SL) 75 min (SS-DL) 82 min (DS-SL) 150 min (DS-DL) 12cm 74 min 8cm 20 min 12cm 600 min CD MP3 The operating method of some DVD discs is specified by the software maker. Please refer to the instruction manual of the disc.
Playback Preparations Using the Power Adapter The DVD player is powered via the switching power adapter or the battery pack (both are included). Directions for connections are found below: 1. Connect the AC adapter to the DVD player in the slot marked “Power In”. 2. Connect the rabbit joint end of the AC adapter to the power cord. 3. Plug the two-prong end of the power cord to a grounded electrical socket. 4.
Power Supply Using and Charging the Battery Pack Charge the Battery Pack before using it the first time. Charging time is normally about 4 hours. Do not charge the Battery Pack more than 8 hours as it could reduce service life. Normally, the Battery Pack can be charged approximately 300 times. When fully charged, the Battery Pack delivers 2.5 hours of continuous power. Battery Pack should be fully charged before initial use! 1.
Power Supply Detaching the Battery Pack Detaching the Battery Pack from the unit: If the player is not going to be used for a long period of time, we recommend that you detach the Battery Pack. Even if the unit is powered down, the unit is still consuming some power in STANDBY mode. This could lead to over discharging the battery. Make sure the power is turned off before detaching the Battery Pack. After detaching the battery pack, take care when handling the unit. 1. Slide and hold in position.
Power Supply About Rechargeable Battery Your portable DVD player comes with a lithium ion rechargeable battery that attaches to the bottom of the player. Rechargeable battery properties: 7.4 Volts, with a capacity of 4200mAh, interior lithiumionic electric circuit protection for recharge and discharge. • If the battery is not used it will automatically discharge gradually within one month. • If the battery loses power during play, stop playing the DVD, otherwise damage may occur.
Play DVD Please read these instructions carefully before using your DVD player for the first time. 1. Turn on the player’s power by switching the POWER switch on the side of the player to “ON”. 2. Press OPEN button on front panel to open the disc cover. 3. Remove the protective lens cover. 4. Load disc with the label facing up to prevent damage to the player or disc. 5. Close the disc cover. The player will automatically search for the disc and when it finds it, play will begin.
Playing a DVD Stop During playback, press the STOP button on the remote control to stop playing. Press the PLAY button, then the player will play from the point where it stopped. Mode During playback, press the MODE button on the control panel to change the aspect ratio on the screen. Title Menu 1. Press the TITLE button on the remote control during payback. The title menu will appear on the TFT screen. 2.
System Setup General Set-Up Change the default settings to your own preferences. 1. Remove the disc from the DVD drive and press the ‘SETUP’ button on the remote control, the settings menu will appear. It includes General Setup, Speaker Setup, Dolby Digital Setup, Video Setup and Preference setup. 2. Press (direction buttons) on the remote control to select a category. 3. All the items in the category will appear on the TV screen. Press the ‘ENTER’ button to confirm your selection. Category 1.
System Setup SPDIF Output This item is used to set the format of digital audio. ‘SPDIF OFF’ turns off the digital audio; ‘SPDIF/RAW’ outputs the original. For example, if the disc being played is Dolby Digital, then the digital audio output is also Dolby Digital. Select ‘SPDIF/PCM’ when you connect with a 2 channel digital stereo amplifier. Captions You can choose captions on or off on screen during playback.
System Setup Preferences TV Type Most countries around the world use one of the following TV broadcast standards: NTSC, PAL and SECAM. NTSC is used in North America and many Asian countries including Japan. PAL is used in nearly every other country. France uses SECAM. Set your DVD player accordingly, or to be safe, set it on multi. Audio, Subtitle, Disc Menu These settings allow you to listen or read subtitles of a DVD in your choice of English, Spanish or French.
Playback Functions Fast Forward & Rewind Press the and buttons to active fast forward or rewind. Slow Forward & Rewind Press the SLOW button to slow forward or rewind. Repeat Repeat a title, chapter or track. Press the REP button on the remote control. Continually pressing the REPEAT button will display a menu as follows: Chapter, Title and All. You can temporarily mark your own section of a DVD that you would like to play repeatedly.
Playback Functions Search by time You can use the GOTO button to search by time, namely to play from a specific time. During DVD playback, press the GOTO button once and TV screen will display the title or chapter, then you can use number buttons to select any one of them. Press the GOTO button twice, then you can use number buttons to input the time you desired (hour, minute, second), and the player will play from the inputted time. NOTE: This function is only available for DVD discs.
Playback Functions Playing a JPEG JPEG is a common picture format that has few bytes and low loss rate of picture. Hundreds of pictures can be stored in a disc in this format. In order to realize real digital album, use film to make ”PICTURE CD”, namely JPEG format. OPERATION Normal Playback Load a JPEG disc in. After reading the disc, OSD will display the menu (the left side is the main menu and the right side is its submenu). Use the direction buttons and ENTER button to choose items.
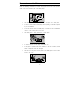
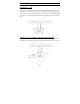
Special Features of the Revolving LCD Screen The revolving LCD screen is one of the outstanding features about this product. You are suggested to take the following steps for proper operation. 1. Open the screen cover to position (A) as shown in left figure at which the screen is vertical to the operation panel. Pos A 2. Revolving the screen horizontally about its axis in the clockwise only. The maximum revolving degree is 180 (position C) at which you will hear a click and the screen faces backward.
Connecting to a Gaming System What you’ll need: ● Two pigtailed RCA audio cables (the ones with the red and white ends) ● Two RCA video cables (the one with the yellow end) ● Three RCA couplers (not included) NOTE: One set of audio and video cables are included with your portable DVD player. Check to see if your game system also includes a set of audio and video cables. 1.
Carrying Case Your Portable DVD Player includes a sturdy carrying bag/headrest mount for the ultimate in portable convenience! The bag/mount is easy to attach and fits on nearly any car or truck headrest (see photo above).
Care of Discs How to hold discs When loading or removing discs, try not to touch their playing surfaces. Cleaning Care Use a soft, dry cloth for cleaning. For stubborn dirt, soak the cloth in a detergent solution; ring well first and wipe. Use a dry cloth to wipe it dry. Do not use any volatile agents such as benzine or paint thinner, as they may damage the surface of the player.
Troubleshooting Symptom What To Check ● ● ● ● The player cannot play. ● ● ● ● There is no sound. ● ● ● There is no picture. Poor AV performance. Cannot continue to play and play a section repeatedly. Make Make Make If the sure sure sure disc system connection is correct. the speakers are turned on. the sound setup of DVD disc is correct. is dirty or warped? Clean or replace disc. ● Make TV is turned on and in correct video mode. Make sure your system connection is correct.
Specifications TFT screen size 8 inches Laser Wavelength Wavelength: 780/650nm Video System NTSC Frequency Response 20Hz~20KHz ±2.5dB Audio Signal-to-noise Rate ≥ 85Db Audio distortion + noise ≤ -70dB (1KHz) Channel Separation ≥ 70dB (1KHz) Dynamic Range ≥ 80dB (1KHz) 0.2 Analog Audio Out Out Level: 2V±1.0 , Load: 10Kς Digital Audio Out Out Level: 0.5VP-P, Load: 75ς Audio Out Video Out Out Level:1VP-P±0.
For service, support and warranty information, visit www.polaroidelectronics.com or in the US call 1-866-289-5168, in Canada call 1-866-301-7922 and in Mexico call 01-800-400-2443. “Polaroid” is a registered trademark of Polaroid Corporation of Waltham, MA USA and licensed for use on the PDV-0823A to Petters Consumer Brands, LLC.