PDC 1100 Quickstart Card side 2 Camera features Shutter button Hand grip Status panel display Flash Pixel resolution/color setting Flash setting Optical viewfinder • Color: low to super • Black & white: low to super • Autoflash • Fill flash on • Flash off • Red eye reduction Lens Tripod socket Number of images remaining Lens setting 36 - Low resolution 16 - Medium resolution 12 - High resolution 6 - Super resolution • Auto focus • Macro • Infinity • Fixed focus: 3, 7, 16 ft LCD display Optic
1100user.book Page i Friday, December 3, 1999 9:29 AM Contents Introduction. . . . . . . . . . . . . . . . . . . . . . . . . . . . . . . . . . . . . . 1 The Polaroid PhotoMAX PDC 1100 Digital Camera Creative Kit . . . . . . . . . . . . . . . . . . . . . . . . .2 Camera Features . . . . . . . . . . . . . . . . . . . . . . . . . . . . . . . . . .3 Front view . . . . . . . . . . . . . . . . . . . . . . . . . . . . . . . . . . . .3 Back view . . . . . . . . . . . . . . . . . . . . . . . . . . . . . . . . . . .
1100user.book Page 1 Friday, December 3, 1999 9:29 AM Introduction Thank you for purchasing the Polaroid PhotoMAX PDC 1100 Digital Camera Creative Kit. This kit contains everything you need to enter the world of digital imaging.
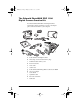
1100user.book Page 2 Friday, December 3, 1999 9:29 AM The Polaroid PhotoMAX PDC 1100 Digital Camera Creative Kit Your Polaroid PhotoMAX PDC 1100 Digital Camera Creative Kit contains everything you need to take digital photos and transfer them to your computer.
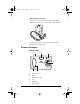
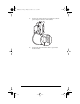
1100user.book Page 3 Friday, December 3, 1999 9:29 AM Attaching the wrist strap Attach the wrist strap to the camera by sliding the strap through the opening on the bottom of the camera as shown. The wrist strap includes a clip to use when removing the memory card from the camera.
1100user.
1100user.book Page 5 Friday, December 3, 1999 9:29 AM Power Supply You can operate the Polaroid PDC 1100 Digital Camera on battery power or with the AC adapter. To conserve battery life, the camera shuts itself off after 4 minutes of inactivity and the LCD display shuts off after 30 seconds of inactivity. To turn on the camera power, slide the power switch (back of camera) to the off and then to the on position. The camera displays a low battery icon on the LCD menu when battery power is weak.
1100user.book Page 6 Friday, December 3, 1999 9:29 AM 3 Insert four AA-size batteries into the compartment. Make sure the + and – terminals are oriented correctly as shown inside the battery compartment. Note: Do not mix old batteries with new batteries, or different types of batteries together. 4 Close and lock the battery compartment cover. To connect the AC adapter Here are some important notes for using the AC adapter with your camera: • Only use the AC adapter that came with your camera.
1100user.book Page 7 Friday, December 3, 1999 9:29 AM 1 Connect one end of the AC power adapter to the AC power adapter connector on the camera. 2 Connect the other end of the cable to a grounded electrical outlet.
1100user.book Page 8 Friday, December 3, 1999 9:29 AM Using the Memory Card The images you take with your PDC 1100 camera are stored on a removable CompactFlash memory card. A 4 MB memory card is provided with the camera. Memory cards with capacities of 2 MB to 96 MB are also available. You must insert the memory card before you can use the camera. If the memory card is not installed, the Status panel displays a flashing CF symbol and a zero representing the number of available photos.
00user.book Page 9 Friday, December 3, 1999 9:29 AM 3 Insert the memory card into the slot (with the label side of the card facing the rear of the camera). Make sure the card is pushed firmly into the slot. 4 Close the memory compartment cover. 5 In the event that the memory card becomes corrupted and unusable, it must be reformatted (see “Delete photos from your memory card” on page 22 for information). To remove the memory card 1 Turn off the camera.
1100user.book Page 10 Friday, December 3, 1999 9:29 AM 3 Use the clip on the wrist strap to pull out the memory card. 4 Close the memory compartment cover. Using the Camera You must insert the memory card before you can turn on the camera (see “Using the Memory Card” on page 8). To turn on the camera power 1 Slide up the power switch on the rear of the camera (a). a b The Status panel displays information about the camera (b).
1100user.
1100user.book Page 12 Friday, December 3, 1999 9:29 AM To set the date and time The camera records a date and time with each photo. To set the date and time: 1 Turn on the camera. 2 Press the Menu Dial. The REC (Record) menu is displayed. 3 Turn the Menu Dial to scroll to the MENU icon. 4 Press the Menu Dial to display the Advanced Menu. 5 Turn the Menu Dial to highlight Time & Date. 6 Press the Menu Dial. The date and time settings for the camera display.
1100user.book Page 13 Friday, December 3, 1999 9:29 AM Changing Camera Settings Using options on the PDC 1100 LCD menu you can change camera settings for taking and reviewing photos. The camera has two LCD menus: • REC (Record) to take photos. • PLAY (Playback) to review photos stored in memory. To switch between the menus: 1 Press the Menu Dial to display the current menu. The default menu is REC. 2 Press again to display the both menu choices.
1100user.book Page 14 Friday, December 3, 1999 9:29 AM To display the REC menu 1 Turn on the camera. 2 Press the Menu Dial (a). The REC menu is displayed (b). Use the Record menu options to change camera settings. a b Changing camera settings The first time you turn on the camera, the camera settings allow you to take pictures in most indoor and outdoor conditions. These settings are the default settings.
1100user.book Page 15 Friday, December 3, 1999 9:29 AM Pixel resolution The resolution setting refers to the number of pixels in a digital photo. The higher the pixel resolution, the more pixels that are contained in your photo. A higher pixel resolution takes up more space on the memory card, but produces a higher quality digital image when printed.
1100user.book Page 16 Friday, December 3, 1999 9:29 AM Flash Choose how the camera flash is used. The default setting is Auto. Icon Flash setting • The flash fires automatically when needed. • The flash does not fire. • Use in places where flash is prohibited or may be distracting. • Use when shooting toward a reflective background, such as a window or a mirror. • Each flash is preceded by a preflash to reduce red-eye effect. • The flash fires automatically when needed. • Flash is on.
1100user.book Page 17 Friday, December 3, 1999 9:29 AM Focusing distance Determine the distance from the camera at which a subject will be properly in focus. The default setting is Autofocus. Icon For subjects From 2 feet to infinity (60 cm to infinity) from the camera. From 8 inches to 3 feet (20 cm to 90 cm) from the camera. 3 feet (1 m) from the camera. 7 feet (2 m) from the camera. 16 feet (5 m) from the camera. More than 16 feet (5 m) from the camera.
1100user.book Page 18 Friday, December 3, 1999 9:29 AM Self timer Set the camera self-timer. The self-timer applies to the next picture you take. Set the self-timer for each photo you want to delay. Icon Action Delays the camera shutter 10 seconds when you press the shutter button. Turns off the camera self timer. Color Choose to take photos in color or in black and white. Icon Action Camera captures images in color. Camera captures images in black and white.
1100user.book Page 19 Friday, December 3, 1999 9:29 AM Advanced Menu Set the following options: Menu choice Used to Quick review • Turn on to review and delete images immediately after taking. Digital zoom • Magnify the center of the image by 2x (capture smaller area in detail). • Automatically sets resolution to low (640x480). Exposure • To override the camera’s automatic exposure. • You can change the camera lens opening from +4 to -4.
1100user.book Page 20 Friday, December 3, 1999 9:29 AM LCD Display brightness Choose to display images on the LCD display in low light or bright conditions. Icon Action Normal view. Increase contrast of view.
1100user.book Page 21 Friday, December 3, 1999 9:29 AM Viewing images on the LCD display You can view images stored in memory on the LCD display. 1 Turn on the camera. 2 Press the Menu Dial to display the LCD menu. The REC menu displays. 3 Press the Menu Dial again to display the PLAY setting. 4 Rotate the Menu Dial to highlight PLAY. 5 Press the Menu Dial to select PLAY and close the menu. The last photo you took appears. Turn the Menu Dial to view all of the photos in memory.
1100user.book Page 22 Friday, December 3, 1999 9:29 AM Delete photos from your memory card Warning: Once you delete an image, it cannot be retrieved. You can lock images to prevent them from being deleted from memory. 1 With the PLAY menu selected, turn the Menu Dial to highlight DELETE icon. 2 Press the Menu Dial to select. The Delete photos menu displays. Select from the following: – – – – 3 Current: Delete the currently selected photo. All: Delete all photos.
1100user.book Page 23 Friday, December 3, 1999 9:29 AM Enlarge an image by 2X You can enlarge any displayed message displayed on the LCD display. 1 With the PLAY menu selected, turn the Menu Dial to highlight the ZOOM 2x icon. 2 Press the Menu Dial to select. The photo is enlarged by a factor of two. Scroll bars are displayed that you can use to view the entire image. Set information display You can display information about each photo you take on the LCD display.
1100user.book Page 24 Friday, December 3, 1999 9:29 AM Set LCD display brightness You can change the brightness of the LCD display to view images in bright or dark conditions. 1 With the PLAY menu selected, turn the Menu Dial to highlight the LCD icon. 2 Press the Menu Dial to display the brightness options. You can choose to make the LCD display brighter or darker. Choose a logo You can select one of your own photos to use as the logo that appears on the LCD when you turn on the camera.
1100user.book Page 25 Friday, December 3, 1999 9:29 AM To take a photo 1 Turn on the camera (a). 2 To use the LCD display, slide the LCD switch up and release (b). Note: To change the camera settings see “Changing Camera Settings” on page 13. 3 Frame the subjects of your photo in the optical viewfinder (c) or in the LCD display. c e f d a b 4 Press the shutter button (d) halfway to focus the camera and measure the light level.
1100user.book Page 26 Friday, December 3, 1999 9:29 AM Tips for Great Photos Here are some tips to help you take better photos! 26 • Keep the sun behind you or at your side. Avoid having the sun directly overhead. • Use the flash On setting if there is light behind your subject. • In low light conditions, use the flash or use a tripod to avoid camera movement during exposure. • Avoid extreme temperatures, which can affect battery performance.
1100user.book Page 27 Friday, December 3, 1999 9:29 AM Installing Polaroid PhotoMAX Image Maker Software This section describes how to install Polaroid PhotoMAX Image Maker Software and get help when using the software.
1100user.book Page 28 Friday, December 3, 1999 9:29 AM To get help To get help while using Polaroid PhotoMAX Image Maker software: • Click the Help button on the left side of the Polaroid PhotoMAX window or click the ? button in the corner. • Move your mouse cursor over any button or feature in the software and right click your mouse to display context-sensitive help that explains the software button or feature.
1100user.book Page 29 Friday, December 3, 1999 9:29 AM Transferring Photos to Your Computer The following sections describe how to transfer images from the Polaroid PDC 1100 Digital Camera to your computer. The drivers for the Polaroid PDC 1100 Digital Camera are automatically installed with the Polaroid PhotoMAX Image Maker Software included in your kit.
1100user.book Page 30 Friday, December 3, 1999 9:29 AM 30 2 Connect the serial cable to the serial port on the camera. 3 Connect the serial cable to the serial port on the back of your computer. 4 Connect one end of the AC power adapter to the AC power terminal on the camera and the other end of the cable to a grounded electrical outlet. 5 Turn on your camera.
1100user.book Page 31 Friday, December 3, 1999 9:29 AM 6 Turn on your computer. The Status panel on your camera displays a PC message when the camera is properly connected to your computer. 7 Start the Polaroid PhotoMAX software: From the Windows desktop: Double-click the Polaroid PhotoMAX icon on your desktop to start the Polaroid PhotoMAX Image Maker Software. From the Windows Start menu: Click on the Start menu, select Programs then open the Polaroid PhotoMAX folder and select PhotoMAX 3.0.
1100user.book Page 32 Friday, December 3, 1999 9:29 AM The Select Source dialog box appears displaying the list of supported devices. 11 Select PDC 1100 and click Select. The Polaroid PDC 1100 TWAIN software opens. From this dialog box, you can manage the photos in the camera’s memory. Note: The TWAIN software can be used with other applications.
1100user.book Page 33 Friday, December 3, 1999 9:29 AM To connect using the USB cable With the power on in the computer: 1 Connect the other end of the USB cable to the USB port on the camera. The cable will only connect one way. 2 Connect the rectangular USB cable to the USB port on the computer. 3 Connect one end of the AC power adapter to the AC power terminal on the camera and the other end of the cable to a grounded electrical outlet.
1100user.book Page 34 Friday, December 3, 1999 9:29 AM 4 Turn on the camera. The computer will detect the camera. 5 When PC appears in the camera status panel, you can start the Polaroid PhotoMAX software: From the Windows desktop: Double-click the Polaroid PhotoMAX icon on your desktop to start the Polaroid PhotoMAX Image Maker Software. From the Windows Start menu: Click on the Start menu, select Programs then open the Polaroid PhotoMAX folder and select PhotoMAX 3.0. 6 Click Photo Album.
1100user.book Page 35 Friday, December 3, 1999 9:29 AM Transferring images to the computer With a cable connection established between your computer and the PDC 1100 and the Polaroid PDC 1100 dialog box displayed, you can transfer images to your computer. To transfer images: 1 Ensure that the Photo tab is displayed. Thumbnail images of the photos in the camera memory are displayed on this tab. 2 Click on the thumbnail images you want to transfer to computer.
1100user.book Page 36 Friday, December 3, 1999 9:29 AM Deleting images in the camera memory You can also delete the images stored on the camera memory from the Photo tab. • By selecting thumbnail images displayed on this tab and clicking the Delete Selected Photos from Camera you can delete those photos from the camera’s memory. • Click Delete All Photos from Camera to clear the camera memory.
1100user.book Page 37 Friday, December 3, 1999 9:29 AM Displaying Images on a TV You can view images stored in your camera on any TV equipped with a video input terminal. For more information about using your TV for video input, see the manufacturer’s manual for your TV. To display images on a TV 1 Turn off the TV and the power to the camera. 2 Open the memory compartment on your camera and the plug the other end of the video cable into the TV connection.
1100user.book Page 38 Friday, December 3, 1999 9:29 AM 38 6 Connect one end of the AC power adapter to the AC power terminal on the camera and the other end of the cable to a grounded electrical outlet. 7 Turn the camera on. 8 Press the Menu Dial twice to review images.
1100user.book Page 39 Friday, December 3, 1999 9:29 AM Troubleshooting Problem Solution Polaroid PhotoMAX Image Maker Software does not see the PDC 1100 Digital Camera. • Ensure that the digital camera power is turned on and a PC message appears on the Status panel. Use the AC adapter when downloading images. • For serial port connections, connect one end of the serial cable to the computer serial port. Connect the other end of the cable to the serial cable connector on the digital camera.
1100user.book Page 40 Friday, December 3, 1999 9:29 AM Problem Solution The digital camera has no power. • Turn off and then turn on the digital camera. The digital camera may have automatically turned off to save battery power. • Check to make sure that the battery terminals (+ and -) are correctly orientated as shown inside the battery compartment. • The batteries are dead. Replace all four AA batteries. Do not mix old batteries with new batteries, or use different manufacturer’s batteries together.
1100user.book Page 41 Friday, December 3, 1999 9:29 AM Problem Solution The LCD display does not turn on. • Turn the LCD display on/off switch to the on position. • The digital camera is connected to a computer or to a television set. Disconnect the digital camera to turn on the LCD display. • The batteries are weak. Replace the batteries or use the AC adapter. To save battery power, use the optical viewfinder when composing photos. The live picture in the LCD display looks "jumpy.
1100user.book Page 42 Friday, December 3, 1999 9:29 AM Problem Solution My photo looks too light. • The flash fired when lighting conditions didn’t need it. Use the Autoflash setting. • The digital camera was focused on a bright object or light. Try taking the photo from a different angle to avoid bright spots in photos. • The subject was too close to the flash when the photo was taken. Turn off the flash when using the Macro lens setting, or take the photo from a greater distance.
1100user.book Page 43 Friday, December 3, 1999 9:29 AM FCC Notice This equipment has been tested and found to comply with the limits for a Class B digital device, pursuant to part 15 of the FCC Rules. For detailed information about FCC compliance, see the online Polaroid PhotoMAX Image Maker Products User’s Guide. Camera Precautions Observe the following precautions when you use the Polaroid PDC 1100 Digital Camera: • Do not open the camera case or attempt your own repairs.
1100user.book Page 44 Friday, December 3, 1999 9:29 AM Battery Handling When using batteries: • Use only AA alkaline or lithium disposable batteries or NiCad or NiMH rechargeable batteries with the camera. • Never mix old batteries with new batteries, or use different types of batteries together. • Do not expose batteries to direct heat or dispose of them by burning. Dispose of batteries according to local laws and regulations.
1100user.book Page 45 Friday, December 3, 1999 9:29 AM Internet support Technical support is available via the Internet. Visit our Web site at: www.polaroid.com One Year Limited Warranty Polaroid will, at our option, repair or replace any unit found defective in manufacture within the warranty period. The warranty period is determined by the date of purchase. Keep the receipt as proof of purchase. Otherwise, the warranty period is determined by the date of manufacture.
PDC 1100 Technical Support Information (This information replaces that found on Page 44) Polaroid Corporation provides technical support for digital cameras at http://www.polaroid.com/, and within the United States by calling 800-897-0356 from 10 A.M. to 7 P.M. EST, (Mon - Fri) and 10 A.M. to 4 P.M. EST (Sat). Please note that phone support and repair services are regional and may not be available for a particular product outside the country where it was purchased.