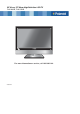
32”/81cm, 37”/94cm High Definition LCD TV FLA-3232B, FLA-3732B For more information or service, call 1300 366 144.
Safety Instructions IMPORTANT SAFETY INSTRUCTIONS To reduce the risk of fire or electric shock, do not expose this equipment to rain or moisture. CAUTION RISK OF ELECTRIC SHOCK DO NOT OPEN CAUTION: TO AVOID THE RISK OF ELECTRIC SHOCK, DO NOT REMOVE COVER (OR BACK). NO USER-SERVICEABLE PARTS INSIDE. REFER SERVICING TO QUALIFIED SERVICE PERSONNEL. This symbol is intended to alert the user to avoid the risk of electric shock, do not disassemble this equipment by anyone except a qualified service personnel.
Safety Instructions IMPORTANT SAFETY INSTRUCTIONS To prevent any injuries, the following safety precautions should be observed in the installation, use, servicing and maintenance of this equipment. Before operating this equipment, please read this manual completely, and keep it nearby for future reference. Do not place the equipment on any uneven or unstable carts, stands, tables, shelves etc..
Safety Instructions IMPORTANT SAFETY INSTRUCTIONS Opening and removing the covers may expose you to dangerous voltage or any other hazards and may void your warranty. Refer service from qualified personnel. Do not place or drop any other objects on top. Do not insert anything into the ventilation holes of your equipment.Inserting any metal or flammable objects may result to fire or electric shock. Do not place the equipment on uneven or unstable carts, stands, tables, shelves etc...
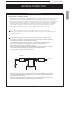
ANTENNA CONN. ANTENNA CONNECTION EXAMPLE OF OUTDOOR ANTENNA GROUNDING If an outdoor antenna is connected, follow the precautions below: An outdoor antenna should not be located anywhere that can be in contact of overhead power lines, or any other electric light or power circuits. When installing an outdoor antenna system, extreme caution should be taken to prevent contact with power lines. Direct contact with power lines may be fatal and should be avoided at all costs.
ANTENNA CONN. ANTENNA CONNECTION ENGLISH Cable TV (CATV) Connection NOTE TO CATV SYSTEM INSTALLER This reminder is provided to call the CAT V system installers atte ntion to Ar ticle 820-40 of the National Elec trical Code (NEC ) that provides guidelines for proper grounding and, in par ticular, specifies that the cable ground shall be connec ted to the grounding system of the building accurately, or as close to the point of cable entr y as possible.
ANTENNA CONN. ANTENNA CONNECTION ANTENNAS The antenna requirements for good color TV reception are more important than those of a black & white TV reception. For this reason, a good quality outdoor antenna is strongly recommended. The following is a brief explanation of the type of connection that is provided with the various antenna systems. PAL-type connector A 75-ohm system is generally a round cable with PAL-type connector that can easily be attached to a terminal without tools (not included).
CONTENT CONTENT ......................................................................................................................................................... 8 Features ........................................................................................................................................................................................ 8 Package Contents ............................................................................................................................
PREPARATION PREPARATION Congratulations on the purchase of your new High Def inition Compatible Television. In order to maximize the potential of this television, you must use it in conjunction with a High Def inition Signal Source, utilizing a proper High Def inition receiving unit (of ten referred to as a “set-top” box). Only “true” High Def inition transmitted video will yield optimum picture qualit y.
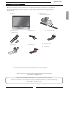
PREPARATION Package Contents Once you open the box, make sure all of the following contents are included. If you’re missing any items, please return this product to the original place of purchase. Bottom Stand / Screw Driver and 6 Screws Remote Control/ AAA Batteries x 2 VIDEO Cable Power Cord AUDIO Cable Component Cable Quick Start Guide User’s Manual These items are all you need to set up and operate the LCD TV in its basic configuration.
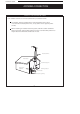
PREPARATION Setting Up Your LCD TV Attach the Stand If you prefer to mount your new Polaroid TV on a wall instead of attaching it to the stand, please reference the instructions included in the wall mounting kit (not included). IMPORTANT : Attach the Stand to the TV with the bottom foam packaging material still attached. Read all instructions before continuing with the stand installation. a) Lift foam packaging material from the top of the TV out of the box.
PREPARATION LCD TV Front View ENGLISH 1 2 3 4 5 6 7 Front View ITEM DESCRIPTION 1 VOLUME Adjusts the volume up and down. Changes settings for items and the value for items on the OSD mode. 2 CHANNEL Scans up and down through channels. Selects sub-menu items on the OSD mode. 3 MENU Press MENU to display the OSD (on screen display), press again to turn the OSD off. 4 INPUT Chooses from different input signal sources. 5 Turns the LCD TV on and into standby mode.
PREPARATION LCD TV Rear View AV1 ($53+21( 287 AUDIO IN 2 3 AV6 AV5 1 6 Power Swith AC IN AV3 +'0, ,1 9*$ 3& ,1 $8',2 ,1 $8',2 ,1 < 3E &E 3U &U $8',2 ,1 /,1( 287 $8',2 ,1 $8',2 ,1 $8',2 287 AV1 AV2 AV4 VIDEO OUT TV 4 5 6 7 8 ITEM DESCRIPTION 1 AC IN/Power Switch Connects the AC power cord./ Turns the LCD TV on and off. 2 AV6 HDMI Connects to a digital set-top box or other deceives with a HDMI interface.
PREPARATION Remote Control 1 POWER Turns the LCD TV on and into standby mode . ENGLISH 2 Mutes and restores your LCD TV sound. 3 I-II LOCK Cycles through the TV Sound options: MONO/DUAL/STEREO 4 SLEEP Sets the LCD TV sleep time. 5 P.SIZE Selects from the following modes settings: 16:9 ,14:9, Zoom , Spectacle, Full, Original, 4:3. 6 FAV.CH This function make you select your favourite programmes directly. 7 PIP Turns on and off the PIP/POP function. 8 FREEZE Freezes and restores the picture.
PREPARATION Remote Control 15 INFO Displays information on the LCD TV screen such as channel and channel label. 16 LOCK Cycles among the different input signal sources: TV AV1 AV2 AV3 AV4 AV5 AV6 17 Exits the OSD menu (on-screen display), PIP/POP Mode. 18 19 20 21 S.MODE Selects sound mode:Flat,Music,Movie,Speech, User. P.MODE Selscts picture mode:Standard,Mild,Game,User, Dynamic. 22 PIP CH / : select a programme for the sub-picture.
PREPARATION Remote Control Installing the batteries in your remote control 2 3 Pull the tab of the back cover and pull up on the cover to open the battery compartment of the remote control. ENGLISH 1 Insert two AAA size batteries. Make sure to match the (+) and (-) ends of the batteries with the (+) and (-) ends indicated in the battery compartment. Align the lower tabs of the back cover to the remote control and snap the cover into place.
PREPARATION Using your LCD TV Always turn the LCD TV off when the LCD TV is not in use for a long period. The Power button is only used for switching the LCD TV into standby mode, it does not disconnect the device from the main voltage. To completely disconnect the main voltage, please switch off the power switch on the rear or remove the power plug from the socket.
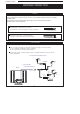
INSTALLATION INSTALLATION Connecting a TV cable or Antenna Basic Connection: Connecting cable or an antenna . 1 A: 2 B: 3 Press the POWER button to turn on your LCD TV. 4 Select the Auto Programme in the Setup menu to search for available channels automatically before watching TV for the first time. Use a supplied antenna cable to connect the VHF/UHF to your LCD TV. Connect all AC power sources before turning on the power switch of the LCD TV or other connected equipments.
INSTALLATION Connecting a DVD Player For best picture quality, if your equipment has (Y Pb/Cb Pr/Cr) video output, Please use component cable instead of a standard video or S-video cable. 1 METHOD A (AV3/AV4) Use a Component cable to connect the (Y, Pb/Cb, Pr/Cr) jacks on the DVD player, to your LCD TV. Use an audio cable to connect the DVD’s audio jacks to your LCD TV. METHOD B (AV2) Use an Audio cable to connect the DVD’s audio output jacks to your LCD TV.
INSTALLATION Connecting a VCR & a Video Camera ENGLISH 1 METHOD A (AV2) Use an Audio cable to connect the VCR’s/ the VIDEO CAMERA’s audio output jacks to your LCD TV. Use a S-Video cable to connect your LCD TV and VCR player/ VIDEO CAMERA. METHOD B (AV1) Use an A/V cable to connect the VCR’s/ VIDEO CAMERA’S composite output jacks to your LCD TV. 2 Connect all power sources before turning on the power switch of the LCD TV or other connected equipments. 3 Press the POWER button to turn on your LCD TV.
INSTALLATION Connecting a TV Box and Satellite Receiver 1 Method A(AV3/AV4) : Use a Component cable to connect the Y/Pb(Cb)/Pr(Cr) jacks on the TV Cable Box to your LCD TV. Use an Audio cable to connect TV cable box’s audio output jacks to LCD TV. Method B(AV2) : Use an Audio cable to connect the TV Cable Box’s audio output jacks to your LCD TV. Use a S-Video cable to connect your LCD TV and TV Cable Box.
INSTALLATION Connecting a TV Box and Satellite Receiver 4 5 Press the POWER button to turn on your LCD TV. 6 To watch programs via satellite receiver, press the SOURCE button repeatedly to select TV . To watch TV via TV cable box, press the SOURCE button to select AV1, AV2, AV3, AV4, AV5 or AV6 .
INSTALLATION HDMI HDMI -This TV SET can receive the High-Definition Multimedia Interface(HDMI) or Input of Digital Visual Interface(DVI). -This TV SET supports HDCP(High-bandwidth Digital Content Protection) Protocol for TV SET (480p, 576p, 720p, 1080i) modes. -When you connect to the output of signal source devices (DVD Player, Set Top Box or PC) which can detect HDMI/DVI signal automatically, the signal source devices will set the resolution of LCD TV automatically.
USING THE FEATURES Using the Features Watching your LCD TV LOCK 1 Press the POWER button to turn your LCD TV on. 2 Press the CH. / button to change channel number,or use the 0-9 & -/-- buttons to select a channel. The one/ two digit numbers can be set by pressing -/-- button. 3 Press the JUMP button to alternate back and forth between the current and previous channel. 4 Press the VOL. +/- button to adjust the volume. Press the MUTE button to turn the sound off. Press again to turn the sound on.
USING THE FEATURES Wide-Screen Mode Wide-Screen mode allows you watch the broadcasts with various picture format in wide screen mode. Press the SCALE button repeatedly to toggle through the following wide mode settings. When watching 4:3 image, the original image will stretch horizontally to a 16:9 image to fill the screen. You can enjoy the picture format of 14:9 or general TV programme through the 14:9 mode. The original image will extend the 1.25:1 image to fill the screen.
USING THE FEATURES Wide-Screen Mode When your TV receives the wide screen signal, it will be automatically changed to the original picture format inputted. When watching 4:3 image, the original image will be unchanged and there will be vertical bars on the side of the screen. Press the SCALE button to select repeatedly modes settings as follows: 16:9 14:9 ZOOM SPECTACLE FULL ORIGINAL Note: You can only select 4:3 and 16:9 (Wide) in RGB[PC], HDMI[PC] mode only.
USING THE FEATURES Using PIP/POP functions The PIP/POP feature allows simultaneously viewing of video from two sources. Only master source’s audio is heard. (It has image on the main and sub picture when the current source only for HDMI input.) 1 Watching PIP - Press the PIP button to show the sub-picture. - Each press PIP button to change the current screen (as following). - Press the SWAP button to alternates between main and sub-picture.
USING THE FEATURES Using the Menu The MENU can be shown on the screen in the selected language. Press the MENU button then the main menu will appear on the screen. 2 Use ▲/▼ to highlight your main menu option and then press ► to enter your selected option. Use ▲/▼ to highlight an option of the menu. Use ◄/► to change the value of the item. 3 Press the EXIT button to exit MENU.
USING THE FEATURES SETUP Setup Auto programme - All stations that can be received are stored by this method. It is recommended that you use auto programme during installation of this set. 1. Press the MENU button and then use ▲/▼ button to select the SETUP menu. 2. Press the ► button and then use ▲/▼button to select Auto programme. 3. Press the ► button to select Auto Search. 4. Press the ► button to begin auto programming. All receivable stations are stored. Note : a.
USING THE FEATURES Setup Assigning a Station Name 1. Repeat the ‘Manual programme tuning’ steps from 1 to 2. 2. Press the ► button and then use ▲/▼ button to select Name. 3. Press the ► button to display the Name menu. 4. Press the ▲ button. You can use a blank, +, -, the alphabet A to Z and the number 0 to 9. With the ▼ button you can select in the opposite direction. 5. Select the next position by pressing the ► button and then take your choice of the second character, and so on. 6.
USING THE FEATURES Setup Deleting a programme 1. Select a proramme to be deleted with the ▲/▼ or ◄/► button. 2. Press the RED button twice. If the selected programme is deleted,all the following programmes will shift up one position. Copying a programme 1. Select a programme to be copied with the ▲/▼or ◄/► button. 2. Press the GREEN button. All the following programmes are shifted down one position. Moving a programme 1. Select a programme to be moved with the ▲/▼ or ◄/► button. 2. Press the YELLOW button.
USING THE FEATURES Setup Area Please choose the correct TV Signal applied for your location. ENGLISH Video If the signal source is TV/AV1/AV2/AV3/AV4/AV5/AV6, the OSD displays: Picture Mode Standard, Mild, Game, User, Dynamic are preset and programmed for good picture quality at the factory and cannot be changed. When adjusting picture options (contrast, brightness, colour, sharpness and HUE (NTSC input only) manually, Picture Mode is automatically changed to User.
USING THE FEATURES Video Color Temp. You can adjust red, green, or blue to any colour temperature you prefer. - To reset to default settings, select the Standard option. -The adjustment range of Red, Green and Blue is -30~+30. Each press ▲/▼ button to change the current screen (as following). Standard Warm User Cool Adjust the Color Adjust to select the desired skin colour option. - This function works in the following mode:TV, CVBS,S-VIDEO,COMPONENT,HDMI,VGA.
USING THE FEATURES Audio 1,You can also select Flat, Music, Movie, Speech or User in the Audio menu. 2, Each press the SOUND MODE button to change the current screen (as following). Flat Music Movie Speech User Surround Allows you to select the audio mode to be surround ON or OFF. 1. Press the MENU button and then use ▲/▼ button to select the Audio menu. 2. Press the ► button and then use ▲/▼ button to select Surround. 3. Press the ► button and then use ▲/▼button to select On or Off. 4.
USING THE FEATURES Audio Stereo / Dual Reception - When a programme is selected, the sound information for the station appears after the programme number and station name disappear. On Screen Display Press the I/II button to set NICAM mode Broadcast On screen Display Mono MONO Stereo STEREO Dual DUAL I Mono Sound Selection In stereo reception if the stereo signal is weak, you can switch to mono by pressing the I/II button twice. In mono reception the depth of sound is improved.
USING THE FEATURES Time If the signal source is TV/AV1/AV2/AV3/AV4/AV5/AV6, the OSD displays: Clock If current time setting is erased by a power failure, or if TV is unplugged, reset the clock. Setting the Turn On/Off - Timer function operates only if current time has been already set. - Off Timer function overrides On Timer function if they are set to the same time. - The TV must be set to standby mode for the On Timer to work. 1. Press the MENU button and then use ▲/▼ button to select the TIME menu. 2.
USING THE FEATURES Options If the signal source is TV/AV1/AV2/AV3/AV4/AV5/AV6, the OSD displays: On-Screen Menu Language Selection 1. Press the MENU button and then use ▲/▼ button to select the OPTIONS menu. 2. Press the ► button and then use ▲/▼ button to select Language. 3. Press the ► button and then use ▲/▼ button to select your desired language. From this point on, the on-screen menus will be shown in the language of your choice. 4. Press the EXIT button to return to normal TV viewing.
USING THE FEATURES Screen If the signal source is TV/AV1/AV2/AV3/AV4/AV5/AV6, the OSD displays: Auto adjustment (RGB [PC] mode only) Manual Configure (RGB[PC], RGB[DTV], HDMI[DTV], mode only) - If the picture isn’t clear after auto adjustment and especially that characters are still trembling, adjust the picture phase manually. - To correct the screen size, adjust Clock. - The Phase, Clock function are not available in RGB[DTV],HDMI[DTV], mode. 1.
USING THE FEATURES Screen Setting Picture Format -You can enjoy the picture with various formats. Use ▲/▼ button in the Display Mode Menu or Press SCALE to select 16:9(Wide), 14:9, Zoom, Spectacle, Full, Original and 4:3. Press the EXIT button to return to normal TV viewing. (Refer to Page23-24 ”Wide-Screen Mode”) Picture Size Zoom When enlarging or reducing the picture, the screen may display unnatural picture. (It’s not available for selection of VGA mode) 1.
USING THE FEATURES PIP/DW If the signal source is TV/AV1/AV2/AV3/AV4/AV5/AV6, the OSD displays: Input Double windows PIP ENGLISH Allows to select the source to be TV, AV1(CVBS), AV2(S-VIDEO), AV3(YPbPr1), AV4((YPbPr2), AV5(VGA), AV6(HDMI). 1. Press the MENU button and then use ▲/▼ button to select the PIP/DW menu. 2. Press the ► button and then use ▲/▼ button to select Input. 3. Press the ▲/▼ button to select the input source for the Main picture. 4. Press the EXIT button to return to normal TV viewing.
TROUBLESHOOTING TROUBLESHOOTING Before consulting service personnel, please check the following chart for a possible cause of the trouble you are experiencing and for a solution. PROBLEM SOLUTION TV will not turn on Make sure the power cord is plugged in. The batteries in the remote control may be exhausted. Replace the batteries. No picture, no sound Check the interface cable between TV and antenna/ cable TV. Press the POWER button on the remote.
SPECIFICATIONS SPECIFICATIONS Panel System Display Resolution FLA-2632B FLA-3232B FLA-3732B 26 inch LCD panel 32 inch LCD panel 37 inch LCD panel 1366 pixels(horizontal) x768 pixels (vertical) 1366 pixels(horizontal) x 768 pixels (vertical) 1366 pixels(horizontal) x768 pixels (vertical) Television System PAL / SECAM PAL / SECAM PAL / SECAM Number of Colors 16.7 mil. 16.7 mil. 16.7 mil.
INSTALLATION FLA-4232B Model Panel System Display Resolution 42 inch LCD panel 1366 pixels(horizontal) x768 pixels (vertical) Television System PAL / SECAM Number of Colors 16.7 mil.
SPECIFICATIONS Display Mode For the display modes listed below, the screen image has been optimized during manufacture. Dot X Line Horizontal Frequency(kHz) Vertical Frequency(Hz) 640X480 31.469 59.94 640X480 37.861 72.80 640X480 37.500 75.00 640X480 43.269 85.00 800X600 37.879 60.31 800X600 48.077 72.18 800X600 46.875 75.00 800X600 53.674 85.06 1024X768 48.363 60.00 1024X768 56.476 70.06 1024X768 60.023 75.02 1280X1024 63.981 60.