Direct Connect Adapter User Guide
Table Of Contents What is the Polaroid Direct Connect adapter? Direct Connect features What is in the Direct Connect package About the adapter 5 Setting up the Direct Connect adapter 1 Install the software 2 Connect the adapter to your computer 3 Start the configuration software 4 Select a camera 5 Select a printer 6 Add a watermark to your pictures 7 Choose a picture format 8 5 6 7 8 9 10 10 11 12 16 Printing with the Direct Connect adapter Connecting the camera, adapter and printer Printing modes Pri
What is the Polaroid Direct Connect adapter? The Polaroid Direct Connect adapter lets you print photographic-quality digital pictures from your digital camera – without your computer. The adapter connects your camera directly to your Polaroid ColorShot Photo Printer so you can print self-developing, full-color pictures any time, any place. To print a digital picture from your camera, display the picture on the camera's LCD panel and press the print button on the Direct Connect adapter.
Note: The quality of pictures printed with the Direct Connect adapter depends on the quality of the pictures captured by the digital camera. Picture quality can vary considerably among digital camera models.
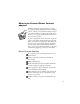
About the adapter a Print button b Print All button c Print Index button d Select Picture/Cancel Print button e LED indicator f ColorShot Photo Printer USB or parallel connector (USB shown) g Direct Connect power connector h ColorShot printer power connector i Camera and computer connector 7
Setting up the Direct Connect adapter Before printing with the adapter for the first time, you need to configure it with the Direct Connect Configuration Software. You can also use the software to change the setup later. Using the software, you define: • the digital camera you are using. • the printer you are using. • the option of adding a watermark to your pictures. • the picture format: Best Fit to Page or Fill Entire Page. To set up the adapter: 1 Install the software. a Start your computer.
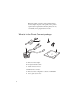
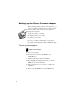
2 Connect the adapter to your computer as shown in Figure 1. Figure 1. Connecting the adapter to your computer a Direct Connect adapter b Not connected (USB connector shown; Direct Connect parallel version has 25-pin connector instead) c Not connected d ColorShot power cord and adapter (provided with ColorShot printer) e Serial port (COM1, COM2, etc.
3 Start the configuration software. a Click Start and then click Programs. b Click Direct Connect Configuration Software The main window opens. The LED indicator on the adapter changes from flashing red to steady orange, indicating that the adapter and computer are communicating. If the indicator is not steady orange, see Solving problems on page 22. 4 Select a camera. Note: The Direct Connect adapter can be set up for only one camera at a time.
5 Select a printer. a Click the Printer button to display a list of compatible printers. If you do not see your printer listed, see Obtaining configuration files for additional cameras and printers on page 29. b Click your printer model and then click the OK button to send the setup information to the adapter. c If you ... Then ... are finished configuring the software Click Exit The setup data is sent to the adapter.
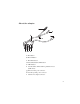
6 Add a watermark to your pictures. 6 You can use the Direct Connect configuration software to add a watermark containing a logo or text (or both) as shown in Figure 2 to all pictures you print. Figure 2. Picture with a watermark The watermark location is limited to one of four picture quadrants, which you select during setup. a At the Direct Connect software main window, click the Watermark button.
upper left quadrant as shown in Figure 4, click the upper left quadrant area. Figure 4. Watermark rectangle c If you want to ... Then ... create a new watermark Click the Create Watermark button and go to step d. add a watermark saved earlier 1 Click the Load Watermark button. 2 Choose the folder and .BMP file containing the watermark. 3 Click Open. 4 Skip to step k on page 15. d Click the Load Image button and then choose the folder and file containing the logo.
When you select the file, the logo appears in the selected quadrant. e To change ... Then ... the logo location within the quadrant Click inside the logo and drag it to its new location. the logo size Click an edge of the logo and drag it outward or inward. the logo background or another color from solid to transparent so the picture shows through 1 Click the Transparent Color Selector button. 2 Click the color in the logo you want to make transparent.
g Click one of the lines, type the text you want to print, and then click the Text Format button to choose the font, style, size and font effects (underline, color, etc.) for the line. h If necessary, repeat steps g to create additional text lines. i After all the text lines are formatted, click the OK button. j To change ... Then ...
m Click the OK button. n If you ... Then ... are finished configuring the software Click Exit. The setup data is sent to the adapter. want to select a picture format Continue to 7 Choose a picture format 7 Choose a picture format. The Direct Connect Configuration Software lets you choose between two picture formats: Best Fit to Page, and Fill Entire Frame. The Best Fit to Page format prints the complete picture.
match the film image area, the picture is cropped to fit the image area as shown in Figure 6. Figure 6. Fill Entire Frame format To choose a picture format: a At the Direct Connect Software main window, click the Settings button. b In the Print Size box, click Fit to Page or Fill Entire Frame. c Click the OK button. d Click Exit to send the configuration data to the adapter and to close the configuration program.
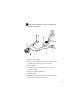
Printing with the Direct Connect adapter Connecting the camera, adapter and printer Connect your camera to the Direct Connect adapter and the ColorShot printer as shown in Figure 7. Figure 7. Connecting the adapter for printing a Direct Connect adapter b USB connector (The Direct Connect parallel version has a 25-pin connector instead.
h USB camera connector (provided with Direct Connect adapter) for use with camera-to-PC USB cable i Serial camera connector (provided with Direct Connect adapter) for use with camera-to-PC serial cable j Direct Connect LED indicator (alternates green and orange until camera communication is established) Printing modes Single print Prints a single picture: the one most recently displayed in camera preview mode on the camera LCD. Print all pictures Prints all the pictures stored in the camera memory.
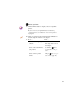
Printing steps Note: If the Direct Connect LED indicator displays flashing orange before or during these steps, the ColorShot Photo Printer is out of film. When this happens, load a new pack of film as shown in Figure 9. (The film cover ejects when you close and latch the film door. Figure 9. Loading the ColorShot Photo Printer 1 Turn on the camera. See your camera instructions. 2 Set the camera to the PC Connect mode. (Your camera may use a different name for this mode.
To print ... Then ... all pictures stored in camera Press the Print All button. index print(s) Press the Print Index button. Note: You can cancel printing by pressing the Picture Select/Cancel Print button. If pictures do not appear on the camera LCD Some digital cameras cannot display pictures on their LCD screen while connected to the Direct Connect adapter.
Solving problems Direct Connect software cannot find serial port Possible cause 22 Solution Direct Connect adapter not powered on Verify that the LED indicator is on. If not, check the connections (page 9) and make sure AC power is available at the outlet. Direct Connect adapter not connected to the computer Verify that the adapter is connected to a serial port on the computer before you start the configuration software.
Possible cause Solution Computer communication baud rate too high Manually select a low baud rate: 1 At the main window, click the Settings button. 2 On the Baud Rate list, click 19200 or 9600. 3 Click the OK button. Other condition as shown by the LED indicator See Computer connection codes (page 25). Adapter does not print Possible cause Solution No film in printer (flashing orange adapter LED) Insert a new pack of film (Figure 9 on page 20).
Possible cause 24 Solution. Direct Connect adapter set up for wrong camera or printer Connect the adapter to your computer, start the configuration software, and choose the correct camera and printer. See Setting up the Direct Connect adapter, page 8. Other condition as shown by the adapter LED indicator See Printer/digital camera connection codes (page 26).
About LED indicator codes The LED indicator on the Direct Connect adapter can help you troubleshoot connection and printing problems. The meaning of the codes depends on whether the adapter is connected to your computer for setup or to the ColorShot printer. Computer connection codes LED state Meaning Suggested action Off No power to adapter Connect adapter to power supply (page 9).
Printer/digital camera connection codes LED state Off 26 Meaning No power to adapter Suggested action Connect adapter to power supply (page 18). Steady orange Communication with printer and camera established Print when ready (normal indication). Flashing green Printing Wait for picture to eject from printer (normal indication). Flashing orange Printer out of film Insert new film pack in ColorShot printer.
Obtaining technical assistance Before calling for technical assistance, be sure to check the problem-solving information in the previous sections. If none of the suggested actions solves your problem, contact Polaroid Technical Assistance as follows. Within the U.S.A. Call us toll-free from within the continental U.S.A. at 1-800-432-5355, Monday through Friday, 8 a.m. to 8 p.m., Eastern time. We offer a variety of Customer Support services; call for details and applicable fees.
Polaroid Technical Support telephone numbers Australia (toll-free) 1800 242 640 Sydney Metro (tel) 02 9842 7120 Austria (tel) 06 60 74 33 (fax) 01 7956 7040 Belgium (tel) 02 714 31 02 (fax) 02 713 12 18 Brazil (tel) 55.11.285.6411 (fax) 55.11.283.
Obtaining configuration files for additional cameras and printers Software for configuring the Direct Connect adapter for additional digital cameras and printers is under development. For information about configuration files that became available after this user guide was printed, visit us at http://www/polaroid.com or call Technical Assistance as described in the previous section. To install a new configuration file: 1 Download the .PCC file for the camera or the .
3 To install ... 30 Then ... a camera configuration file a Click the Camera button b Navigate to the drive and folder containing the .PCC file for the new camera, click the file name, and click Open. The new camera appears on the list of installed cameras. c Click the camera name and then click the OK button. a printer configuration file a Click the Printer button b Navigate to the drive and folder containing the .PCP file for the new printer, click the file name, and click Open.
Limited Equipment Warranty Polaroid Corporation warrants your Polaroid Direct Connect adapter against defects in manufacture for a period of one year from the date of purchase. To verify the warranty period, you should keep the sales receipt or other proof of the purchase date.
FCC NOTICE: RADIO AND TELEVISION INTERFERENCE Note: This equipment has been tested and verified for compliance with the limits for a Class B digital device pursuant to Part 15 of the FCC Rules. These limits are designed to provide reasonable protection against harmful interference in a residential installation. This equipment generates, uses and can radiate radio frequency energy and, if not installed and used in accordance with the instructions, may cause harmful interference to radio communication.
read this Agreement carefully because at the end you will be asked to accept the terms and conditions of this Agreement and continue the installation process or , if you do not wish to accept these terms and conditions, to decline, in which case the installation process will be aborted and you will not be able to use the Software.
IMPLIED, INCLUDING BUT NOT LIMITED TO IMPLIED WARRANTIES OF MERCHANTABILITY AND FITNESS FOR A PARTICULAR PURPOSE. Some states and countries do not allow the exclusion of implied warranties, so the above exclusions may not apply to you. 6. Limitation of Liability.
35
“Polaroid” and “Polaroid ColorShot” are trademarks of Polaroid Corporation, Cambridge, MA, U.S.A. All other product names may be trademarks of their respective owners. PN-00000X-0 9/98 Printed in U.S.A.