Installation Quickstart
English System Requirements 3 PC Systems • A Power Macintosh computer (includes Power Macintosh G3 and G4 computers) or compatible with a PowerPC processor and 64 megabytes (MB) of RAM. An IBM PC computer or compatible with at least a 300-MHz Pentium processor and 128 megabytes (MB) of RAM. (RAM equal to the typical image file size is recommended.) • Microsoft Windows 95, 98 or NT (version 4 or later) operating system. • Apple system software version 7.6 or later. • 400 MB of free disk space.
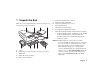
1 Unpack the Box f Make sure you have all the following components. Contact your dealer if any is missing or damaged. h a g b c d i j k l Adapter for 120 film, 2 1/4 x 2 1/4 in. Adapter for single 35mm slide Adapter for 120 film, 2 1/4 x 2 3/4 in.
English 2 Position the Scanner 3 Install the Software Place the scanner on a flat, stable surface, free of vibration. Leave at least 2 inches (50mm) of space around all sides and the top of the scanner for adequate ventilation, and leave room at the back to reach the power switch on the rear panel. 1 Turn the computer on. 2 Close any applications that may be running. 3 Insert the Polaroid PolaColor Insight CD into the drive.
4 Connect the Scanner to the Computer The SprintScan 45 Ultra requires a SCSI host adapter in your computer. If your computer does not have an adapter, you must install one (see page 17). If your computer is a PC-compatible with a SCSI adapter, but the adapter is connected to a hard drive or CD-ROM drive, installing a second adapter is recommended. Set the Scanner SCSI Address Each device connected to a SCSI host adapter must have a unique address from 0-6.
English 7 Connect the SCSI Cables a Place the scanner at the end of the SCSI chain or between the computer and other SCSI devices as shown in the following diagrams. Use the shortest possible cables. Note: Turn the computer, scanner and all other SCSI devices off before connecting or disconnecting any cables. Do not connect the scanner to the parallel connector on your computer. Doing so could damage the scanner or computer.
25 pins Computer 25 pins 50 pins 25 pins 50 pins Other SCSI device (unterminated) 50 pins 25 pins Scanner (termination on) 50 pins You may need additional cables or adapters to connect the scanner. Your cable must have a 50-pin Centronics M or DB-25 M connector at one end for attachment to the scanner, and the cable should be as short as possible. To determine the connector you need for attachment to your SCSI adapter, refer to instructions with the adapter.
English 5 Connect the Scanner to AC Power and Turn On 1 9 2 Turn the scanner power switch on. 3 Check the lights. The green light indicates power on. The yellow light blinks while the scanner initializes, and it remains steady when the scanner is ready. (The yellow light also blinks during scanning.) 4 Turn the computer on. 5 Wait for the system to install the scanner driver and display the normal desktop. Connect the power cord to the power connector (b).
6 Loading the Film Carriers The Four-Slide Film Carrier 1 With the text facing up and the hinge at the top, open the carrier flat as shown. 3 Close the carrier carefully. The 4x5 Carrier (for 4x5 film) 1 2 Place up to four mounted 35mm slides in the spaces provided. Be sure the slide mounts fit properly in the recessed areas. The images should be right-side up and right-reading as you do so. The emulsion side will face down.
English 11 2 Open the carrier flat. Insert a 4x5 chrome or negative so that the left edge is against the positioning pins. Position the film so the image is right-reading and right-side up (emulsionside down). Note: The emulsion side is the dull side. The 120 Film Adapters (for 2 1/4 x 21/4 and 2 1/4 x 2 3/4 in. film) 1 Open the 4x5 carrier as described previously. 2 Locate the appropriate adapter for your image. One is designed for 2 1/4 x 2 3/4 in. images, and one is for 2 1/4 x 2π in. square images.
4 Secure the film with the two magnets provided, on the top and bottom edges. Be sure the magnets are also within the raised ridges. The Single-35mm Carrier 5 Place the adapter in the 4x5 carrier, sliding the notches into the pins on the left edge. The film and magnets should be face up, as shown. 1 Open the 4x5 carrier as described previously. 2 Locate the single-35mm adapter. Note: You can use a negative, or a mounted or unmounted slide.
English 13 4 If the film is unmounted or the mount is thin, use the slide spacer provided. Position the slide spacer on top of the slide. The film should fit snugly into the adapter. (The spacer also ensures that the image will be at the correct distance from the scanning mechanism.) XT TE 5 Place the adapter in the 4x5 carrier, sliding the notches into the pins on the left edge. The slide and tabs should be facing up. 6 Close the carrier.
7 Insert the Carrier into the Scanner 1 3 Note: Do not open the carrier access door while a scan is in process; the scan will be interrupted. The scan will resume when the door is closed, but the quality of the scan may be reduced. Scan again with the door closed for best scanning quality. Open the carrier access door. 4 2 Close the carrier access door. The scanner will not scan if the door is open. Initiate the scan from your software. The software will prompt you when the scan is finished.
English 15 8 Preview an Image 1 Load the film or slide into the film carrier (as described previously). 2 Insert the carrier into the scanner (as described previously). 3 Start the PolaColor Insight program: Power Mac or PowerPC Windows 95, 98 or NT Double-click PolaColor Insight. 1 Select Programs from To start the Photoshop plug-in within another application, select Import from the application’s File menu and select PolaColor Insight. 2 Point to Polaroid Pola- the Start menu.
9 Enhance and Scan the Image Follow the online user’s guide instructions to enhance the image and perform a final scan. To view the online PolaColor Insight User’s Guide: Power Mac or PowerPC Windows 95, 98 or NT 1 Double-click PolaColor 1 Select Programs from Insight, launching the PolaColor Insight program. the Windows Start menu. 2 Select PolaColor Insight Help from the Help menu. 10 Remove the Carrier 1 When the scan is complete, open the door and remove the carrier.
English 17 Installing a SCSI Host Adapter Limited Warranty The SprintScan 45 Ultra connects to a SCSI host adapter in your computer. Most Macintosh computers have a SCSI adapter built in, but most IBM PC compatible computers do not. Polaroid Corporation warrants the SprintScan 45 Ultra scanner against defects in manufacture or workmanship for a period of one year from the date of purchase. To verify the warranty period, you should keep the invoice, sales receipt, or other proof of the purchase date.
Radio and Television Interference FCC Notice (U.S.A.) Note: This equipment has been tested and found to comply with the limits for a Class B digital device, pursuant to Part 15 of the FCC Rules. These limits are designed to provide reasonable protection against harmful interference in a residential installation. This equipment generates, uses, and can radiate radio frequency energy and, if not installed and used in accordance with the instructions, may cause harmful interference to radio communications.
Installation Quickstart Errata
SprintScan 45 Ultra Installation Quickstart Errata English . . . . . . . . . . . . . . . . . . . . . . . . .
English 3 About This Document PC Systems This document provides corrections and updates for SprintScan 45 Ultra Installation Quickstart packaged with the scanner. • An IBM PC or compatible with a 300-MHz Pentium processor and 128 megabytes (MB) of RAM (RAM equal to twice the typical image file size recommended). System Requirements (Page 3) • Microsoft Windows 95, 98, 2000, Me or NT (version 4 or later) operating system. Macintosh Systems • 400 MB of free disk space.
1 Unpack the Box (Page 4) SCSI Termination Switch (Page 7) The PolaColor Insight Software CD contains the following: The normal SCSI termination switch positions (d in the drawing on page 7) are up = on (terminated) and down = off (unterminated). • PolaColor Insight software for Windows 95, 98, Me, 2000 and NT • PolaColor Insight software for Power MAC and PowerPC systems • Online user's guide 3 Install the Software (Page 5) Step 3 for Power Mac or PowerPC (plug in installation) is no longer necessary.
English The 120 Film Adapters (Page 11) Steps 3 and 4 on pages 11 and 12 have changed to the following: 3 Orient the 120 film adapter with the correct side up and the notches (a) on the left. Place the unmounted film over the opening so the image is right-reading and the top of the image is at the top of the adapter. Inserting the Carrier Into the Scanner (Page 14) Step 2 has the following note added: Note: When inserting the 4x5 film carrier, make sure the words "LOCK" and "UNLOCK" face upward.