Pantone 426 C Owner's Manual for Maintenance and Safety
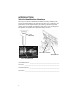
Pantone 426 C Improper vehicle use can result in SEVERE INJURY or DEATH. S S S S S S S S S S S S S S S S S Do not start vehicle until all occupants are seated. Remain seated, holding handles, while the vehicle is in motion. Operate from driver’s side only. Always wear your seatbelt to prevent ejection from vehicle. The roof is not designed or intended to provide rollover protection. Vehicle rollover could cause severe injury or death. Always operate with caution.
WELCOME Thank you for purchasing a Polaris vehicle, and welcome to our worldwide family of Polaris owners. We proudly produce an exciting line of utility and recreational products. • Snowmobiles • All-terrain vehicles (ATVs) • RANGER® utility vehicles • Neighborhood vehicles (NVs) • Victory Motorcycles® We believe Polaris sets a standard of excellence for all utility and recreational vehicles manufactured in the world today.
POLARIS, THE WAY OUT are registered trademarks of Polaris Industries Inc. Copyright 2009 Polaris Sales Inc. All information contained within this publication is based on the latest product information at the time of publication. Due to constant improvements in the design and quality of production components, some minor discrepancies may result between the actual vehicle and the information presented in this publication. Depictions and/or procedures in this publication are intended for reference use only.
TABLE OF CONTENTS Introduction . . . . . . . . . . . . . . . . . . . . . . . . . . . . 4 Safety . . . . . . . . . . . . . . . . . . . . . . . . . . . . . . . . . 7 Features and Controls . . . . . . . . . . . . . . . . . . . 24 Operation . . . . . . . . . . . . . . . . . . . . . . . . . . . . . 39 Cleaning . . . . . . . . . . . . . . . . . . . . . . . . . . . . . . 53 Storage . . . . . . . . . . . . . . . . . . . . . . . . . . . . . . . 55 Maintenance . . . . . . . . . . . . . . . . . . . . . . . . . . .
INTRODUCTION The following signal words and symbols appear throughout this manual and on your vehicle. Your safety is involved when these words and symbols are used. Become familiar with their meanings before reading the manual. The safety alert symbol indicates a potential personal injury hazard. WARNING A WARNING indicates a hazardous situation which, if not avoided, may result in death or serious injury.
INTRODUCTION WARNING Failure to heed the warnings and safety precautions contained in this manual can result in severe injury or death. Your Polaris vehicle is not a toy and can be hazardous to operate. This vehicle handles differently than cars, trucks or other off-road vehicles. A collision or rollover can occur quickly, even during routine maneuvers like turning, or driving on hills or over obstacles, if you fail to take proper precautions. • Read this owner’s manual.
INTRODUCTION Vehicle Identification Numbers Record your vehicle's identification numbers and key number in the spaces provided. Remove the spare key and store it in a safe place. An ignition key can be duplicated only by ordering a Polaris key blank (using your key number) and mating it with one of your existing keys. The ignition switch must be replaced if all keys are lost.
SAFETY Equipment Modifications Your Polaris vehicle is designed to provide safe operation when used as directed. Do not modify this vehicle in a way that will alter the weight distribution of the vehicle. This type of modification may negatively impact vehicle stability. Failure of critical machine components may result from operation with any modifications, especially those that increase speed or power. This vehicle may become less stable at speeds higher than those for which it is designed.
SAFETY Operator Safety WARNING Failure to operate this vehicle properly can result in a collision, loss of control, accident or overturn, which may result in serious injury or death. Heed all safety warnings outlined in this section of the owner’s manual. See the OPERATION section of the owner’s manual for proper operating procedures. Operating Without Instruction Operating this vehicle without proper instruction increases the risk of an accident.
SAFETY Operator Safety Ventilation When Charging Batteries Failure to provide adequate ventilation while charging batteries can result in an explosion. Volatile hydrogen gas is emitted during charging and may accumulate in pockets at the ceiling. Always ensure a minimum of 5 air changes per hour in the charging area. Failure to Inspect Before Operating Failure to inspect and verify that the vehicle is in safe operating condition before operating increases the risk of an accident.
SAFETY Operator Safety Seat Belts Riding in this vehicle without wearing a seat belt increases the risk of serious injury in the event of an accident or sudden stop. Riders must wear seat belts at all times. Seat belts reduce the severity of injury in the event of a sudden stop or accident. Always make sure the seat belts are secured for both the operator and passenger before riding.
SAFETY Operator Safety Carrying a Passenger Never carry a passenger until you have operated this vehicle for at least two hours and have completed the New Operator Driving Procedures outlined on pages 40-41. Passengers must always be seated in a passenger seat with seat belt secured. Never drive the vehicle until all occupants are properly seated.
SAFETY Operator Safety Turning Improperly Turning improperly could cause loss of traction, loss of control, accident or overturn. Always follow proper procedures for turning as described in the owner's manual. Avoid sharp turns. Never turn at a fast speed. Never make abrupt steering maneuvers. Practice turning at slow speeds before attempting to turn at faster speeds.
SAFETY Operator Safety Improper Hill Climbing Improper hill climbing could cause loss of control or overturn. Use extreme caution when operating on hills. Always follow proper procedures for hill climbing as described in the owner's manual. See page 45. Crossing Slopes Crossing a slope is not recommended. Improper procedure could cause loss of control or overturn. Avoid crossing a slope unless absolutely necessary.
SAFETY Operator Safety Operating on Slippery Terrain Operating on excessively rough, slippery or loose terrain could cause loss of traction, loss of control, accident or overturn. Do not operate on excessively rough, slippery or loose terrain. Always use extra caution on rough, slippery or loose terrain. Operating Improperly in Reverse Improperly operating in reverse could result in a collision with an obstacle or person. Always follow proper operating procedures as outlined in this manual. See page 47.
SAFETY Operator Safety Operating Over Obstacles Improperly operating over obstacles could cause loss of control or overturn. Never operate over obstacles. Skidding or Sliding Skidding or sliding can cause loss of control or overturn. Always follow proper procedures for operating on slippery surfaces as described in the owner's manual. When operating on slippery surfaces such as ice or loose gravel, reduce speed and use extra caution to reduce the chance of skidding or sliding.
SAFETY Operator Safety Precautions During Maintenance Always follow all safety instructions in the maintenance portion of this owner’s manual, as well as the following: • Make sure the vehicle is properly immobilized before beginning any maintenance. • Always block the chassis securely before working under the vehicle. • Always disable the vehicle’s electrical system before performing maintenance on the vehicle. Remove the key.
SAFETY Safety Labels and Locations Warning labels have been placed on the vehicle for your protection. Read and follow the instructions of the labels on the vehicle carefully. If any of the labels depicted in this manual differ from the labels on your vehicle, always read and follow the instructions of the labels on the vehicle. If an informational or graphic label becomes illegible or comes off, contact your Polaris dealer to purchase a replacement.
SAFETY Safety Labels and Locations General Warning WARNING READ OWNER’S MANUAL. FOLLOW ALL INSTRUCTIONS AND WARNINGS. • This vehicle does not comply with Federal Regulations for on highway use. Check local laws for usage restrictions. TO OPERATE: 1. Turn Key to ON position 2. Place Forward/Reverse Switch in desired position. 3. Park Brake will release and vehicle will move when accelerator pedal is pressed. 4. To stop, release accelerator and gradually depress brake pedal. 5.
SAFETY Safety Labels and Locations Age Warning WARNING Operating this vehicle if you are under the age of 16 increases your chance of severe injury or death. NEVER operate this vehicle if you are under age 16 and NEVER operate this vehicle without a valid driver’s license.
SAFETY Safety Labels and Locations Discretionary Warning WARNING IMPROPER VEHICLE OPERATION CAN RESULT IN SEVERE INJURY OR DEATH. • Do not start vehicle until all occupants are seated. • Remain seated, holding handles while the vehicle is in motion. • Operate from Driver’s side only. • Always wear your seatbelt to prevent ejection from vehicle. • The roof is not designed or intended to provide rollover protection. Vehicle rollover could cause severe injury or death. Always operate with caution.
SAFETY Safety Labels and Locations CAUTION, MASTER SWITCH CAUTION • When towing the vehicle, the Master ONOFF Switch MUST be in the OFF position or severe motor damage will occur. • Place the Master ON-OFF Switch in the OFF position before disconnecting batteries or servicing the vehicle. • Place the Master ON-OFF Switch in the OFF position if storing the vehicle for greater than 5 days. Failure to due so may lead to complete battery discharge and battery damage.
SAFETY Safety Labels and Locations Passenger Safety Warning WARNING • DO NOT get on or off vehicle while it is in motion. • Remain seated, holding handles while the vehicle is in motion. • Always wear your seatbelt to prevent ejection from vehicle. • The roof is not designed or intended to provide rollover protection. Vehicle rollover could cause severe injury or death. Always operate with caution. • Keep entire body in the vehicle at all times.
SAFETY Safety Labels and Locations Warning Battery WARNING • Battery Explosion could result in severe injury or death. • Wear eye protection when working near batteries. • Do not store items in the battery compartment. • Explosive gases are released when charging batteries. Keep well ventilated. • No smoking. Keep sparks and flames away. • Electrical shorts can result in burns. Do not make connection between positive and negative battery terminals.
FEATURES AND CONTROLS Component Locations FRONT VIEW Canopy Steering Wheel Turn Signal Lever/ Hazard Lights Grab Handles Adjustable Headlights Adjustable Front Shocks 24 Turn Signal Lights
FEATURES AND CONTROLS Component Locations REAR VIEW Hand Hold Passenger Seat T-Bar Passenger Seat Grab Handle Passenger Seat Footrest Tail Light/Brake Light/Running Light 25
FEATURES AND CONTROLS Component Locations SIDE VIEW B Pillar A Pillar Seat Belts Drink Rail 26 Bag Retainer Charging Receptacle Battery Compartment Under Seat
FEATURES AND CONTROLS 12V Accessory Power Outlet Key Switch Forward/ Reverse Switch Headlight Switch Battery Discharge Indicator 12V Accessory Power Outlet A 12V power outlet is provided for charging cell phones and GPS devices. Connected devices should not a exceed 2A or 24W rating. Key Switch Use the key switch to turn the electrical power on or off. OFF: All electrical power is off, depends on ON/OFF switch ON: Electrical power is on. See page 40 for New Operator Driving Procedures.
FEATURES AND CONTROLS Forward/Reverse Switch When the Forward/Reverse switch is in the center position, the vehicle is in neutral and will not operate. Select forward or reverse to operate the vehicle. Push the top of the switch to select forward operation. Push the bottom of the switch to select reverse operation. Forward Neutral Reverse Tip: A warning alert will sound when reverse is selected, regardless of key position.
FEATURES AND CONTROLS Battery Discharge Indicator (BDI) The battery discharge indicator shows the amount of energy removed from the batteries. 70% discharge is indicated by the second to the left LED bar flashing. Full charge is indicated when the rightmost led BAR IS LIT. Avoid discharging the batteries more that 80%. Battery Discharge Indicator NOTICE: When the last bar is blinking, the gauge reflects 80% discharge.
FEATURES AND CONTROLS Master On/Off Switch The master switch is located under the seat on the passenger side of the battery box. ON The switch must be in the ON position (forward) for the vehicle to operate.
FEATURES AND CONTROLS Multifunction Light Multifunction Light Troubleshooting Guide Flash Sequence OFF 1 Flash Solution If the light does not illuminate, verify that the master on/off switch is in the ON position. Check battery cable connections. The system controller has an internal error. See your Polaris dealer for service. 2 Flashes Move the master on/off switch to OFF. Inspect electrical connections to the direction selector switch. Return the master on/ off switch to ON.
FEATURES AND CONTROLS Batteries This vehicle is equipped with six 8-volt batteries that supply the power needed to operate the vehicle. Refer to the battery maintenance section beginning on page 71 for battery safety warnings and safe handling and maintenance procedures. • Always make sure that all electrical accessories are grounded directly to the battery (-) post. Never use the chassis or body as a ground connection. • Always observe all battery safety warnings and safe handling procedures.
FEATURES AND CONTROLS Brakes Park Brake Brake Pedal Accelerator Pedal Park Brake The park brake pedal is located in the upper left corner of the brake pedal. To engage the park brake, depress the brake pedal firmly and tip the park brake portion of the pedal forward with your foot until it latches. To release the park brake, depress the accelerator. Brake Pedal Depress the brake pedal with moderate pressure to slow or stop the vehicle.
FEATURES AND CONTROLS Accelerator Pedal Depress the accelerator pedal to release the park brake and increase vehicle speed. The key must be ON and the direction selector switch must be in either FORWARD or REVERSE. Release the pedal to decrease speed. Holding the accelerator pedal down continuously will accelerate the vehicle to the maximum designed speed. Use the brakes to control speed when traveling down a slope. NOTICE: Operating at excessive speeds may result in damage to drivetrain components.
FEATURES AND CONTROLS Seats Driver’s Seatback Adjustment There is not an adjustment for the front seat base or rear seats.You can adjust the driver’s side seatback. To adjust pull on the knob on the driver’s side B-pillar. Rotate the seatback into the desired position and ensure the knob completely returns to its starting position. Test the seatback to ensure that it is secure before operating.
FEATURES AND CONTROLS Seats Open Seat to Access Batteries To Flip the Seat Up for Service 1. Make sure the driver’s side seatback is in rearmost position 2. Rotate the driver and passenger buckles underneath the seatbacks 3. Grasping the driver or passenger side armrest, rotate the seat forward until it rests against the steering wheel. To Completely Remove the Seat Follow Step 1 through 3 from above. Seek the assistance of a friend or service technician.
FEATURES AND CONTROLS Seat Belts Falling from a moving vehicle could result in serious injury or death. Always fasten your seat belt securely before operating or riding in this vehicle. Always make sure the seat belts are secured for both the operator and passengers before riding. To wear the seat belt properly, follow this procedure: 1. Place the belt across your lap as low on your hips as possible. Make sure that the belt is not twisted. 2. Push the latch plate into the buckle until it clicks. 3.
FEATURES AND CONTROLS Passenger Seat/Bag Retainer To access the passenger seat, lift the passenger seat release handle and push down the seat until it is securely resting on the passenger seat bumpers. Pull the passenger T-bar handle forward until it latches. To access the bag retainer, lift on the passenger seat release handle and push the passenger T-bar handle down. Lift up the seat until it is securely fastened in place.
OPERATION Brake System Break-in Apply only moderate braking force for the first 50 stops. Aggressive or overly forceful braking when the brake system is new could damage brake shoes and drums. Pre-Ride Inspection Failure to inspect and verify that the vehicle is in safe operating condition before operating increases the risk of an accident. Always inspect the vehicle before each use to make sure it's in safe operating condition.
OPERATION New Operator Driving Procedures 1. Read and understand the owner's manual and all warning and instruction labels before operating this vehicle. 2. Disconnect the battery charger (if connected). See page 72. 3. Perform the pre-ride inspection. See page 39. 4. Do not carry a passenger until you have at least two hours of driving experience with this vehicle. 5. Sit in the driver's seat and fasten the seat belt. 6.
OPERATION New Operator Driving Procedures Stopping 1. Release the accelerator pedal completely. 2. Depress the brake pedal and brake to a complete stop. Parking 1. Stop the vehicle on a level surface. 2. Engage the park brake. Tip: A roll-away alert will sound if the vehicle begins to roll away after being parked. Return to the vehicle immediately and make sure the park brake is engaged. 3. If the vehicle will be parked for more than a few minutes, turn the key off.
OPERATION Driving with Passengers 1. Complete the New Operator Driving Procedures outlined on pages 40-41. 2. Perform the pre-ride inspection. See page 39. 3. Make sure all occupants are properly seated and have their seatbelts secured. 4. Slow down. Always travel at a speed appropriate for your skills, your passenger's skills, and operating conditions. Avoid unexpected or aggressive maneuvers that could cause discomfort or injury to your passengers. 5. Vehicle handling may change with passengers on board.
OPERATION Battery Use • New batteries should be given a full charge before use. • New deep cycle batteries need to be cycled several times before reaching full capacity (50-125 cycles, depending on type). Capacity will be limited during this time. Always make sure that all electrical accessories are grounded directly to the battery (-) post. Never use the chassis or body as a ground connection. • Always observe all battery safety warnings and safe handling procedures.
OPERATION Driving on Slippery Surfaces WARNING Skidding or sliding can cause loss of control or overturn (if tires regain traction unexpectedly). When operating on slippery surfaces such as ice or loose gravel, reduce speed and use extra caution to reduce the chance of skidding or sliding out of control. Do not operate on excessively slippery surfaces. When driving on slippery surfaces such as wet trails, loose gravel, or ice, be alert for the possibility of skidding and sliding.
OPERATION Driving Uphill Whenever traveling uphill, follow these precautions: 1. Always check the terrain carefully before ascending a hill. 2. Avoid steep hills (15° maximum). 3. Drive straight 15° maximum uphill. 4. Never climb hills with excessively slippery or loose surfaces. 5. Proceed at a steady rate of speed and accelerator position. Never apply full throttle suddenly. 6. Avoid unnecessary changes in speed or direction. 7. Never go over the crest of a hill at high speed.
OPERATION Driving Downhill Whenever descending a hill, follow these precautions: 1. Avoid steep hills (15° maximum). 2. Always descend a hill with the direction selector switch in forward. Never descend a hill with the switch on neutral. 15° maximum WARNING! Coasting down a hill could result in excessive speed, which could result in loss of control. Never travel down a hill at high speed. 3. Use the brake pedal to control speed when descending a hill. 4.
OPERATION Driving in Reverse Follow these precautions when operating in reverse: 1. Always check for obstacles or people behind the vehicle. 2. Apply the pedal lightly. Never press quickly on the accelerator pedal. 3. Back slowly. 4. Apply the brakes lightly for stopping. 5. Avoid making sharp turns.
OPERATION Driving on a Sidehill (Sidehilling) Driving on a sidehill is not recommended. Improper procedure could cause loss of control or overturn. Avoid crossing the side of any hill unless absolutely necessary. If crossing a hill is unavoidable, follow these precautions: 1. Drive slowly and use extreme caution. 2. If the vehicle begins to overturn, or if it feels as if it may overturn, immediately turn downhill. 3.
OPERATION Parking on an Incline A rolling vehicle can result in serious injury. Avoid parking on an incline. If parking on an incline is unavoidable, follow these precautions: 1. Set the Parking Brake. 2. Turn the Forward/Reverse switch to Neutral. 3.
OPERATION Hauling Cargo WARNING Overloading the vehicle or carrying or towing cargo improperly can alter vehicle handling and may cause loss of control or brake instability. Always follow these precautions when hauling cargo: Never exceed the stated load capacity for this vehicle. REDUCE SPEED AND ALLOW GREATER DISTANCES FOR BRAKING WHEN HAULING CARGO. NEVER EXCEED THE MAXIMUM WEIGHT CAPACITY of the vehicle.
OPERATION Towing the Vehicle Follow these procedures when towing the vehicle: 1. Place the direction selector switch in the NEUTRAL position. 2. Move the master ON/OFF switch to the OFF position. 3. Turn the key off. 4. Always follow these precautions when towing this vehicle: • Do not operate faster than 12 mph (19 km/h). • Do not tow on public streets. • Do not allow passengers in the towed vehicle. • Avoid abrupt starts and stops. • Avoid sharp turns and abrupt steering maneuvers.
OPERATION Transporting the Vehicle on a Trailer When transporting the vehicle for a long distance or on public streets, always use a trailer with an approved load rating of 1200 lbs. (544 kg) per vehicle being transported. Follow these procedures when trailering the vehicle: 1. Place the direction selector switch in the NEUTRAL position. 2. Engage the park brake. 3. Remove the key to prevent loss during transporting. 4. If the trailer is not enclosed, remove the windshield (if equipped). 5.
CLEANING Washing the Vehicle Keeping your Polaris vehicle clean will not only improve its appearance but it can also extend the life of various components. NOTICE: High water pressure may damage components. Polaris recommends washing the vehicle by hand or with a garden hose, using mild soap. Certain products, including insect repellents and chemicals, will damage plastic surfaces. Do not allow these types of products to contact the vehicle.
CLEANING Washing the Vehicle If a high pressure water system is used for cleaning (not recommended), exercise extreme caution. The water may damage components and could remove paint and labels. Avoid directing the water stream at the following items: • Electrical components, wiring, switches and controls, such as turn signals and dash controls. • Wheel bearings • Brakes • Cab and body panels • Labels and decals If warning and safety labels are damaged, contact your Polaris dealer for free replacement.
STORAGE Storing the Vehicle Any time the vehicle will be parked for more than a few hours, follow the recommended storage procedures: 1. Make any necessary repairs and clean the vehicle. See page 53. 2. Clean the batteries. See page 72. 3. Store the vehicle out of the sun in a cool, dry place. 4. Be sure the storage area is well ventilated. 5. Move the Master On/Off switch to the OFF position. 6. Do not engage the park brake. 7. Verify that tire pressure is at specification. 8.
STORAGE Removal from Storage 1. 2. 3. 4. 5. 6. 56 Inspect all battery connections. Verify that batteries are fully charged. Verify that tire pressure is at specification. Perform the pre-ride inspection. See page 39. Inspect and verify the tightness of the bolts, nuts and other fasteners. Lubricate at the intervals outlined in the Periodic Maintenance Chart beginning on page 57.
MAINTENANCE Periodic Maintenance Chart Careful periodic maintenance will help keep your vehicle in the safest, most reliable condition. Inspection, adjustment and lubrication of important components are explained in the periodic maintenance chart. Inspect, clean, lubricate, adjust and replace parts as necessary. When inspection reveals the need for replacement parts, use genuine Polaris parts available from your Polaris dealer. Record maintenance and service in the Maintenance Log beginning on page 82.
MAINTENANCE Periodic Maintenance Chart Maintenance Chart Key X Perform these operations more often for vehicles subjected to severe use. n Have an authorized Polaris dealer perform these services. WARNING! Improperly performing the procedures marked with a n could result in component failure and lead to serious injury or death. Have an authorized Polaris dealer perform these services. Perform all services at whichever maintenance interval is reached first.
MAINTENANCE Periodic Maintenance Chart Item Maintenance Interval Remarks (whichever comes first) Hours Calendar Miles (Km) n Brake and Acceler- 30 H 3M 300 (500) Inspect; adjust; lubricate; at intervals or after submersion in water X General lubrication 50 H 3M 500 (800) Lubricate all fittings, pivots, cables, etc.
MAINTENANCE Lubrication Recommendations Check and lubricate all components at the intervals outlined in the Periodic Maintenance Chart beginning on page 59, or more often under severe use, such as wet or dusty conditions. Items not listed in the chart should be lubricated at the general lubrication interval. Item Lube Method Steering Kingpins Polaris Premium all Season Locate fittings and grease. Grease or grease conforming to NLGI No.
MAINTENANCE Transaxle Transaxle Specification Chart Use of other fluids may result in improper operation of components. Transaxle Lubricant Capacity Fill Plug Torque Transaxle Lubricant Gearcase Polaris PN 2873602 12 oz. (355 ml) 20-30 ft. lbs.
MAINTENANCE Speed Control System/Accelerator Pedal WARNING Failure to check or maintain proper operation of the accelerator pedal system can result in an accident and lead to serious injury or death if the accelerator pedal sticks during operation. Never start or operate this vehicle if it has a sticking or improperly operating accelerator pedal. Immediately contact your dealer for service if accelerator pedal problems arise. Always check the pedal for free movement and return before and during operation.
MAINTENANCE Brakes The rear brakes are mechanical drum type brakes activated by the brake pedal. See page 33. Always check brake pedal travel before each use of the vehicle. When applied, the brake pedal should feel firm. If you discover any irregularities in brake system operation, including excessive pedal travel, contact your dealer for proper diagnosis and repairs.
MAINTENANCE Suspension Settings The front suspension shocks are preload adjustable, with three settings on each axle. Lowest (Softest) Setting Highest (Stiffest) Setting Adjustment Cam The suspensions are set on the middle setting at the factory. This setting is appropriate for nearly all riding conditions. • Always apply the same adjustment setting to both wheels.
MAINTENANCE Tires WARNING Operating your vehicle with worn tires will increase the possibility of skidding, loss of control and an accident, which could result in serious injury or death. Always replace tires when the tread depth measures 1/8" (3 mm) or less. Improper tire inflation or the use of non-standard size or type of tires may adversely affect vehicle handling, which could result in vehicle damage or personal injury. Always maintain proper tire pressure.
MAINTENANCE Axle and Wheel Nut Torque Specifications Inspect the following items occasionally for tightness, and if they've been loosened for maintenance service. Do not lubricate the stud or the lug nut. Front 40 ft. lbs. (54 Nm) Rear 95-115 lbs. (129-156 Nm) Fastener Nut Torque Wheel Lug Nut 90 ft. lbs. (122 Nm) Front Hub Nut 40 ft. lbs. (54 Nm) Rear Hub Nut 95-115 ft. lbs.
MAINTENANCE Tires WARNING! Improperly installed wheels can adversely affect tire wear and vehicle handling, which can result in serious injury or death. Always ensure that all nuts are torqued to specification. Do not service axle nuts that have a cotter pin installed. See your Polaris dealer. Wheel Removal 1. Position the vehicle on a flat level surface. 2. Place the gear selector switch in neutral. 3. Apply the parking brake. 4. Loosen the wheel nuts slightly. 5.
MAINTENANCE Tires Wheel Installation 1. Place the transmission in NEUTRAL. Rear 2. Place the wheel in the correct position on the wheel hub. Be sure the valve stem is toward the outside and rotation arrows on the tire point toward forward rotation. 3. Attach the wheel Front nuts and finger tighten. 4. Carefully lower the vehicle to the ground. 5. Torque the wheel nuts to specification. See page 66.
MAINTENANCE Lights WARNING! Poor lighting while driving can result in severe injury or death. Headlight and tail light lenses become dirty during normal operation. Wash the headlights frequently to maintain lighting quality. Headlight Lamp Replacement Do not service the headlamps until they've cooled sufficiently. 1. Unplug the headlamp from the wiring harness. Wiring Be sure to pull on the Harness connector, not on the wiring. 2. Turn the lamp counterclockwise to remove it. 3. Install the new lamp.
MAINTENANCE Lights Brake Lights When the brake pedal is depressed, the brake light comes on. Check the brake light before each ride. 1. Turn the ignition switch to the ON position. 2. Apply the brakes.If the light doesn't come on, check the wiring, the brake switch or the tail light assembly.
MAINTENANCE Batteries WARNING Battery posts, terminals and related components contain lead and lead compounds, chemicals known to cause cancer and reproductive harm. Always wash your hands after touching or handling the batteries. WARNING Charging a damaged battery can result in serious injury. Never attempt to charge a frozen or bulging battery. Discard the battery appropriately and install a new battery.
MAINTENANCE Batteries Battery Cleaning If cleaning is necessary, remove the corrosion with a stiff wire brush. Wash with a solution of one tablespoon baking soda and one cup water. Rinse well with tap water and dry off with clean shop towels. Coat the terminals with dielectric grease or petroleum jelly. Be careful not to allow cleaning solution or tap water into the batteries. Battery Charging When not in use, park the vehicle indoors and connect the battery charger.
MAINTENANCE Batteries Battery Fluid A poorly maintained battery will deteriorate rapidly. Check the battery fluid level often. Add only distilled water. Tap water contains minerals that are harmful to a battery. Batteries should always be watered after charging unless plates are exposed before charging. If exposed, plates should be covered by approximately 1/8” of water. Check level after charge. The level should be kept 1/4” below the bottom of the fill well in the cell cover.
SPECIFICATIONS BREEZE NV Gross Vehicle Weight Rear Seat Capacity Maximum Weight Capacity Rear Gearcase Oil Capacity Overall Length/Width/Height Wheelbase Ground Clearance Motor Front Suspension Rear Suspension Driving System Type Shift Type Drive Ration Final Tire Size Front/Rear Tire Pressure-Front Tire Pressure-Rear Brakes Headlights Tailights Brake lights Auxiliary DC Outlet 74 1130 lbs. (514 kg) 300 lbs. (136 kg) 700 lbs. (317.5 kg) (riders/cargo/accessories) 12 oz. (355 ml) 113 in.
POLARIS PRODUCTS Part Number 2873602 2870465 2871312 2871322 2871423 2871515 2871551 2871329 2871956 Description Gearcase / Transmission Lubricants Premium AGL Synthetic Gearcase Lubricant (qt.) Pump for Gallon Jug Grease / Specialized Lubricants Grease Gun Kit, Premium All Season (3 oz.) Premium All Season Grease (3 oz. cartridge) Premium All Season Grease (14 oz. cartridge) Premium U-Joint Lube (3 oz.) Premium U-Joint Lube (14 oz.
TROUBLESHOOTING Vehicle Doesn’t Operate Possible Cause Low battery voltage Loose battery connections Loose contactor connections Loose electronic control box connections Accelerator pedal depressed when turning the key switch on 76 Solution Recharge the battery overnight Check all connections and tighten Check all connections and tighten Inspect, clean, reinstall connectors Return accelerator pedal to rest position
WARRANTY LIMITED WARRANTY Polaris Sales Inc., 2100 Highway 55, Medina, MN 55340, gives a TWO YEAR LIMITED WARRANTY on all components of your Polaris vehicle against defects in material or workmanship. This warranty covers the parts and labor charges for repair or replacement of defective parts which are covered by this warranty. This warranty begins on the date of purchase. This warranty is transferable to another consumer during the warranty period through a Polaris dealer.
WARRANTY LIMITATIONS OF WARRANTIES AND REMEDIES The Polaris limited warranty excludes any failures that are not caused by a defect in material or workmanship. This warranty does not cover accidental damage, normal wear and tear, abuse or improper handling.
WARRANTY LIMITATIONS OF WARRANTIES AND REMEDIES U.S. Battery’s liability shall be to replace the defective battery. Replacement shall mean furnishing a new battery or used battery with sufficient life to complete the warranty term, which is incidental or reasonably equivalent to the warranted product at no cost to the purchaser during the replacement period.
WARRANTY Exported Vehicles EXCEPT WHERE SPECIFICALLY REQUIRED BY LAW, THERE IS NO WARRANTY OR SERVICE BULLETIN COVERAGE ON THIS VEHICLE IF IT IS SOLD OUTSIDE THE COUNTRY OF THE SELLING DEALER'S AUTHORIZED LOCATION. This policy does not apply to vehicles that have received authorization for export from Polaris Industries. Dealers may not give authorization for export. You should consult an authorized dealer to determine this vehicle's warranty or service bulletin coverage if you have any questions.
WARRANTY If You Move: If you move to another country, be sure to contact Polaris Customer Assistance and the customs department of the destination country before you move. Vehicles importation rules vary considerably from country to country. You may be required to present documentation of your move to Polaris Industries in order to continue your warranty coverage. You may also be required to obtain documentation from Polaris Industries in order to register your vehicle in your new country.
MAINTENANCE LOG Use the following chart to record periodic maintenance.
83
INDEX A Accelerator Pedal. . . . . . . . . . . . . . . 34 Adjustment Seat . . . . . . . . . . . . . . . . . . . . . 35 Axle Nut Torque . . . . . . . . . . . . . . . 66 B Batteries . . . . . . . . . . . . . . . . . 32, 71-73 Charging . . . . . . . . . . . . . . . . . 72 Cleaning. . . . . . . . . . . . . . . . . . 72 Fluid. . . . . . . . . . . . . . . . . . . . . 73 Safety Warnings. . . . . . . . . . . . 71 Battery Discharge Indicator (BDI) . 29 Before Riding. . . . . . . . . . . . . . . . . .
INDEX P S Park Brake. . . . . . . . . . . . . . . . . . . . . 33 Parking on an Incline . . . . . . . . . . . . 49 Passenger Seat/Bag Retainer . . . . . . 38 Periodic Maintenance Chart . . . . 57-59 Polaris Products . . . . . . . . . . . . . . . . 75 Polishing the Vehicle . . . . . . . . . . . . 54 Power Outlet . . . . . . . . . . . . . . . . . . . 27 Pre-Ride Inspection. . . . . . . . . . . . . . 39 R Removal, Seat . . . . . . . . . . . . . . . . . . Removal, Wheels . . . . . . . . . . . . . . .