RIDE COMMAND DISPLAY RIDE COMMAND DISPLAY INTRODUCTION Thank you for purchasing a RIDE COMMAND Display, and welcome to the Polaris RIDE COMMAND App. This intuitive display gives you access to your vehicle’s custom information and a variety of features. For a safe and enjoyable riding experience with your new Display, please read your vehicle’s owner’s manual and this Display owner’s manual.
RIDE COMMAND DISPLAY NOTICE Using the display for an extended period of time while the vehicle’s engine is off can drain the battery (if equipped). DEVICE OPERATING REQUIREMENTS Phone functionality is dependent on the capabilities of your cell phone. NOTICE Some cell phones or operating systems will not work as shown in this manual. TOUCHSCREEN DISPLAY COMPLIANCE STATEMENT Notice: This device complies with part 15 of the FCC Rules and with Industry Canada license-exempt RSS standard(s).
RIDE COMMAND DISPLAY CAUTION This equipment complies with part 15 of the Federal Communications Commission (FCC) rules. These requirements are intended to provide reasonable protection against harmful interference in a residential installation. This equipment generates, uses and can radiate radio frequency energy and, if not installed and used in accordance with the instructions, may cause harmful interference to radio communications.
RIDE COMMAND DISPLAY 1. This device may not cause interference. 2. This device must accept any interference, including interference that may cause undesired operation of the device. CAUTION This equipment complies with part 15 of the Federal Communications Commission (FCC) rules. These requirements are intended to provide reasonable protection against harmful interference in a residential installation.
RIDE COMMAND DISPLAY VEHICLE-TO-VEHICLE COMMUNICATION (V2V) IMPORTANT For applications that use vehicle-to-vehicle (V2V) communication, radio transmitter IC: 5966A-RC7W has been approved by Innovation, Science and Economic Development Canada (ISED) to operate with Polaris antenna (part number 4019211) with gain of 3dBi. Any antenna that has a gain greater than 3 dBi is prohibited for use with this device.
RIDE COMMAND DISPLAY OVERVIEW For the latest information about your Ride Command display, including software updates, please visit: https://ridecommand.polaris.com. WARNING Driving while distracted can result in loss of vehicle control, crash, and injury. We strongly recommend that you use extreme caution when using any device that may take your focus off the trail. Your primary responsibility is the safe operation of your vehicle.
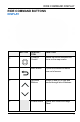
RIDE COMMAND DISPLAY RIDE COMMAND BUTTONS DISPLAY BUTTON DESCRIPTION FUNCTION q 5-Way UI Control Moves the cursor and pans the focus on the map screen. w Back Button Cycles all screens and backs user out of menus. e Up/Down Buttons Zooms in and out of map and scrolls through lists of features. r Polaris Button Opens and closes the Badge Panel.
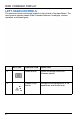
RIDE COMMAND DISPLAY LEFT HAND CONTROLS The electronic hand controls are located on the left side of the handlebars. The hand controls operate certain Ride Command features, headlights, reverse operation, and heated grips. BUTTON DESCRIPTION FUNCTION t Select Button Opens the Badge Panel and chooses options. y Heated Grips Button Activates the smartwarmers in the handlebars and throttle lever.
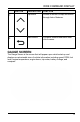
RIDE COMMAND DISPLAY BUTTON DESCRIPTION FUNCTION u Up Button Zooms in and out of map and scrolls through lists of features. i Back Button Cycles all screens and backs user out of menus. GAUGE SCREEN The Gauge Screen is the screen that will appear upon vehicle start-up and displays a customizable view of vehicle information including speed, RPM, fuel level, engine temperature, engine hours, trip meter, battery voltage, and compass.
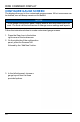
RIDE COMMAND DISPLAY CONFIGURE GAUGE SCREEN The display allows up to four customized gauge screens. All but one screen can be deleted; one will always remain as the default. NOTICE In the gauge configuration panel, display buttons and hand controls will not work. You must use the touchscreen to change screen settings and layouts. Follow the instructions below to create customized gauge screens. 1. Press the Gear Icon in the bottom right corner of the touchscreen. 2.
RIDE COMMAND DISPLAY NO CONFIGURATION DESCRIPTION q Two circular widgets and three linear widgets. w Five linear widgets. e Four circular widgets. 4. Select the Data Tab. Choose up to 5 widgets to display on the screen. TIP Keep your display software up-to-date as more widget options become available. For more information, see Update Software.
RIDE COMMAND DISPLAY 5. Reorder the widgets by pressing and holding down on the widget and sliding the widget up or down into the desired position. 6. Click the green check mark or “Done” to close the configuration panel. GAUGE VIEW MODE Press q to toggle between the two available gauge view modes, Analog and Digital.
RIDE COMMAND DISPLAY ICON BAR The Icon Bar is located across the top of the touchscreen and displays cell phone and headset connectivity, fuel range, compass heading and local time. NOTICE The Icon Bar will not appear when the Badge Panel is open.
RIDE COMMAND DISPLAY BADGE PANEL The badge panel provides easy access to frequently used features, basic display and vehicle controls, and a list of recent notifications. To access the Badge Panel, press the Polaris logo at the top of the display screen, or press the Polaris Menu/Power hard button. ACCESSING THE BADGE PANEL There are two ways to open the Badge Panel, press the Polaris icon q at the top of the touchscreen or the Polaris Button w on the right of the display.
RIDE COMMAND DISPLAY e Controls Tab r App Tray t Display Mode y Badge Panel/Polaris Icon u Notifications Tab i Heated Grips o Fuel Type a Display Brightness s Lock Vehicle Button d All Settings Button CONTROLS TAB Press the Controls tab to change display mode, display brightness, activate heated grips, and change fuel type. APP TRAY The App Tray provides easy access to key features on the display screen. Tap on any of the listed icons to navigate to that display screen.
RIDE COMMAND DISPLAY Day Mode Night Mode POLARIS BUTTON The Polaris icon opens and closes the Badge Panel. NOTIFICATIONS TAB Press the Notifications tab to view DTC codes, installed software, and vehicle warnings. ENGINE OVERHEAT INDICATOR When the engine goes over temperature, a red banner will appear at the top of your 7S Display stating: ENGINE OVERHEATING – STOP IMMEDIATELY. The appearance of this banner indicates continued operation of your snowmobile could result in serious engine damage.
RIDE COMMAND DISPLAY NOTICE If engine overheating seems to be caused by something other than poor cooling conditions, see your dealer or other qualified technician for service. HEATED GRIPS Matryx models are equipped with three individual Smartwarmer heated grips: the left handgrip, right handgrip, and right thumb throttle lever. The warmers automatically adjust in response ambient temperature and wind chill to always keep the temperature of the grips at the preset temperature.
RIDE COMMAND DISPLAY In the Heated Grips section of the Badge Panel, press the Heated Grip Settings button on the touchscreen. To customize the temperature of your hand grips and thumb lever, use Plus and Minus Buttons beside each heat level to choose your preferred setting. Click the “X” in the top left of the screen, or the Back Button, to close the menu. BUTTON BUTTON NAME FUNCTION Heated Grips Button Changes the level of hand grip warmth to low, medium, high, or off.
RIDE COMMAND DISPLAY DISPLAY BRIGHTNESS From the Controls tab, select display brightness by moving the touchscreen slider to the left or right. Press the AUTO check box to allow the screen to adjust automatically based on ambient light conditions. LOCK VEHICLE BUTTON If your vehicle is equipped with a pin activated security system (P.A.S.S.), the Lock Vehicle button will appear on the Badge Panel. Press this button to lock the vehicle before powering off the engine.
RIDE COMMAND DISPLAY Audio playback through USB or Bluetooth® devices are compatible with your Ride Command display. The Music Screen allows you to access music stored on your smartphone or other music device. You can pair your device using Bluetooth®, or by connecting it to the display’s USB port. DEVICE REQUIREMENTS Audio playback is only available on USB flash drives formatted to ex-FAT or FAT32 and operating systems iOS® 10 and Android® 5.0 or newer.
RIDE COMMAND DISPLAY • For phones, shows signal strength. • Listen to music over a headset or through optional vehicle speakers. NOTICE Ensure that your smartphone Bluetooth® settings are set to share phone calls, media audio, text messages, and contact information. NOTICE There is no built in microphone in the display. Phone call audio will play through the phone speakers or Polaris approved headset if connected. Some dial options may be unavailable at speeds greater than 3 MPH.
RIDE COMMAND DISPLAY 4. Ensure the confirmation code on the screen and your phone are the same then press “OK” on your phone. 5. For optimal experience press “Accept” on your phone when requested to access contacts and messages. 6. The display will now show a list of previously connected phones on the display. If it is unpaired, click on your phone from the list. 7. Once the display says connected/paired, your phone is now connected to the display via Bluetooth®.
RIDE COMMAND DISPLAY MAP SCREEN Press the Back Button to cycle to the map screen or press the Map button from the App Tray in the Badge Panel. The map will center you based on the location of the in-vehicle GPS. NOTICE Controls on the map surface disappear after 10 seconds of inactivity, return with a tap anywhere on the map. ZOOM Use the plus and minus signs on the left side of the screen, or pinch the screen with your fingers, to zoom in and out on the map.
RIDE COMMAND DISPLAY MAP ORIENTATION The compass icon on the right side of the screen toggles how the map orients itself during navigation. There are two orientation options: North Up and Course Up. Pressing this button will also re-center your vehicle if not already centered.
RIDE COMMAND DISPLAY MAP ORIENTATION MAP ICON North Up view locks the maps orientation so that North is always at the top of the screen, regardless of your vehicle’s position or direction. Course Up view rotates the map to match the direction of your vehicle. WAYPOINTS Waypoints are user-defined locations on the map. Waypoints can be saved and shared with friends. To add a waypoint, do the following: 1. From the map screen, tap the map menu icon at the bottom of the display screen q. 2.
RIDE COMMAND DISPLAY NOTE Go to Nav does not provide turn-by-turn directions to a POI. GROUP RIDE NOTICE The display requires a GPS lock, indicated by a blue arrow marker (as shown below), before you are able to setup or join a group ride. Invite your friends to a group to see their live location on the map of your smartphone, tablet, or in vehicle Ride Command Display.
RIDE COMMAND DISPLAY GROUP RIDE SETUP There are two ways to set up a group ride.
RIDE COMMAND DISPLAY MOBILE PHONE GROUP RIDE Features of using your mobile phone for group riding: • • • • Works within cellular range Requires a tethered mobile phone Infinite range between vehicles Works with friends using the mobile app To set up a group ride using a mobile phone, do the following: 1. From the map menu, tap the Group Ride button. 2. Tap the Setup Mobile Phone Group Ride button on the display screen. 3.
RIDE COMMAND DISPLAY 4. Press the back button to go back to the group ride screen and join your Group Ride. NOTICE In order for vehicles with a V2V antenna and vehicles using mobile phone based group ride to join the same group, at least one member of the group must be connected to both the V2V antenna and the mobile phone based group ride.
RIDE COMMAND DISPLAY JOINING A RIDE GROUP To join a group, do the following: 1. From the map menu, tap the Group Ride button. 2. Nearby ride groups will display in order of distance. 3. Tap the Join button q to join a group. NOTICE You can only be active in one ride group at a time. Close the pop up to show the map view of your chosen ride group. Other riders appear as dots on the map. If a rider is moving, the dot includes a heading arrow pointing in the direction they are riding.
RIDE COMMAND DISPLAY RIDING WITH A GROUP 1. Tap the handle by the group name w to minimize the panel and show more map. 2. After 10 seconds of not interacting with the screen, the map controls will disappear. Tap the screen to make them visible again. 3. Tap on a rider icon in the ride group panel to show that rider relative to your location. If center-on-me is enabled, the display reverts to the centered state after 10 seconds. CREATING A RIDE GROUP To create a Ride Group, do the following: 1.
RIDE COMMAND DISPLAY 3. After creating a group, the panel closes and shows the new group on the map. 4. If your ride group has been set to Private, other riders must enter your chosen passcode to join the group. 5. After a second rider joins, the map will switch to zoom-to-group and as you ride it will automatically zoom to keep all riders in view. Tap the zoom control to return to manual zoom mode.
RIDE COMMAND DISPLAY SETTINGS From Settings, you can view important details about your vehicle and personalize your touchscreen display. The settings menu is comprised of four categories: Vehicle Info, General, Time, and Vehicle Settings. To open Settings, press the Polaris button on the display and then the All Settings button from the touchscreen.
RIDE COMMAND DISPLAY VEHICLE INFORMATION From the Information settings tab you can view the following: • • • • • Vehicle Identification Number (VIN) Installed Software Version Mileage Total Engine Hours Next Service Interval 34
RIDE COMMAND DISPLAY GENERAL SETTINGS From the General settings tab you can do the following: • • • • • • • • Connect to Ride Command account Manage Bluetooth® devices Change the display language Set the speed units of measure (MPH or KM/H) Set the temperature units (F or C) System information Update software Update maps and trails 35
RIDE COMMAND DISPLAY TIME SETTINGS From the Time Settings tab you can do the following: • • • • • Set time from internal GPS location Set time zone Set time (if GPS time is not enabled) Set date Enable GPS Time (automatically sets the time to the time zone you are currently in) • Set the time format (12-hour or 24-hour) 36
RIDE COMMAND DISPLAY VEHICLE SETTINGS From the Vehicle Settings you can do the following: • • • • Access vehicle diagnostics GPS Status Set fuel type Customize heated grip temperatures 37
RIDE COMMAND DISPLAY PIN ACTIVATED SECURITY SYSTEM (IF EQUIPPED) NOTICE The P.A.S.S. feature must be activated by your dealer using Polaris Digital Wrench. See your dealer for setup and activation. The Pin Activated Security System (P.A.S.S.) allows you to safely lock and unlock your vehicle from the Ride Command display screen. ENABLE P.A.S.S. 1. Go the settings menu by pressing the Polaris button followed by the All Settings button. 2. Select Vehicle Settings from the left toolbar. 3.
RIDE COMMAND DISPLAY MAINTENANCE CARE AND MAINTENANCE To clean the display shell, use a soft cloth with mild soap and water. Do not use harsh or abrasive cleaners. For best results, use a micro-fiber towel to clean the screen. NOTICE Certain products will damage the screen and other plastic surfaces. Do not use alcohol to clean the display. Immediately clean off any gasoline that splashes on the display.
RIDE COMMAND DISPLAY 4. Select the file you wish to load (use date listed in the file name to determine most recent file). 5. Select Yes to restart display (restart required). ERROR MESSAGES If an error occurs while updating your software, perform one or all of the following actions to resolve the issue: 1. Remove and reconnect the USB flash drive securely. 2. Make sure the display files are not inside a folder on the flash drive. 3. Make sure only display files are on the flash drive.
RIDE COMMAND DISPLAY USB PORT TIP The USB Port is located in the storage compartment behind the display. The USB Port makes it easy to power devices, such as phones, audio sources, or GPS units, in addition to allowing you to stream music through the LCD display to your Bluetooth® headset. On models equipped with a Polaris Ride Command display, the USB port is also used to update the display software. For the latest software, go to https:// ridecommand.polaris.com/en-us/update.