Graphic Design CIS USA/GBR Manufactured by: Polar Electro Oy Professorintie 5 FIN-90440 KEMPELE Tel. +358-8-520 2100 Fax +358-8-520 2300 www.polar.
Time of Day Heart rate measuring File Options Recall the latest file Recording Exercise Set BasicUse Function Set Bike Set User Set Monitor Set Watch Set CountDown/ CountUp Timer Wheel size Birthday Sound On/Off Alarm HRmax Units 1/2 Time 1/2 Help On/Off Date ExeSet Speed On/Off Timer 1 Timer 2 AutoStart On/Off Timer 3 Limits 1 Limits 2 ROAD MAP Press OK Limits 3 Recovery Press Up/Down Bike functions are included in S150 model only
CONTENTS This manual contains user information for both Polar S120™ and Polar S150™ heart rate monitor owners. The information specific only for the S150 is marked with a grey background and a bike symbol. A. GETTING GOING ................................................................. 4 POLAR HEART RATE MONITOR PARTS ..................................................... 4 FUNCTIONS OF BUTTONS .......................................................................... 5 HOW TO WEAR THE HEART RATE MONITOR .
BIKE SETTINGS (S150) ............................................................................. Setting Wheel Size .............................................................................. Turning Speed Measurement On/Off ................................................ Turning AutoStart On/Off .................................................................. 23 23 24 24 C. EXERCISE .......................................................................... 25 1. HEART RATE MEASURING MODE ........
a GETTING GOING This section describes the most essential issues of monitoring your heart rate with Polar S120/S150. To fully benefit from your heart rate monitor, after reading this section, please read Settings, Exercise, and Recalling Training Information sections. POLAR HEART RATE MONITOR PARTS The transmitter detects your heart rate and transmits it to the wrist receiver. The elastic strap holds the transmitter comfortably, yet firmly, in the correct position.
FUNCTIONS OF BUTTONS Signal • Turns heart rate zone alarm on or off during exercise. Reset • Resets the heart rate monitor. Stop • Stops measuring heart rate. • Exits the displayed mode level and returns to the previous mode level. • Pressing and holding the button brings you to the Time of Day display, wherever you are in the File or Options mode. OK • Starts measuring heart rate. • Records laps. • Locks in your selection in the File and Options modes. Up • Moves to the following mode.
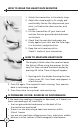
HOW TO WEAR THE HEART RATE MONITOR 1. Attach the transmitter to the elastic strap. 2. Adjust the strap length to fit snugly and comfortably. Secure the strap around your chest, just below the chest muscles, and buckle it. 3. Lift the transmitter off your chest and moisten the two grooved electrode areas on the back. 4. Check that the wet electrode areas are firmly against your skin and the Polar logo is in a central, upright position. 5. Keep the wrist receiver within 3 feet/ 1 meter of your transmitter.
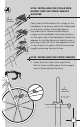
S150: INSTALLING THE POLAR BIKE MOUNT AND THE SPEED SENSOR ADAPTER Riding direction Check that the Bike Mount fits snugly on the handlebar. If necessary, attach the rubber pad on the inner surface of the Bike Mount. Use cable ties to secure the Bike Mount snugly on the handlebar. The correct place is on the right side of the handlebar. Attach the adapter to the Bike Mount so that the wire is pointing to the left. Press the adapter so that it stays firmly in its place.
2. Pass the adapter wire from the Bike Mount to the chosen area so that the wire is not hanging loosely. If necessary, wind the wire around the front fork and brake or gear cables. 3. Place the rubber pad on the fork and the speed sensor on the rubber pad. 4. Adjust the angle of the sensor as shown in the illustrations. 5. Pass the cable ties through the sensor and loosely adjust the ties. 6. Install the spoke magnet so that it faces the sensor.
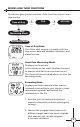
MODES AND THEIR FUNCTIONS This section gives you an overview of the functions of your heart rate monitor. Time of Day Press Up Press OK FILE Press Up OPTIONS Heart Rate Measuring Mode Press OK Recording Mode Time of Day Mode Your Polar wrist receiver is a watch with two time zones, date and weekday indicators, and alarm function. Heart Rate Measuring Mode Displays your heart rate. In this mode you can select whether you want to exercise with BasicUse or an Exercise Set.
File Mode Recalls the information of your latest exercise: • total duration of the exercise • average and maximum heart rate • recovery value • heart rate limits of the target heart rate zones • times spent in, above and below the target heart rate zones • lap information • cumulative exercise time • distance cycled during the exercise (S150) • average and maximum speed (S150) • cumulative riding time (S150) • cumulative distance (S150) Options Mode Enter the following settings: • Exercise settings: select
SETTINGS b Options mode Press Down Time of Day OPTIONS Press OK EXE. SET Press FUNCTION SET Press BIKE SET Up Up Press USER SET Press MONITOR SET Press WATCH SET Up Up Up To customize your Polar heart rate monitor to optimally serve you, please read this section prior to using your heart rate monitor as a training tool. You can always return to the previous mode level by pressing the Stop button. Press and hold Stop to return to the Time of Day mode. EXERCISE SETTINGS OPTIONS Press OK EXE.
You can also make the exercise type selection in Heart rate measuring mode, before entering the Recording mode. 1. BasicUse BasicUse is a simple exercise type. No settings are selected prior to exercising with BasicUse. There are no heart rate limits in use in this mode.
Exercise Set • Timers 1, 2 and 3 • Heart rate limits 1, 2 and 3 • Recovery calculation On/Off On/Off On/Off The timers follow each other sequentially. At the end of each timer, the receiver will alarm you with a sound to swap the heart rate limits. You can swap them by pressing and holding the upper right button. The heart rate limits are independent from the timers. You can also set only heart rate limits and swap them during exercise, without using the timers. Setting an Exercise Set 1.
12. Press OK and Up. 13. Repeat steps 9 -12 to set limits 2 and 3. If limits are turned off and you want to reactivate them, press OK in the particular Limits display. OFF starts to blink. Press and hold Signal. The limits will reappear. 14. After setting the limits, scroll up. “Recovery” is displayed. 15. Press OK. Scroll up or down to set recovery calculation on or off. Press OK. If you set recovery calculation off, skip the rest of exercise settings. Press and hold Stop to exit exercise settings.
HOW TO DETERMINE YOUR TARGET HEART RATE ZONE Your target heart rate zone is a range between the lower and upper heart rate limits expressed as a percentage of your current maximum heart rate (HRmax). (See User information settings about determining your HRmax.) • Heart rate between 50% and 60% of your HRmax: Light intensity zone. This zone is good for warm-up and recovery. • Heart rate between 60% and 70% of your HRmax: Light to moderate intensity zone. This zone is good for losing and controlling weight.
FUNCTION SETTINGS OPTIONS Press OK EXE. SET Press FUNCTION SET Up Press OK CD/CU Timer In this mode you can set an independent timer as a CountDown Timer (running down to zero) or a CountUp Timer (running up from zero). For example, you can use this timer to assist you in interval training, or to prevent dehydration so that the timer reminds you to drink regularly. 1. In the Time of Day display, scroll up or down until OPTIONS is displayed. 2. Press OK. EXE. SET is displayed. 3. Press Up.
USER INFORMATION SETTINGS OPTIONS Press OK Scroll EXE. SET Up/ Down USER SET Press OK Birthday Press OK HR Max In this mode, you set your birthday and your personal maximum heart rate (HRmax), which are used when displaying your heart rate as a % of your maximum heart rate. 1. In the Time of Day display, scroll up or down until OPTIONS is displayed. 2. Press OK. EXE. SET is displayed. 3. Scroll up until USER SET is displayed.
Setting the Maximum Heart Rate (HRmax) (If you start from the Time of Day display, repeat steps 1 - 9.) 10. After setting your birthday, “HR Max” and a blinking number are displayed. This is your age-based maximum heart rate (HRmax) calculated according to your birthday (HRmax = 220 - age). 11. A. Accept the age-based HRmax by pressing OK. or B. If you know your exact clinically tested current HRmax, scroll up or down to set the correct value and press OK. The receiver returns to USER SET display.
1. In the Time of Day display, scroll up or down until OPTIONS is displayed. 2. Press OK. EXE. SET is displayed. 3. Scroll up or down until MONITOR SET is displayed. Turning Activity/button Sound On/Off (If you start from Time of Day display, repeat steps 1 - 3.) 4. MONITOR SET is displayed. 5. Press OK. “Sound” is displayed. 6. Press OK. On or OFF starts to blink. 7. Scroll up or down to set sound on or off. Press OK. Press Stop to return to MONITOR SET.
Turning Help On/Off (If you start from Time of Day display, repeat steps 1 - 3.) 4. MONITOR SET is displayed. 5. Press OK and scroll up or down until “Help” is displayed. 6. Press OK. Scroll up or down to set Help function on or off. Press OK. Press Stop to return to MONITOR SET. Press and hold Stop to return to Time of Day display. In the Heart rate measuring and Recording modes, if you change the information in the middle row, Help displays the name of the new function for a few seconds.
8. In 12 h time mode: Scroll up or down to select AM/ PM. Press OK. In 24 h time mode: Skip this step. If you want to activate the 12h time mode, see “Setting Time of Day”, below. 9. Hours start to blink. Scroll up or down to set the correct hour. Press OK. 10. Minutes start to blink. Scroll up or down to set the correct minute. Press OK. Press Stop to return to WATCH SET. Press and hold Stop to return to the Time of Day display.
Setting Date (If you start from Time of Day display, repeat steps 1 - 3.) 4. WATCH SET is displayed. 5. Press OK. Scroll up or down until 12h Time mode: DATE is displayed. month - day - year. 6. Press OK. "Month"/ "Day" appears 24h Time mode: in the display and the number day - month - year. starts to blink. 7. Scroll up or down to select the correct month/ day. 8. Press OK. "Day"/ "Month" appears in the display and the number starts to blink. 9. Scroll up or down to select the correct day/ month. 10.
BIKE SETTINGS (S150) OPTIONS Press OK Scroll EXE. SET Up/ Down BIKE SET Press OK Wheel Press Speed Press AutoStrt Up Up In this mode you can • set wheel size • select whether you want to measure your speed • select whether you want the recording to start automatically when you move your bicycle 1. In the Time of Day display, scroll up or down until OPTIONS is displayed. 2. Press OK. EXE. SET is displayed. 3. Scroll up or down until BIKE SET is displayed.
Look at the wheel of your bike and find the wheel diameter printed on it. On the chart below, find your wheel diameter in inches or in ERTRO reading and match it to the wheel size in millimeters on the right. ERTRO 30-559 35-559 44-559 47-559 622-20 622-23 622-25 Wheel size diameter (inches) 26x1.25 26x1.5 26x1.75 26x1.
EXERCISE c You can use two modes in your exercise: Heart rate (HR) measuring mode or Recording mode. • in the HR measuring mode your heart rate is displayed but exercise data is not recorded • in the Recording mode the stopwatch and other calculations start and your exercise is recorded Time of Day Press OK HR Measuring Mode Press OK Recording Mode 1. HEART RATE MEASURING MODE 1. Start from the Time of Day display. 2. Press OK. Your heart rate appears in a few seconds.
S150: the following display will alternate with the previous display: Bike / Bike Off S (speed) and A (autostart); underline indicates that function is set on. Time of day Heart rate b0 (bike off) / b1 (bike on) Selecting BasicUse or Exercise Set In the Heart rate measuring mode you can select between two exercise types. This choice will be activated when you enter the Recording mode. • BasicUse (no settings) • Exercise Set (ExeSet) with timers, heart rate target zones and recovery calculation.
2. RECORDING MODE In the HR measuring mode, press OK to enter Recording mode. In the Time of Day mode, press and hold OK to enter Recording mode. The stopwatch and exercise recording start when you enter the Recording mode. Recording is indicated by running bars on the right side of the display. The new exercise file is recorded over the previous one. FUNCTIONS DURING EXERCISE The following functions can be used both in the BasicUse and the Exercise Set.
LOWER ROW Press and hold Down button to select heart rate information in the lower row. Heart rate as a % of your HRmax Current heart rate Average heart rate Heart rate as a % of your HRmax is displayed only if you have set your birthday and HRmax (see section User Information Settings). CountDown/CountUp Timer You can use an independent timer during your exercise. The use of this timer is not recorded in the file. Set the timer as described in section Function Settings.
Pausing the Exercise Press Stop. Stopwatch and exercise recording are paused; five bars on the right side of the display stop running. CountDown and CountUp Timers are not paused. Press OK to continue exercising. Or, press Stop again to return to Time of Day display. The receiver automatically returns to the Time of Day display within 5 minutes if you forget to quit the heart rate measuring after having stopped the stopwatch and taken the transmitter off your chest.
FUNCTIONS ONLY FOR EXERCISE SET (EXESET) The following functions can be used only in Exercise Set. All the functions described in the section “Functions during exercise” are available also in this exercise type. You can use three timers and three heart rate zones when exercising with Exercise Set. Heart rate zones are independent from the timers: the heart rate zone limits are not swapped automatically but at the end of each timer, you will hear a sound signal which alarms you to swap the limits manually.
Checking Current Heart Rate Limits with Heart Touch Function Bring the receiver near the transmitter’s Polar logo. 1. The current heart rate limits of the exercise are displayed. 2. Time spent in the selected target zone is displayed. Recovery Calculation Press and hold OK to start recovery calculation. During the recovery, you will see the following information: Continue according to your settings: A. time-based or B. heart-rate-based recovery calculation. A.
RECALLING TRAINING INFORMATION d File mode You can recall the information of your latest exercise in the File mode. Time of Day Press Up FILE Press OK Recall the latest file 1. Start with the display showing time of day. 2. Press Up. FILE is displayed. 3. Press OK. The main information of the file is displayed: Exercise name (ExeSet or BasicUse) Starting time and date (alternating) S150: Bike symbol, if speed measured during exercise. 4. Press OK. Exe. Time is displayed.
1 Exe. Time: The amount of time that you exercised with stopwatch running. Exe. Dist (S150): Distance cycled during exercise. Alternating with Exe. Time. Average heart rate of the exercise (AVG) and maximum heart rate of the exercise (MAX) are alternating in the lower row.
5 6 Limits 1/ 2/ 3: Target zone limits 1, 2 or 3 are displayed if you exercised with an Exercise Set and the limits were on during exercise. InZone 1/ Above 1/ Below 1, InZone 2/ Above 2/ Below 2, InZone 3/ Above 3/ Below 3: Times spent in, above and below target zone 1, 2 or 3 (the values alternate in the display). These were calculated when the particular limits were used. 7 Rid. Time (S150): Cumulative riding time during several exercise sessions starting from the previous resetting.
ADDITIONAL FEATURE: e CONNECTION TO COMPUTER Your Polar S120/S150 offers you the option of downloading one exercise set and monitor icons via Polar UpLink from our web site: • USA and Canada: www.polarusa.com • other countries: www.polar.fi To be able to use the UpLink, you need a PC with a sound card (compatible with SoundBlaster™) and dynamic loudspeakers or earphones. See further instructions at our web site. You can see the monitor icon by pressing and holding Up button in the Time of Day display.
f CARE AND MAINTENANCE Your Polar heart rate monitor is a high-tech instrument of superior design and workmanship and should be treated with care. The suggestions below will help you fulfill the guarantee obligations and enjoy this product for many years to come. Taking Care of Your Polar Heart Rate Monitor • Wash the transmitter regularly after use with a mild soap and water solution. Dry it carefully after washing with soft towel. • Never store the transmitter wet.
Batteries Transmitter The estimated average battery life of the transmitter is 2500 hours of use. Contact your authorized Polar service center for a replacement transmitter. Polar recycles used transmitters. See your Customer Care Charter for detailed instructions. Wrist Receiver The estimated average battery life of the wrist receiver is 1,5 years in normal use (1h/ day, 7 days a week). Note also that excessive use of the alarm signals will use the battery more rapidly.
g PRECAUTIONS Using Heart Rate Monitor while Cycling While riding a bike, please keep your eyes on the road to prevent possible accidents and injury. When using the speed sensor, check that you can turn your handlebar normally and that cable wires for the brakes or gearing do not catch on the sensor. Check also that the sensor does not disturb pedaling or the use of the brakes or gearing. Using the Polar Heart Rate Monitor in a Water Environment Your Polar S120 is water resistant to 160 feet/ 50 meters.
3. Put the transmitter back on the chest and keep the wrist receiver in this interference-free area as far as it is possible. 4. If the Polar heart rate monitor still does not work with the exercise equipment, this piece of equipment may be electrically too noisy for wireless heart rate measurement. Minimizing Possible Risks in Exercising with a Heart Rate Monitor Exercise may include some risk, especially for those who have been sedentary.
FREQUENTLY ASKED QUESTIONS h What should I do if... ...I don’t know where I am in the Options or File cycle? Press and hold the stop button until time of day is displayed. ...I cannot find the previous exercise’s file? You may have used the Heart rate measuring mode during your exercise, which means that your exercise was not stored. To record the exercise you have to turn the stopwatch on by pressing the OK button in the Measure mode. ...there is no heart rate reading (- -)? 1.
...heart rate reading becomes erratic or extremely high? You may have come within range of strong electromagnetic signals which cause erratic readings. Check your surroundings and move further away from the source of disturbance. ...the display is blank or fading? If the display is blank, activate the wrist receiver by pressing the OK button twice, after which the Time of Day display appears. If the display is fading, have the batteries checked. ...
TECHNICAL SPECIFICATION i Polar Heart Rate Monitors are designed to indicate the level of physiological strain and intensity in sports and exercise. No other use is intended or implied. Heart rate is displayed as number of heartbeats per minute (bpm).
Speed Sensor and Adapter Operating temperature 14 °F to 122 °F/ -10 °C to +50 °C Accuracy of speed and distance measurement: ± 1%, wheel size being 2000 mm Splash-proof Default Settings Time of day Alarm Date of Birth Activity sound Units Help CountDown/ CountUp Timer Timer 1, 2, 3 Limits 1, 2, 3 Recovery function Recovery heart rate Recovery timer Speed (S150) Wheel size for bike (S150) AutoStart (S150) Limit Values Exercise time Heart rate limits Target zone time Recovery time Cumulative exercise time Lap
LIMITED POLAR INTERNATIONAL GUARANTEE j • This limited Polar international guarantee is issued by Polar Electro Inc. for the consumers who have purchased this product in the USA or Canada. This limited Polar international guarantee is issued by Polar Electro Oy for the consumers who have purchased this product in other countries. • Polar Electro Inc.
k DISCLAIMER • The material in this manual is for informational purposes only. The products it describes are subject to change without prior notice, due to the manufacturer’s continuous development program. • Polar Electro Inc. / Polar Electro Oy makes no representations or warranties with respect to this manual or with respect to the products described herein. Polar Electro Inc.
DISPLAY SYMBOLS l Indicates an ongoing heart rate measurement and flashes to the beat of your heart. Indicates there has not been heart rate reception for at least 5 seconds. -- Indicates there is no heart rate reception. Time of Day mode: the alarm is on. Recording mode: beeps if you are exercising outside your target heart rate zone. Recording mode: Indicates the heart rate above the target heart rate zone. Recording mode: Indicates the heart rate below the target heart rate zone.
m INDEX 12/24h time mode ........................................................................................ 21 Activity/button sound On/Off ..................................................................... 19 Alarm settings .............................................................................................. 20 AutoStart On/Off ......................................................................................... 24 BasicUse exercise ..................................................
48 48