
User Manual

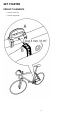
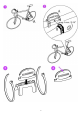


Table Of Contents
5
INSTALLING THE CADENCE SENSOR
To install the cadence sensor and cadence magnet, you need cutters.
1. Check the chain stay for a suitable place for the cadence sensor (picture 1 A ). Do not install the sensor on the same
side as the chain. The Polar logo on the sensor should be facing away from the crank (picture 2).
2. Attach the rubber part to the sensor (picture 3).
3. Clean and dry a suitable place for the sensor and place the sensor on the chain stay (picture 2 A). If the sensor
touches the rotating crank, tilt the sensor slightly away from the crank. Pass the cable ties over the sensor and
rubber part. Do not tighten them fully yet.
4. Place the cadence magnet vertically on the inner side of the crank (picture 2 B). Before attaching the magnet, clean
and dry the area thoroughly. Attach the magnet to the crank and secure with the tape.
5. Fine-tune the positioning of the sensor so that the magnet passes close to the sensor without actually touching it
(picture 2). Tilt the sensor towards the magnet so that the gap between the sensor and the magnet is under 4
mm/0.16’’. The gap is correct when you can fit a cable tie between the magnet and the sensor. There is a small caved
dot on the backside of the sensor (picture 4), which indicates the spot the magnet should be pointing at when
passing the sensor.
6. Rotate the crank to test the cadence sensor. The flashing red light on the sensor indicates that the magnet and the
sensor are positioned correctly. If you keep rotating the crank, the light will go off. Tighten the cable ties securely
and cut off any excess cable tie ends.