
Owners manual

©2016 POISON SPYDER CUSTOMS 951-849-5911 • WWW.POISONSPYDER.COM
POISON SPYDER CUSTOMS INST-14-02-052_A • DeFender™ Full Length Side Plates 2
serts MUCH easier than using the free tool included
in this kit, and it will come in handy with future product
installations as well. If using a professional nut-sert
installation tool, follow the directions that came with the
tool and skip the next three steps of these instructions.
The simple “tool” included with this product is
admittedly frustrating to use, however it will work for
those with patience who would like to save the cost of
the professional tool. If using the simple tool included
with this product, continue through the following steps:
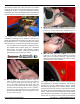
The provided nut-sert install tool consists of a bolt,
two washers and a coupler (long) nut. Assemble
these items as shown (bolt—washer—coupler
nut—washer—nut-sert). Insert the nut-sert end of
the assembly into the hole you drilled.
7. Use an open end wrench to hold the coupler nut
stationary while turning the head of the bolt clockwise
with a ratchet (or small impact wrench) and socket. As
you turn the ratchet, the bolt will draw the far end of the
nut-sert toward the inside of the sheet metal, gripping it
with the knurled outside edge of the nut-sert as it deforms.
Continue to turn the ratchet until the nut-sert is fully seated.
DO NOT OVER-TIGHTEN as you can damage the nut-sert,
or cause it to lose its grip.
8. Once the nut-sert has seated correctly, loosen the
bolt then remove it and the rest of the tool from the nut-sert.
Install a new nut-sert onto the tool, oriented the same as
the last, and set it aside until your next nut-sert installation.
9. With the tool removed, inspect the nut-sert to
make sure it is properly seated and that the surrounding
sheet metal isn’t excessively deformed. Note that some
deformation of the sheet metal is normal, and that it will be
covered by the part after installation.
If you “spin” a nut-sert: That is, if it loses its grip due to
over-tightening or improper installation, the quickest,
easiest x is to use a MIG welder to place a small
tack weld at the edge of the nut-sert ange. Before
applying the tack weld, sand or grind the paint from a
very small area of the sheetmetal where the tack weld
will be. Then insert a screw into the nut-sert to protect
the threads from weld splatter. Only apply a very small
tack or two, as you do not want to heat up and deform