AUTOMATIC CAT LITTER BOX Instruction Manual
Contents and Safety Instructions Table of Contents 1p : Contents and Safety Instructions 2p : About Package, Repair and Exchange Method 3p : Recommended cat litter types to use 4p : Setting Up Your Circle O (Zero) 5p : How to use 6p : Principle of operation and sensors 7p : Waste bin and sensors 8p : How to clean and disassemble 9p : Assembly way 11p : This is not a malfunction 12p : Questions and Part name of product Words of thanks Thank you for your purchase of Pluto Electronics Circle O (Zero).
For Packaging and Repair Exchange Packaging Please check the part and contact us if there are any defective or insufficient parts. We will provide the parts. ※ Each part is assembled and packaged. Main body Main body Main body Main body Outer shell Cover : 1 Outer shell Base : 1 Litter box : 1 Scoop : 1 Main body Main body Main body Main body Waste bin : 1 Motor cover(top) : 1 Screw cap : 1 Adapter : 1 Repair Exchange Repair This product has a warranty for free repairs.
Litter Types Recommended for Usage The Circle O (Zero) requires CLUMPING TYPE LITTER to work properly. Two types of scoops are available: Bentonite and Tofu cat litter. Important: Usable litter type differs by the scoop types. We recommend using litter types listed in the table below. DO NOT use non-clumping or other types of litters not on the list as they might not get filtered well. Please refer to the litter standards.
Setting Up Your Circle O(Zero) Check 1 Please check that the shipment is fully assembled and may not be assembled during shipment. Motor cover(Top) Please open the cover of the product to make Check that there are no gaps in the litter box and product entrance before using it. sure that the motor cover (top) is fully insta- If there is a gap, refit the litter box and make sure that the motor cover(top) is installed lled. Sand entering the motor cover (top) may before operating. cause failure.
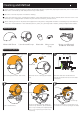
Basic Methods of Use Description of basic usage. The rotating scoop is moving with very strong force. Never touch an active scoop or put your hand in the litter box. Motion Sensors This product does not have a power button. At power-on, one LED lamp on the front of Simply plug-in and power on. the body lights up and becomes standby. Two LED lamps will illuminate during the 7 minutes countdown.
Principles of Sensor and Operation Principle of Operation Slide door Scoop After 7 minutes of sensor recognition, the scoop turns clockwise. Scoop turns counterclockwise once to bring the litters to the opposite side. Clumped up litters filtered by the scoop are thrown into the waste bin. Scoop turns clockwise again to leave no small clumps in the litter box. One more turn clockwise to flatten out. Sequence complete. Standby mode.
Waste bin and Sensor Cat excrements are collected into the gutter(Waste bin) located in rear main body. When waste bin is full, waste sensor activates putting cleaning process on hold (when sensor button is turned on). Clean the litter box frequently to prevent failures and to use it hygienicly. The litter box can be washed. After cleaning, make sure to dry the parts completely. Sensor Outer shell Cover Waste bin If the three LED lamps turn on, this notifies that the waste bin is full.
Cleaning and Method Clean regularly to prevent hygiene problems and product failures. In particular, keeping the waste bin, motor covers and their motor surroundings clean will prevent from product failure. Be sure to remove the power cord before cleaning. Parts other than the motor cover(bottom) and the outer shell base(bottom) can be cleaned. Never clean the motor cover (bottom) as it is equipped with a number of parts that use electricity, such as motors.
Assembly method Be sure to remove the power cord after you have checked the product has completely stopped working. Be careful when stopping components in the wrong position, as it may not function correctly or cause failure. Assembly ※ A look from above Motor shaft connection Position sensor The word "UP" is facing upwards. The positioning sensor is facing down. First check the position of the motor shaft connections. If the positioning sensor is facing directly down, it is in the normal position.
Assembly method Set inside properly leaving no gap A gaping condition Waste bin Bumper on the motor cover(bottom) is hidden in the motor cover (top). Assemble the motor cover (top) so that the motor cover (bottom) protrusion is visible. Install the motor cover(top). Make sure that the motor cover is properly fitted to the bumper of the motor cover (bottom). Outer shell Cover (Top) Install the outer shell cover(top).
This is not a malfunction These are some of the most frequently asked questions. Please read them if you are experiencing troubles. Check point The scoop is still and stops moving. Is it broken? If the sensor responds during operation, it stops working, but starts moving again after 7 minutes. In addition to the cat's bowel activity, the sensor often detects the head and tail, which can delay cleaning. The cat litter has a strong resistance that prevents the scoop from draining it.
Names and Enquiries Names of each part The name of each part is ‘Automatic cat litter box’. Outer shell Cover (Top) Litter box Lid (Top) Scoop Motor cover (Top) Shaft Buckle Litter box Base (Bottom) Screw cap Waste bin Motor Shaft Connection Motor cover (Bottom) Outer shell Base (Bottom) Lamp Sensor Contact E-mail pluto@plutostory.com www.plutostory.com Product Information External size : 60 × depth 64 × height 58 cm Circle Zero KC Safety Certification Weight (about) :11.