USER’S MANUAL UP-800 PLUS English
I M P O R T A N T I N F O R M A T I O N Precautions Please read this manual car efully before using your PLUS UP-800 Data Projector and keep the manual handy for future reference. Your serial number is located next to the main power switch on the back of your UP-800. Record it here: CAUTION TO PREVENT SHOCK, DO NOT OPEN THE CABINET. NO USER-SERVICEABLE PARTS INSIDE. REFER SERVICING TO QUALIFIED PLUS SERVICE PERSONNEL. WARNING TO PREVENT FIRE OR SHOCK, DO NOT EXPOSE THIS UNIT TO RAIN OR MOISTURE.
Important Safeguards Lamp Replacement These safety instructions are to ensure the long life of your Data projector and to prevent fire and shock. Please read them carefully and heed all warnings. • Be sure to replace the lamp when the Status light comes on. If you continue to use the lamp after 1000 hours of use, the lamp will turn off. Installation • Allow a minimum of ONE minute to elapse between turning the lamp off and on. High voltage is applied to the lamp immediately when the power is turned on.
Ta b l e o f c o n t e n t s 1. Introduction Introduction To The UP-800 Data Projector ................................................... E-5 How Do You Get Started? ................................................................................ E-6 What’s In The Box? ......................................................................................... E-6 Getting To Know Your UP-800 Data Projector ............................................... E-7 Front Features ..................................
1 I N T R O D U C T I O N This section introduces you to your new PLUS UP-800 Data Projector, provides a list of materials that comes with your projector and describes the features and controls. Note: Composite video standards are as follows: NTSC: U.S. TV standard for video in U.S. and Canada. PAL: TV standard used in western Europe SECAM: TV standard used in France and Eastern Europe NTSC4.
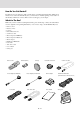
How Do You Get Started? The fastest way to get started is to take your time and do everything right the first time. Taking a few minutes now to review the manual may save you hours later on. At the beginning of each section of the manual you'll find an overview. If the section doesn't apply, you can skip it. What’s In The Box? Make sure your box contains everything listed. If any pieces are missing, contact your dealer.
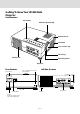
Getting To Know Your UP-800 Data Projector Front Features Top features Monaural Speaker(2W) Remote Sensor STA ND BY STA ND BY ME NU SE LEC T EN Ventilation TE R AD JUS T VID EO PL IDE O RG B IN Lens and lens Cap US IN S-V VID EO PC L/M AUD ONO · AUD IO IN CO NTR OL IO · R RG B OU T AUD IO O UT Focus Ring Cooling Fan Zoom Ring Rever Adjusters Rear Features Remote Sensor Slot for Kensington MicroSaver Security System Left Side Features VIDEO IN VIDEO S-VIDEO RGB IN
Top Features 1 Standby Button Use this button to turn the power on and off when Main Power Switch is on and the Data projector is on standby. (When this button is pressed and held for at least two seconds, the “Display Mute” mode will be canceled.) 2 Menu Button STATUS STANDBY MENU SELECT 2 3 ENTER ADJUST Displays the on- screen menu. 3 Select Button After you press the “Menu” button, use this button to select the menu icon of the item you wish to adjust.
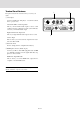
Terminal Panel Features 1 2 This panel is located in the side and is where you connect your cables. 1 Video Input VIDEO IN PC CONTROL Connect a VCR, laser disk player, or document camera here to project video. Left Channel/Mono Audio Input Jack S-VIDEO RGB IN This is your left channel audio input for stereo sound coming from video equipment or audio system. This also serves as your monaural audio input. Right Channel Audio Input Jack This is your right channel audio input for stereo sound.
4 RGB Output Connector (Mini D-Sub 15 pin) The video image input to the RGB INPUT terminal is output on the monitor. Even if VIDEO is selected, the video image input to the RGB INPUT terminal is output. 5 Built-in Security Slot ( VIDEO IN PC CONTROL ) This security slot supports the MicroSaver® Security System. S-VIDEO RGB IN VIDEO L/MONO·AUDIO·R AUDIO IN RGB OUT AUDIO OUT MicroSaver® is a registered trademark of Kensington Microware Inc.
Remote Control Features You can use your remote control wireless to operate your UP-800 Data Projector. With the remote mouse receiver connected to your computer, you can also use the projector's remote control to operate your computer's mouse wireless, too. (See page E-20 to connect the remote mouse receiver to your computer.) 1 2 NOTE: If you are using a Macintosh computer, you can click either the right or left button to activate the mouse.
9Menu Button Use this button to call up the On-Screen Menu so you can adjust and set the image. After you press this button, it will light up. During this time you can use the mouse pointer and right / left click buttons to make menu selections. If no buttons are pressed within 10 seconds while it illuminates, the light goes out. To return to the main menu from a sub menu, press this button again. 0 Mouse Pointer Buttons Works as a mouse for your projected computer image.
2 I N S T A L L A T I O N This section describes how to set up your UP-800 Data projector and how to connect video and audio sources. 350 Setting Up Your UP-800 Data Projector 300 Diagonal Image Size (inch) Your UP-800 Data Projector is simple to set up and use. But before you get started, you must first: 1. Determine the image size 2. Set up a screen or select a non-glossy white wall onto which you can project your image.
M o v i n g t h e p r o j e c t o r When moving the projector, use the carrying case that came with it. How to store the projector in the carrying case 1. Remove any accessories. 2. From the folded state, open the carrying case. 3. Put the projector main unit in the square box section. 4. With the projector packed in the carrying case this way, zip up the sides. Projector Zipper 5. 6. Put the notebook PC into the carrying case too. (Completely close the zipper.
Projection distance and screen size examples ¶ Horizontal projection position Lens centered left to right ¶ Vertical projection position H Screen size Projection distance L m Dimension H cm Inches Wide (W) Tele (T) Both W & T 24 1.20 7.0 40 1.60 2.10 12.2 60 2.40 3.15 17.6 80 3.25 4.20 23.8 100 4.05 5.30 29.1 200 8.20 10.65 59.9 300 12.30 89.1 L WARNING • Only use your Data projector on a solid, level surface. If the projector falls to the ground, you can be injured and the projector severely damaged.
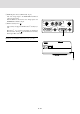
c Wiring Diagram To AC power output VIDEO IN VIDEO S-VIDEO RGB IN PC CONTROL L/MONO · AUDIO · R AUDIO IN RGB OUT AUDIO OUT Document Camera To video,S-video, video,S-video, audio inputs inputs on on and audio Data projector. projector. the LCD VCR or LaserDisk Player IBM/MAC MultiCable To mini D-Sub 15-pin connector on the Data projector.
Connecting Your PC Or Macintosh Computer Connecting your PC or Macintosh computer to your UP-800 Data Projector will enable you to project your computer's screen image for an impressive presentation.
Changing Video Resolutions Depending on your computer's graphic capability, you may be able to select one of several resolutions. Generally a computer- either a PC or Macintosh- with 1 meg. of memory will run: 640 × 480 at 16.7 million colors (24 bit Truecolor) 800 × 600 at 65000 colors. 1024 × 768 at 256 colors. As the resolution increases, the number of colors you can run decreases. With 2 meg. of memory a computer will run: 640 × 480 at 16.7 million colors (24 bit Truecolor). 800 × 600 at 16.
Connecting Your Document Camera You can connect your UP-800 Data Projector to a document camera. To do so, simply: 1. Turn off the power to your Data projector and document camera. 2. Use a standard video cable to connect your document camera to the Video input on your Data projector. 3. Turn on the Data projector and the document camera. NOTE: Refer to your document camera's owner's manual for more information about your camera's video output requirements .
Connecting Your Remote Mouse Receiver The remote mouse receiver enables you to operate your computer's mouse functions from the remote control. It is a great convenience for clicking through your computer-generated presentations. To connect the remote mouse receiver: 1. Turn off your computer. 2. For PCs: Remove your current mouse and connect the serial cable from the remote mouse receiver to your PC's mouse port. (Use the 6-pin adapter for connecting to a PS/2 computer.
3 O P E R A T I O N This section describes how to select a computer or video source and how to adjust the picture and sound. General Controls Before you turn on your UP-800 Data Projector, ensure that the computer or video source is turned on and that your lens cap is removed. 1. Turn On The Data Projector The main power switch is on the back panel of the UP-800 Data Projector. By turning this switch on, the projector will go into its standby mode and the power light will glow amber.
Using The Menus 1. Press the "Menu" button on the remote control or projector cabinet to display the Main Menu. 2. Press the "Select" button on the projector cabinet or (▲) (▼) buttons on your remote control to highlight the menu for the item you want to adjust. 3. Press the "Enter" button on the projector cabinet or the "Left Click" button on the remote control to select a submenu or item. 4.
Menu Descriptions & Functions Source Menu Enables you to select a video source such as a VCR, laser disk player, computer or document camera depending on what is connected to your inputs. Press the "Select" button on the projector cabinet or (▲) (▼) buttons on your remote control to highlight the menu for the item you want to adjust. Video Selects what is connected to your Video input-VCR, laser disk player or document camera.
Image Adjustment Menu Provides access to controls for your image and sound. Use the “Select” button on the projector cabinet or (▲) (▼) buttons on your remote control to highlight the menu for the item you want to adjust. The volume, brightness, contrast, color, tint, sharpness and Image Mode controls are available for Video or S-Video sources. The volume, brightness, contrast, horizontal position, vertical position and auto picture controls are available for RGB source.
Horizontal Position** Use the “Adjust” (+) button to move the image right; (–) to move it left. Vertical Position** Use the “Adjust” (+) button to move the image up; (–) to move it down. Auto Picture** Use the “Adjust” (+) button to turn this feature on so “Picture” and “Fine Picture” adjustments are made automatically. Use the “Adjust” (–) button to turn this feature off so you can make “Picture and Fine Picture” adjustments manually.
Settings Menu Enables you to set preferences and other operating options. Use the “Select” button on the projector cabinet or (▲) (▼) buttons on your remote control to access the submenu you want. Custom Memory This enables you to save your current settings for an RGB source in one of five memories, Custom 15. “Custom 6” is read only. This feature is useful when an S-VGA image (800×600) is displayed with a notebook computer supported by XGA (1024×768).
4 M a i n t e n a n c e This section describes the simple maintenance procedures you should follow to replace the lamp, clean and replace the batteries in the remote control. Replacing The Lamp After your lamp has been operating for 1000 hours or longer, the “status” light in the cabinet will go on. Even though the lamp may still be working, replace it at 1000 hours to maintain optimal projector performance. Lamp Cover CAUTION • DO NOT TOUCH THE LAMP immediately after it has been used.
Remote Control Battery Installation 1. Press firmly and slide the battery cover off. 2. Remove all two old batteries and install new ones (AA). Ensure that you have the batteries' polarity (+/–) aligned correctly. 3. Slip the cover back over the batteries until it snaps into place.
5 T r o u b l e s h o o t i n g This section helps you resolve problems you may encounter while setting up or using your UP-800 Data Projector. Status Light Messages Condition Status OFF Normal On Continually The projector lamp has exceeded 1000 hours of operation and should be replaced. Blinking Very Rapidly (On and off in a cycle of 1 sec.) • The lamp housing is not correctly installed. Install it correctly. Blinking Rapidly (On and off in a cycle of 4 sec.
Common Problems & Solutions Problem Check These Items Does not turn on • Check that the cord is plugged in and that the power switch on the back panel is on. • Check the status light to see if the projector has overheated or the lamp usage exceeds 1100 hours. No picture • Use the menu icons to select your source (Video, S-Video, or RGB). (See page E-23.) • Ensure your cables are connected properly. • Adjust the brightness and contrast. • Remove the lens cap.
6 S p e c i f i c a t i o n s This section provides technical information about the UP-800 Data Projector's performance. Optical DMDTM Single Chip Digital Micro Device(DMDTM), 800×600 dots Lens Manual zoom, manual focus F 3.0 f =27.5-35.75 mm Lamp Metal halide lamp 270 W Image Size 610-7620 mm (24-300 inches) diagonal Projection Distance 1.2 – 12.
Dimensions 310 14 (122) 235 98 MENU SELECT ENTER ADJUST PLUS STANDBY VIDEO IN VIDEO S-VIDEO RGB IN (Lens senter) PC CONTROL L/MONO · AUDIO · R AUDIO IN RGB OUT AUDIO OUT approx. 85.
D-Sub Pin Assignments PC 15-Pin mini D-Sub Pin No.
Timing Chart Yes/No Signal Resolution Y Y Y Y Y Y Y Y Y Y Y Y Y Y Y Y Y Y Y Y Y Y Y Y Y Y # N # # # # # N 640×480 768×576 768×576 640×350 640×400 640×400 640×400 640×480 640×480 640×480 640×480 640×480 640×480 640×480 640×480 640×480 720×350 720×400 720×400 720×350 720×400 800×600 800×600 800×600 800×600 800×600 832×624 1024×768 1024×768 1024×768 1024×768 1024×768 1024×768 1024×768 NTSC PAL SECAM VESA IBM VESA MAC VESA IBM MAC MAC MAC VESA VESA IBM VESA IBM IBM VESA IBM IBM VESA VESA VESA VESA VESA MAC
PLUS CORPORATION 3-B22, NAKASE 1-CHOME, MIHAMA-KU, CHIBA 261-01 JAPAN PHONE: 043-296-3056 FAX: 043-296-3025 TELEX: J22113 PLUSJIM, CABLE PLUSJIMUK TOKYO E – 35