
User's Manual DATA PROJECTOR U4-232, U4-232h
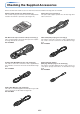
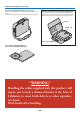
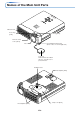
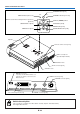
Table Of Contents
- INDEX
- English
- IMPORTANT SAFETY INFORMATION
- Major Features
- Table of Contents
- Checking the Supplied Accessories
- Names of the Main Unit Parts
- Names of the Remote Control Parts
- Preparing the Remote Control
- The Procedure Up to Projecting to the Screen
- Placement Guide
- Connecting Personal Computers and Video Equipment
- Power Cable Connections and Switching the Power On/Off
- Adjustment of the Projection Screen
- General Operation
- Input Selection
- Automatic Adjustment of Analog RGB
- Selection of Aspect Ratio
- Freezing a Moving Picture
- Cancelling Video and Audio Temporarily
- Lamp Mode
- Keystone
- Adjustment of the Volume
- Enlargement of the Image and Video Movement
- Using the Presentation Timer
- Protecting the Projector with the Security Lock
- Using the Quick Menu
- Menu Operation Method
- Image
- Color
- View
- Setup
- Option
- Info.
- When an Indicator is Lit or Blinking
- Troubleshooting
- Cleaning
- Replacing the Lamp Cartridge
- Specifications
- Table of Supported Frequencies
- Cabinet Dimensions

E-8
Checking the Supplied Accessories
“WARNING”
Handling the cables supplied with this product, will
expose you to lead, a chemical known to the State of
California to cause birth defects or other reproduc-
tive harm.
Wash hands after handling.
Carrying case (for projector and accessories) [1]
This is a case designed for storing the projector and its acces-
sories.
Use this carrying case when storing or moving the projector.
OPEN
STATUS
SOURC
E
STAN
DBY
AUTO
MENU
QUICK
MEN
U
User’s Manual (CD-ROM Edition) [1]
User’s Manual (Simplified Edition) [1]
HOW TO PUT THE PROJECTOR INTO THE CARRYING CASE
Close the lens shutter or lens cap before putting the pro-
jector in its case, then fasten the projector in place with the
Velcro belt. Place the accessories in the storage pocket.
Pocket
Velcro strap
Cable storage pouch [1]