
User's Manual DATA PROJECTOR U4-232, U4-232h


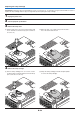
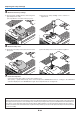
Table Of Contents
- INDEX
- English
- IMPORTANT SAFETY INFORMATION
- Major Features
- Table of Contents
- Checking the Supplied Accessories
- Names of the Main Unit Parts
- Names of the Remote Control Parts
- Preparing the Remote Control
- The Procedure Up to Projecting to the Screen
- Placement Guide
- Connecting Personal Computers and Video Equipment
- Power Cable Connections and Switching the Power On/Off
- Adjustment of the Projection Screen
- General Operation
- Input Selection
- Automatic Adjustment of Analog RGB
- Selection of Aspect Ratio
- Freezing a Moving Picture
- Cancelling Video and Audio Temporarily
- Lamp Mode
- Keystone
- Adjustment of the Volume
- Enlargement of the Image and Video Movement
- Using the Presentation Timer
- Protecting the Projector with the Security Lock
- Using the Quick Menu
- Menu Operation Method
- Image
- Color
- View
- Setup
- Option
- Info.
- When an Indicator is Lit or Blinking
- Troubleshooting
- Cleaning
- Replacing the Lamp Cartridge
- Specifications
- Table of Supported Frequencies
- Cabinet Dimensions
E-60
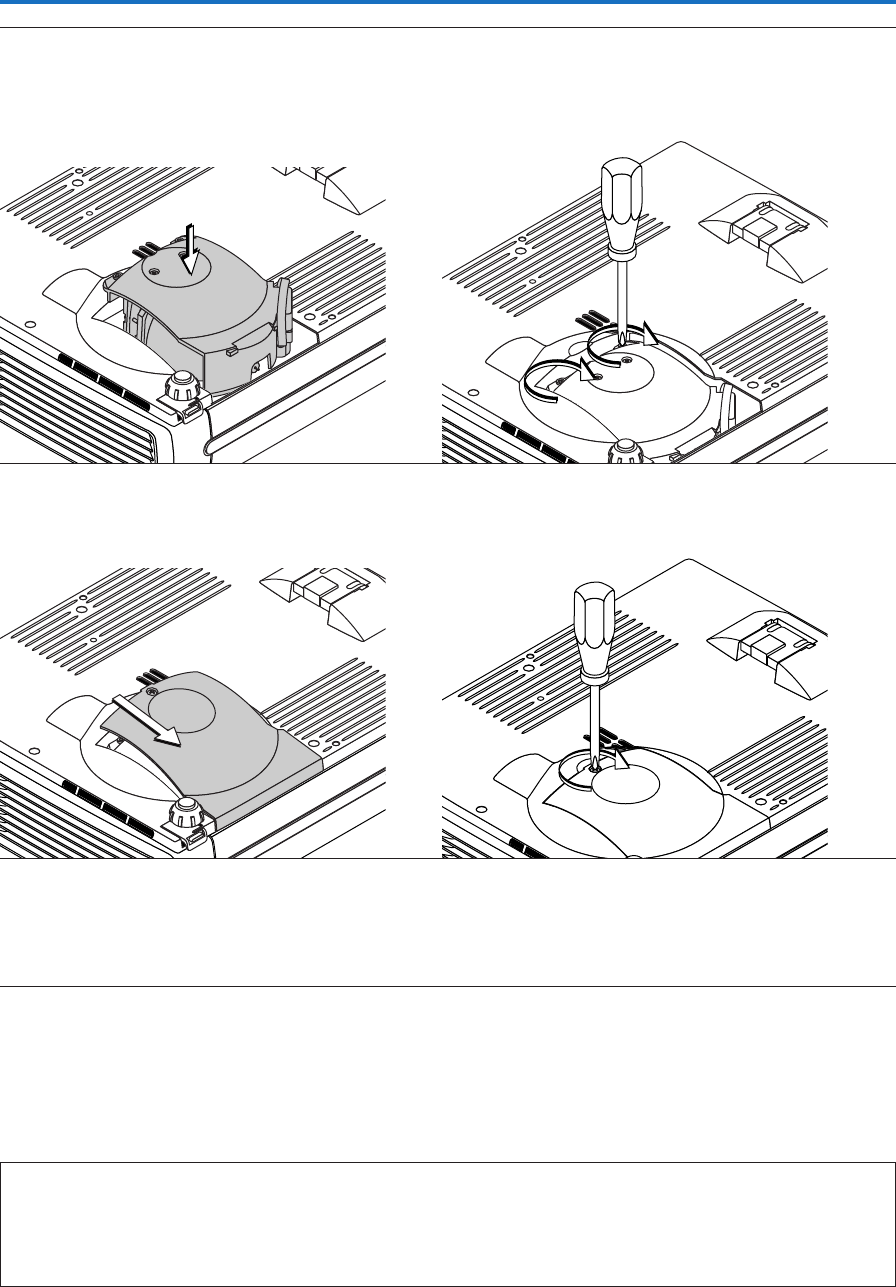
Replacing the Lamp Cartridge
5
Mount the new lamp cartridge.
(1) Place the lamp cartridge with its socket facing to the
right and push it in slowly.
(Line it up with the screw holes in the projector.)
6
Mount the lamp cover.
(1) Set the tip of the lamp cover in place, then close the
lamp cover.
7
Reset the Lamp Timer.
Connect the power cable, switch on the power, and then reset.
Select [Info.] → [Lamp Timer Reset] on the menu and press the ENTER button. There is a change to the initialization
verification display. Press the ENTER button again. See “Lamp Timer Reset” on Page E-53.
Note:
After reaching the lamp service life, if the lamp is used for more than another 100 hours, it will not be possible to switch on the power. Should
this happen, while the projector is in the standby mode, simultaneously holding down the projector’s SOURCE button and AUTO button for
more than 5 seconds will clear the lamp timer. Checking that the STATUS indicator is out will show that the lamp timer has been cleared.
Contact a store that sells the U4-232/U4-232h for a replacement lamp. Indicate you need a U4-150 replacement lamp for the U4-232/U4-232h
(order code 28-061).
(2) Turn the two lamp cartridge screws clockwise to
tighten them.
(2) Turn the lamp cover’s screw clockwise to tighten it.