Digital Multimedia Projector User’s Manual Thank you very much for purchasing this DLP™ Technology Projector. Please read this operating guide to ensure correct use of the device. After reading this manual, keep it for future reference. Outline This DLP™ Technology Projector can display various computer signals and NTSC/PAL/SECAM video signals.
User’s Manual Copyright Copyright © 2002. All rights reserved. No part of this publication may be reproduced, transmitted, transcribed, stored in a retrieval system or translated into any language or computer language, in any form or by any means, electronic, mechanical, magnetic, optical, chemical, manual or otherwise, without the prior written permission of this company. Disclaimer This Corporation.
User’s Manual Table of Contents Introduction ............................................................................................................................................................1 Projector Features .........................................................................................................................................................................1 Description ..........................................................................................................
User’s Manual Introduction Projector Features 1 A. Image Resolution Fully compatible with true SVGA/ XGA, and supports SXGA using advanced intelligent compression technology. The advanced intelligent compression technology enables it to present clear compression SVGA/XGA images without line omission. B. Brightness Provides superior brightness using TI’s Digital Micromirror Device (DMD) and our own optical design, with a geometric effect that increases light usage efficiency.
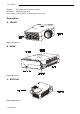
User’s Manual SECAM France and Eastern Europe standard NTSC4.43 Middle East standard If users want to watch CATV, AV box will serve the need. Description A. FRONT Figure 1 Front view B. REAR Figure 2 Rear view C.
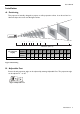
User’s Manual Installation A. Positioning This projector is basically designed to project on a flat projection surface. It can focus from 1m– 10m and adjust the screen size like figure below. 300" 203" 145" 145" 131" 225" 116" 30" 44" 23" 1 59" 74" 1.5 2 102" 154" 2.5 3 101" 89" 79" 68" 57" 45" 34 " 88" 3.5 4 112" 4.5 7 5 10 Distance (unit: m) Projection screen size (diagonal length) Max. Zoom 30” 44” 59” 74” 88” 102” 116” 131” 145” 203” 300” Min.
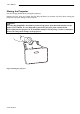
User’s Manual Moving the Projector Use the carrying handle when moving the projector. Replace the lens cover and rotate the feet fully clockwise (to shorten the feet) when moving the projector to prevent damage to the projector. Caution The carry bag (supplied) is intended to protect the projector from dust and scratches on the surface of the cabinet. It is not designed to protect the projector from external shock.
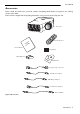
User’s Manual Accessories Please check and make sure your box contains everything listed below. If any pieces are missing, contact your dealer. Please save the original box and packing materials in case you ever need to ship the unit.
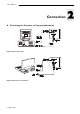
User’s Manual Connection A.
User’s Manual B.
User’s Manual Operation 3 Turn On/Off Procedure A. Power on Press the Standby/On key to turn on the lamp. The LED will blink green during warm up and then light solid green.
User’s Manual MAIN UNIT FUNCTION AUTO To correct the size and phase of the projected image automatically. KEYSTONE + To correct the upper distortion of the projected image when keystone occurs. KEYSTONE - To correct the lower distortion of the projected image when keystone occurs. MENU To call the OSD menu. Standby/On To turn the projection lamp on and off. Standby/On indicator Functions as an indicator showing the standby status.
User’s Manual B.
User’s Manual Main Unit Function Standby/On To turn the projection lamp on and off. Freeze Pressing this button displays a still (frozen) picture. Magnify Pressing this button partially magnifies a displayed picture. (Move the picture with the Disk Pad after pressing the Magnify button.) Disk Pad When the OSD menu is active, Disk Pad acts as 56selecting device. When the onscreen menus are not active, it works as mouse pad.
User’s Manual Remote Control Range The remote sensors are located on the back of the unit. It can function in a range 50 degrees horizontal and 30 degrees vertical relative to a line that is a right angle to the remote sensor. The distance between the remote control and remote sensor must be shorter than four meters (13 feet). Figure 16 Range Usage and Replacement of Lamp The light source lamp has a limited service life.
User’s Manual 2. Lamp is not well attached If the LED blinks rapidly, it indicates that the lamp is not attached properly. 3. Temperature is too high If the projector’s internal temperature is too hot to operate safely, the LED will blink slowly for one minute and then the lamp will turn off automatically. 4. Normal status If the LED light is off, it means the lamp and temperature inside the projector are normal. Caution: The lamp indicator will light up when the lamp becomes too hot.
User’s Manual • Do not turn on power with lamp cover removed. • Whenever the lamp is replaced, reset the total operation time of the lamp. Do not reset if the lamp has not been replaced. • Do not reset the timer without changing the lamp, as this can cause the lamp to break.
User’s Manual Resetting Lamp Timer If replacing the lamp after 1500 hours of operation, please carry out the following operation within 10 minutes of powering on. OSD FUNCTION Press the MENU button into OSD menu, and use “4” (KEYSTONE+) or “3” (KEYSTONE-) to select the Control page. Then press the Menu button again to highlight the Lamp item. Press “4” (KEYSTONE+) or “3” (KEYSTONE-) buttons, the lamp usage time will display on the bottom of the screen and can be adjusted.
User’s Manual A. Display Page When a PC is the input source, there will be only four items on this page: Keystone, Brightness, Contrast, and Color Balance (Fig. 22). On the other hand, when the input source are video, S-video, TV or CATV, there will be other 4 items on this page: Keystone, Brightness, Contrast, and Sharpness (Fig.23).
User’s Manual Resize H. Phase H. Size Setting effects When Resize is 4:3 or 16:9, the projector determines the best fit of the image to the screen. If flicker occurs on a projected image, users may try to adjust the H. Phase manually. If the projected image is too wide or too narrow for the screen, users may turn Auto Image off and adjust the H. Size manually to fit the screen size. H.Position (move the image left) (move the image right) The Auto Image should be turned off to activate the H.
User’s Manual Setting effects To reset display, image and control settings to factory settings. Auto To select the OSD menu language. Eight languages are supported: English, French, German, Italian, Spanish, Korean, Simplified Chinese and Traditional Chinese. (See Figure 27). To select Normal projection, H-Invert projection, V-Invert projection, or H/V Invert projection. To set the time to turn the power off after the start up screen is displayed and no signal is detected or sync is out of range.
User’s Manual Other Correspondent Remote Functions and Messages OSD FUNCTION The selected source will be displayed at the bottom right of the screen for 3 seconds after selecting the source. (PC, VIDEO, S-VIDEO). Source Freeze Mute Volume Magnify Laser Disk Pad Drag Blank The image will be frozen when the “Freeze” button is pressed. A “‖” mark appears at the lower right of the screen for 3 seconds during the freeze function.
User’s Manual Maintenance and Troubleshooting 4 A. Lamp Replacement Refer to Page 13. B. Cleaning the Lens Follow these steps to clean the projection lens: 1. Apply a non-abrasive camera lens cleaner to a soft, dry cleaning cloth (abrasive cleaners, solvents or other harsh chemicals might scratch the lens). 2. Avoid using an excessive amount of cleaner. 3. Lightly wipe the clean cloth over the lens. 4. Affix the lens cover whenever the projector is not in use. C.
User’s Manual Specifications A. Optical 5 1-chip 0.7” DMDTM (Digital Micromirror Device) Manual zoom, manual focus (F/#= 2.8) mercury lamp 150W 23” to 300” 1 to 10 M 450:1 DMD TM Lens Lamp Image size Projection Distance Contrast Ratio B. Electrical RGB (H:31.47 to 68.70 kHz V:56.25 to 85.00 Hz) (NTSC/PAL/SECAM/NTSC 4.43) Full color, 16.7 million colors simultaneously. 100 to 240 VAC, 50 to 60 Hz Inputs Video Color Reproduction Power Requirement C. Mechanical Dimensions 24.3 cm (L)× 6.2 cm (H)× 19.
User’s Manual Appendix Guideline to AV box Features and Connection AV Connection Port This box is compatible with RCA input, S-Video input and audio output. Figure 29 Connection of AV box Speaker RCA Jack For Video and Audio Input from VHS or V8 For S-Video Input S Video Port *AV box is sold separately and is not included in the standard configuration of accessories in the unit. Please contact the dealer if you need the box or visit our web site for more information.
User’s Manual Connecting the Box Please follow the instructions here to place the AV box: Figure 31 Side View of AV box Figure 30 Bottom View of AV box To attach the AV box to the unit: 1. Precisely place the two chocks at the lower surface of the AV box into the lower slots in the correspondent position in the projector. 2. Slowly push the box to fit the unit and, meanwhile, insert the box plug into the A/V connector closely. 3.