Using Carta
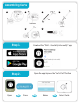
Assembling Carta 1 2 3 5 6 4 Step 1. Dowload the “Plott - Creativity into reality” app Step 2.
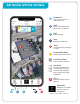
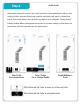
Get familiar with the interface 6 1 Background 2 Mark 3 Start 4 Paths 5 Share 6 Measurements Menu Take or select a picture for scale and context Record a measurement and mark points on your project Begin measuring Add, delete, or hide Paths Send a Plott file of your design to others Manage all your measurements Set Distance Alarm Alerts for specific distances Line Modes Free line mode allows you to accurately measure curves and turns while straight line mode is great for measuring str
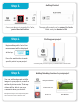
Step 3. Getting Started Once your phone is mounted to Carta, press the start button Step 4. The app will prompt you to connect to Carta. Make sure your device is ON Plotting your project Begin walking with Carta. Your measurement will be displayed at the top. Press the mark button to mark specific points in your project. Step 5. You can add background satellite images to your projects, as well as written & picture notes. That way others will be able to see your comments when you share it.
Step 6. Guide mode Guide mode allows you to retrace your steps & go back to your marked points. When you’re ready, just select your path by pressing it and the start button will switch to Guide Mode button. Press Guide Mode, select the points you want to go to, and press “Change Reality” to begin guiding. When starting make sure you are in the same starting location where you plotted from, and facing towards your first marked point.