
Installation Instructions

7077-801D • September 17, 2019
(877) 477- 4768
16
•
Frequency: Monthly or every 25 bags or more
frequently depending on ash build-up.
• By: Homeowner
a. Appliance must be completely cool.
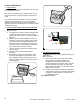
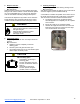
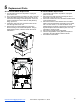
b. Open the door and remove the center bae rst
and then the right and left baes. Thoroughly
vacuum the exhaust path and drop tube and
continue throughout the rest of the rebox. Also
vacuum the front and back of the baes.
c. Using a small brush, clean the inner walls of the
exhaust outlet from the access hole inside the
rebox. The access hole will be visible following the
removal of the left side bae. After loosening up
debris on the inner walls of the outlet, vacuum out.
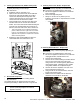
– This is important as the exhaust temperature
probe is attached to the right side of the outlet.
If this is not maintained on a regular basis, the
appliance will experience nuisance shut downs
and/or missed ignitions.
d. Replace the right and left baes and then the
center bae and close and latch the door
.
• Frequency: Monthly or prior to heating season
• By: Homeowner
The gasket between the glass and rebox should be
inspected periodically to make sure there is a good seal.
NOTE: GHP recommends using a heavy duty vacuum
cleaner specically designed for solid fuel
appliance cleaning.
1
2
3
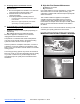
• Frequency: Monthly depending on Dust/Dirt build-up
• By: Homeowner or Qualied Service Technician
a. Be sure the appliance is allowed to cool and has
been unplugged.
b. Remove the right side panel.
c. Sweep or vacuum out any build-up on the
impellers. Use a brush or compressed air to loosen
dirt if needed.
– Avoid damaging the impellers.
• Frequency: Yearly or more frequently depending on
ash build-up
• By: Homeowner or Qualied Service Technician
a. Be sure the appliance is allowed to cool, has been
unplugged and the exhaust blower is o.
b. Remove the left side panel.
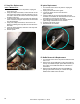
c. Remove the six screws holding the exhaust blower
motor to the housing and remove the motor.
Using caution as to not damage the gasket when
removing the blower. If damage occurs, install a
new gasket available as a replacement part.
d. Vacuum the blower’s impellers. Use care not to
bend or damage the blower ns.
e. Using a brush or vacuum attachment, clean the
inside of the exhaust outlet.
f. Reattach the motor. Make sure the wires are
attached to the terminals on the blower.
7. Cleaning the Exhaust Path, Baes & Drop Tube
8. Door Handle Inspection
9. Cleaning Convection Blower - Requires No
Lubrication
10. Cleaning Exhaust Blower - Requires No
Lubrication